


The Blue Screen of Death is one of the most common Windows problems that a Windows user can face. There are various types of BSOD or Blue Screen Of Death errors that one may encounter, one such error code is a kernel data entry error. This error usually occurs due to hardware or software issues your system may be facing.
The blue screen of death usually occurs when your system encounters a software or hardware failure. Due to a system failure, the system will forcibly stop the OS, which may cause a blue screen to appear on your system.
If the BSOD error keeps popping up quite often, it can lead to permanent hardware damage or data loss. If you are experiencing a BSOD error with a Kernel Data Inpage Error code, then you have come to the right place. In this article, we will discuss how you can fix the kernel data entry error.
Common Cause of Kernel Input Error
Before proceeding with fixing the error on the kernel data page, let’s discuss why this error can occur on your PC. There are various reasons why you might encounter this error on your PC. Below are some reasons why this error occurs.
- Hard disk errors can also cause a kernel data entry error.
- Wrong BIOS settings
- Loss of wires is another reason for this error.
- Damaged or damaged motherboard drivers
- Virus or malware
- Corrupted system files
- Swap file corruption
These were some of the most common causes of a kernel data entry error.
Fixes for Kernel Data Inpage Error in Windows
Now that you already know what can cause the error, let’s discuss possible ways to fix it. However, before proceeding with the fix, make sure you have a backup of your data.
1. Check for loose wires and connections.
You should check your system for loose wires and connections. This problem mainly occurs due to the hard drive, so check if the hard drive or SSD is properly connected.
Also check if the RAM is properly installed in the slot. If you’re using a laptop, it’s a good idea to check the wiring and connection with an IT professional. You should not attempt to open your laptop until you have a good understanding of the machine’s internals.
2. Look around your hard drive
The next thing you can do is check your hard drives for errors or corrupted data. You can check your disk using the built-in Windows error checking tools or using the chkdsk command.
Checking the hard drive with the Windows Error Checker tool
- To check your hard drive with the Windows 10 Error Checker, go to File Explorer on your PC.
- Right click on any partition of your drive and then open properties.
- In properties, go to the tools tab. Under the tools tab, you will see an option to check the disk for errors.
- Next, follow the instructions to check the disk for errors. Please note that you will have to individually check all partitions of your disk for errors.
Checking with chkdsk
- Run Command Prompt as Administrator, then type Chkdsk /r/f X: and press Enter. You will need to replace the X with the assigned partition letter.
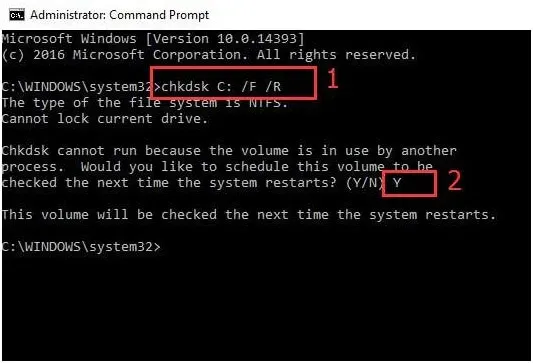
- The command line will start testing, wait for the process to finish. This will give you a full report on the disk and whether there is a problem with it or not.
3. Perform a clean boot
The next thing you can do is perform a clean boot on your computer. To do this, follow the steps given below:
- First, disconnect all devices connected to your PC and turn it off.
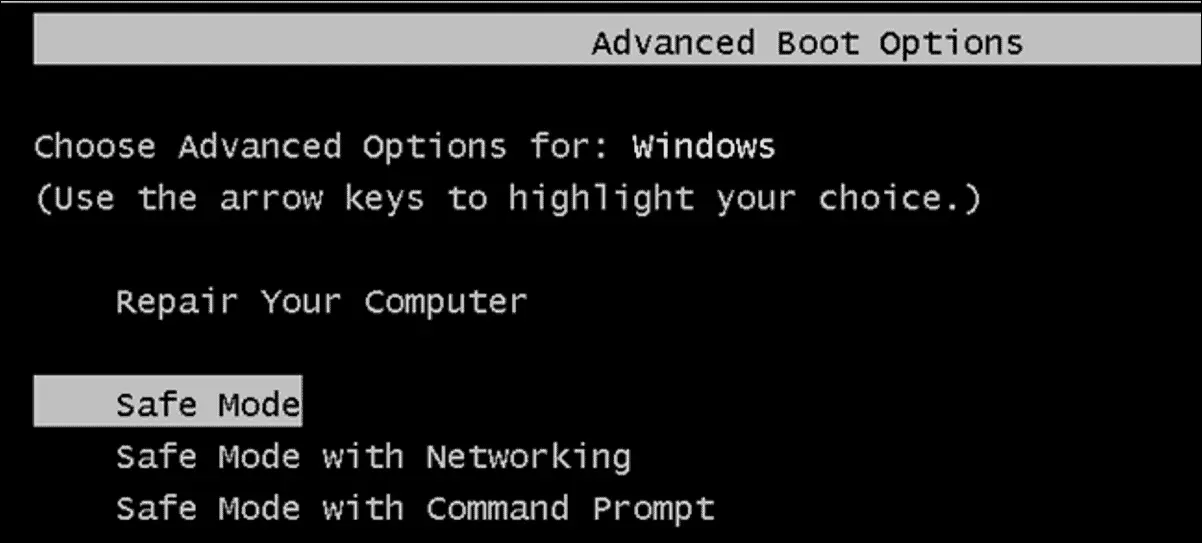
- Press the power button and immediately start pressing the F8 key continuously. This will open the advanced download option.
- In the advanced boot option, go to “Safe Mode with Networking”and press Enter.
- Then log in and press the key combination Windows + R, enter the MSConfig command and run it. This will open the system configuration.
- In the system configuration, go to the General tab and select the selective startup option.
- Now uncheck “load startup items”. After that, go to the “Services”tab and check the “Hide all Microsoft services”box. Then click on the “disable all”option and save the changes.
- Restart your computer and this will most likely fix the problem.
4. Run a virus scan
Windows comes with Windows Defender by default, with which you can scan your computer for viruses or malware. Moreover, if you use any third party antivirus, you can use it to scan your system for any kind of malware. If your PC is experiencing kernel data entry error due to malware or virus infection, this will fix the issue.
5. Remove any hardware
If you encounter this error after connecting any hardware on your device, try removing it. Frequently used hardware may not be compatible with your device. In many cases, drivers for hardware may not be installed correctly, which can also cause an error. You can try removing the hardware and plug it back in.
6. Update drivers
The next thing you can try is to update your drivers. You can do this with the Windows update method. In many cases driver update comes with windows update as an option, you can check windows update if you have any driver update.
You can also try using third-party applications such as Driver Booster and Driver Pack Solution to download or update drivers. You can also download drivers from the manufacturer’s websites. If you are using a laptop, you can find hard drive drivers on your laptop manufacturer’s website.
Another way to update your drivers is to check with Device Manager. In most cases, this error occurs due to the hard drive, so you might want to check for updates to your hard drive drivers. To do this, follow the steps given below:
- In the Start menu, find Device Manager.
- In Device Manager, click on Drives to expand it. Right click on the drive and then click “Update Driver”to update the driver.

After updating your drivers, restart your computer and you won’t encounter the problem again.
7. Remove incompatible software
If you encounter a problem after installing a third-party program on your computer, try uninstalling it. If the error occurs due to an application, it will be resolved after uninstalling it.
8. Reset BIOS
Incorrectly configured BIOS settings can also cause a kernel data entry error. You can reset your BIOS settings to fix the issue. To do this, follow the steps given below.
- Turn off your computer. After shutdown, press the power button and then keep pressing F2 continuously. F2 is usually the BIOS key to access BIOS settings, however you can check with your OEM for the default BIOS key.
- Now you will enter the BIOS settings. There you will find an option to reset to default, click on it to reset your BIOS settings.
- Restart your computer and this will fix the problem. Or you can follow our latest article on how to check and update BIOS in Windows 10.
9. Perform an SFC scan
You can check your system with SFC (System File Checker). SFC scans your PC for missing or corrupted files and fixes the issue. To run an SFC scan, follow these steps:
- Run command prompt as administrator.
- At the command prompt, type SFC code /scannow and press enter.
- Command Prompt will start scanning your computer. After the scan is complete, reboot your system.
10. Check your RAM
The next thing you can do is use a RAM check. This can be done using Windows Memory Diagnostics. To do this, follow the steps given below:
- In the Start menu, find Memory Diagnostic Tools and open it.
- Then click “Restart now and check for problems”.
- This will check your computer for RAM related issues.
Final words
If the steps above do not resolve the kernel data entry error, it is recommended that you contact an IT professional to resolve the issue. Visit a service center to fix it. Hope you find this article helpful.