

The Microsoft Compatibility Telemetry Service (CompatTelRunner.exe) is designed to collect application usage, performance, and telemetry data and report it to Microsoft. And after downloading Windows 10, many customers automatically subscribe to the Microsoft Customer Experience Improvement Program.
The Microsoft Compatibility Telemetry feature is to blame for excessive CPU usage by the Windows 10 system. Many Windows 10 users are experiencing issues with the “Microsoft Compatibility Telemetry High CPU Usage Issue”.
Here I’ll look at the best practices for disabling this feature and using resources for other tasks.
What is Microsoft Compatibility Telemetry?
In Windows 10, a process called Windows Compatibility Telemetry (CompatTelRunner.exe) sends technical information. It’s about how Windows 10 PCs and apps are used and run.
It periodically collects information from your computer and transmits it to Microsoft to improve the user experience. Users are aware of the Windows Compatibility Telemetry Service because it sometimes uses excessive resources, slowing down the computer.
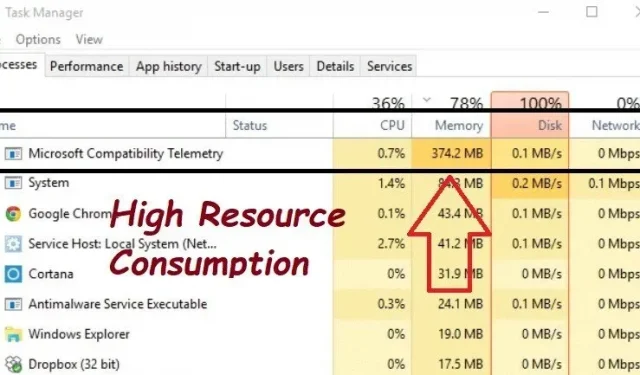
The high disk usage issue of Microsoft Compatibility Telemetry is one of the reasons for the sudden slowdown of the computer. It even freezes because it consumes a lot of resources like high CPU and disk usage.
When Task Manager is opened by pressing Ctrl-Alt-Del, you can see how many resources Microsoft Compatibility Telemetry is using.
Levels in Microsoft Compatibility Telemetry
The level of Windows Data Telemetry significantly affects the data that Windows Compatibility Telemetry collects and sends. There are four levels of data telemetry.
Safety
- Security information is required to protect Windows, Windows Server, and System Center.
- It also contains information about Windows Defender, anti-malware tool settings, and related user experience settings and telemetry components.
Increased
- Includes information such as tips and tricks for using Windows, Windows Server, System Center, and apps.
- Extended Reliability data and data at the Basic and Security levels is how it is done.
Base
- Information about the fundamentals of the device, such as quality data, app compatibility data, app usage, and “security”level data.
Full
- All information needed to detect and help solve the problem, including information at the “safe”, “basic”and “advanced”levels.
Microsoft Compatibility Telemetry High CPU Usage Troubleshooting Methods
- Disable Microsoft Compatibility Telemetry Using the Local Group Policy Editor
- Switch feedback and diagnostics to basic
- Disable Application Experience Tasks in Task Scheduler
- Disable telemetry using the Windows Registry Editor
- Disable Connected User Interaction and Telemetry Service
- Disable Microsoft Compatibility Telemetry in Task Manager
- Remove Compattelrunner.exe
- Scan and repair corrupted system files
- Checking and repairing bad sectors on a hard drive
- Disable service in Windows settings
- Update device drivers
- Delete Windows temporary files
- Disable Diagnostic Tracking Service
- Update Windows OS
- Scan for viruses and malware
- Perform a System Restore
1. Disable Microsoft Compatibility Telemetry using the Local Group Policy Editor.
Your computer will no longer run slowly due to the Microsoft Compatibility Telemetry high disk usage issue and will not work properly again.
The issue can be resolved in various ways. Use a third party application or a registry editor to fix the issue. The easiest way is to disable Microsoft Compatibility Telemetry using the Group Policy Editor.
- Disabling Microsoft Compatibility Telemetry using the Group Policy Editor is the quickest and easiest way to resolve the issue.
- By holding down the Windows key and the R key, the Run command window will be displayed as shown below:
- Click OK after typing
gpedit.mscto launch the Windows Group Policy Editor.
- Follow these steps to access data collection and preview builds by going to Computer Configuration > Administrative Templates > Windows Components.
- In the right pane, select and double-click Allow Telemetry.
- Click “OK”to save the setting after selecting “Disabled”.
2. Switch feedback and diagnostics to basic
Reverting to basic diagnostics helps resolve a high CPU usage issue related to Microsoft Compatibility Telemetry.
- Select the Settings option by right-clicking the Start menu.
- Click Privacy > Diagnostics & Feedback in the Windows Settings pop-up window.
- Select “Required Diagnostic Data”in the “Diagnostic Data”column.
- Other parts on the same page, such as “Handwriting and Typing Improvement”and “Custom Experience”are visible; turn the bar to the OFF position.
3. Disable Application Interaction Tasks (Microsoft Compatibility Appraiser)
You must use one of the following solutions to stop the service completely. Many users have found Task Scheduler useful in disabling the Microsoft Compatibility Appraiser.
- Open the Run command window by pressing Windows + R.
- Type “
taskschd.msc“into the “Run”box to run it. - Navigate to the Microsoft Compatibility Telemetry service in Task Scheduler.
-
Task Scheduler Library/Microsoft/Windows/Application Experience
-
- The Microsoft Compatibility Telemetry service is located at the top of this folder. Right click on it to change its settings.
- You can select “Disable”from the drop-down menu. To disable the Microsoft Compatibility Telemetry service, click on it.
- Check if this fixes the Microsoft Compatibility Telemetry high CPU usage issue.
4. Disable telemetry using the Windows Registry Editor.
The problem of using Microsoft Compatibility Telemetry on a large number of disks can also be solved using the Registry Editor. It is recommended that you back up your system first.
- Open the Run window with Windows + R, type
regeditthen press Enter. - The user account management window will appear, then click YES.
- Follow these sequential steps to get to each destination in the Registry Editor window:
-
HKEY_LOCAL_MACHINE\SOFTWARE\Policies\Microsoft\Windows\DataCollection
-
- Tap and double-click AllowTelemetry to open it by finding it in the right pane.
- If AllowTelemetry is nowhere to be found, manually create a new DWORD (32-bit) value named AllowTelemetry.
- Press the OK button after changing the numeric data to 0.
- Now check if the Microsoft Compatibility Telemetry high CPU usage issue is fixed.
5. Disable the connected user interface and telemetry service.
Please note that this file is digitally signed and contains a component of the Windows operating system. OS files that are digitally signed should generally not be deleted, as this may affect the stability of the system.
- When you find the Services app, type Services in the search box next to the Start menu and select Run as administrator.
- Find and double-click Connected User Experiences and Telemetry in the service popup.
- In the “Startup type”field, you must set the value to “Disabled”after the settings window appears. Next, click the Apply button.
- Set “Startup type”to “Disable”and save the settings.
6. Disable Microsoft Compatibility Telemetry in Task Manager.
Try closing Microsoft Compatibility Telemetry from Task Manager as a first step if you’re experiencing high disk usage issues.
- To launch the task manager and change the handler window, use ESC, Shift and Ctrl.
- Select Microsoft Compatibility Telemetry from the list below, and then click the End Task button in the lower right corner.
- You can now resolve the Microsoft Compatibility Telemetry high CPU usage issue.
7. Remove Compattelrunner.exe
To work around high disk usage issues with Microsoft CompatTellRunner Telemetry, you can disable CompatTellRunner.exe in Task Scheduler and manually delete the CompatTellRunner.exe file.
- Find CompatTelRunner by opening the “C:Windows/System32″folder in Windows Explorer.
- CompatTelRunner can be enabled by right-clicking it and selecting Properties > Security tab > Advanced button > Edit Link > Advanced button.
- Find your account in the “Search Results”column after clicking the “Find Now”button. Then click OK.
- Click the Apply button when you return to the Advanced Security Settings window. When a message box appears, click OK.
- To change the resolution, return to the Properties page and click the Change button.
- In the Allow section, select Administrators, and then select Full Control. Encrypt changes.
- To remove CompatTelRunner, use the context menu.
8. Scan and repair corrupted system files
Corrupted system files or hard drive crashes can be the root of Microsoft Compatibility Telemetry high CPU usage or high CPU usage issues. You can use the SFC and chkdsk commands to diagnose the problem.
- When Command Prompt appears in search results after typing Command or cmd in the Windows search box, click Run as administrator.
- On the command line, write
sfc /scannowand press Enter. Wait for the process to complete. - After entering,
chkdsk /rpress Enter.
- You will see the message “Because another process is using the volume, Chkdsk cannot be executed. Would you like to have this volume checked on the next system restart?”
- Press the Enter key after entering Y.
- Wait for the Check Disk process to complete, and then check if that fixes the Microsoft Compatibility Telemetry high CPU usage issue.
9. Check and repair bad sectors on your hard drive
You can use DISM and the RestoreHealth option to automatically fix any errors found during the scan.
Suppose any files in the local Windows 10/11 image are corrupted. In this case, Deployment Image Servicing and Management (DISM) will immediately connect to the Windows Update servers and download the appropriate replacements.
Use DISM to fix a Windows image issue by doing the following:
- Select Start.
- Use the search box next to the Start button to find Command Prompt.
- To run as administrator, right-click the first result and select this option.
- To fix the issues, type the following command into a command prompt window:
-
DISM /Online /Cleanup-Image /restorehealth.
-
- The procedure will complete successfully in a few minutes.
- Now check if this fixes the Microsoft Compatibility Telemetry high CPU usage issue.
10. Disable the service in Windows settings.
You have an easy choice to turn off Microsoft Compatibility Telemetry in Windows Settings. Use it by following these instructions:
- To access Windows settings, press the “Windows + i”keys on your keyboard.
- In Windows 10, you can find many tiles dedicated to specific settings.
- Select “Privacy”from the menu.
- You can see the “Diagnosis and feedback”option in the left column. In this area, there is a preference setting for your system’s privacy.
- The first information in the area of diagnostics and feedback refers to diagnostic data.
- Switch to “Required Diagnostic Data”if the “Optional Diagnostic Data”option is already selected.
- The service can consume less system resources and collect little data.
- Once disabled, check if that fixes the Microsoft Compatibility Telemetry high CPU usage issue.
11. Update device drivers
You should update your device drivers as soon as possible to resolve the above issues. Outdated drivers can also cause excessive consumption of Microsoft Compatibility Telemetry drives.
- Select Device Manager by right-clicking the Start button.
- Locate the device with the yellow label in the list, then select Update Driver from the context menu.
- Tap the “Search for Drivers Automatically”option in the new window and wait for it to complete.
- Update your drivers as soon as you find available updates.
- Updating your drivers may fix the Microsoft Compatibility Telemetry high CPU usage issue.
12. Delete Windows temporary files
Too many temporary Windows files can load your drive and slow down your computer, interfering with its normal operation. You can try deleting Windows temporary files to fix Microsoft Compatibility Telemetry high CPU usage.
- Open the Run window with Windows + R, type temp and press Enter.
- To select all files and folders, press Ctrl+A. Then right-click on one of the selected files and choose “Delete”from the extended menu.
- Open the execution window again, type.”
%temp%” and press OK.
- To select all files and folders, press Ctrl+A. Then right-click on one of the selected files and choose “Delete”from the extended menu.
- Open the run window again, type
prefetch, and then click OK. - To select all files and folders, press Ctrl+A. Then right-click on one of the selected files and choose “Delete”from the extended menu.
13. Disable Diagnostic Tracking Service
The Diagnostic Tracking Service collects information about operational issues. Heavy disk usage can lead to issues with Microsoft Compatibility Telemetry.
Only earlier versions of Windows 10 still show the Diagnostics Tracking Service, which has been renamed Connected User Experience and Telemetry.
- Open the Run window with Windows + R, type
services.mscand press Enter. - To start the diagnostics tracking service, find it in the list of services and double click on it.
- Change the startup type to Disabled in the General panel, then click the OK button.
14. Update Windows OS
The most recent version of Windows can help resolve Microsoft Compatibility Telemetry high CPU usage. To fix this problem, you can try updating your version of Windows.
- Open Windows Settings by pressing Windows + I, then select Update & Security from the menu.
- Tap the Check for Updates tab in the Windows Update window.
- Click the Download and Install button if any updates are available.
15. Scan for viruses and malware
Systems running Windows 10 are vulnerable to viruses that can break compatibility. The Microsoft Compatibility Telemetry high CPU usage issue could be related to this. It would be helpful if you used Windows Defender to scan and fix the infection.
- Open the search box by pressing Windows + S, then type “Windows Security”and press Enter.
- Click the Virus & Threat Protection button in the Windows Security panel.
- Click Scan Options in the Current Threats area.
- Then click the “Scan Now”button at the bottom after selecting “Full Scan”in advanced options.
16. Perform a System Restore
System Restore can be used to fix a Microsoft Compatibility Telemetry high disk usage issue if you created a system restore point before the problem occurred. The system will fix the Microsoft Compatibility Telemetry high CPU usage issue.
- On the desktop, right-click This PC and select Properties.
- Click the System Protection button in the right pane under the default About menu.
- Click the System Restore button in the System Properties panel.
- Click Next on the System Restore window.
- Select a restore point by entering the date and time, and then click Next.
- Follow the instructions to restore your Windows system to its original state.
Conclusion
Microsoft Windows is one of the most famous and widely used operating systems in the world. Despite the many fantastic features, the OS is far from perfect because it often has problems. You will experience lags and stutters on your system if a single process is using more than 60% of your CPU.
High CPU Usage Microsoft Compatibility Telemetry is a common process. Your Windows 10 PC may be experiencing unusually high CPU or disk usage, which can be very annoying. Use all the methods listed above to resolve this issue quickly.
FAQ
What is Microsoft Compatible Telemetry High CPU?
A Windows system service called Microsoft Compatibility Telemetry is responsible for collecting and reporting usage and performance statistics to Microsoft. CompatTelRunner.exe is a concern as some Windows 10 users have found that it consumes a lot of CPU and disk space.
Should I disable Microsoft Compatibility Telemetry?
Disabling a service is safe. In fact, technical information about how devices and related software work is contained in the Windows Compatibility Telemetry service. It regularly provides data to Microsoft so that the operating system can be updated to improve the user experience.
How to permanently disable Microsoft telemetry?
The Connected User Experiences and Telemetry service can be found by searching. To open the properties of a service, double-click the service. Change the Startup Type to Disabled while staying on the General tab. Select OK.
Does Windows 10 telemetry affect performance?
The Windows 10 telemetry feature set, enabled by default, regularly sends usage and performance statistics to specific Microsoft IP addresses. Telemetry helps improve user experience and resolve issues, according to Microsoft. For many users, this undoubtedly poses privacy concerns. In addition, it is well known that it consumes a lot of resources and slows down the performance of the computer.