While the Apple Mail app isn’t as flashy as other preinstalled apps on iPhone and iPad, it’s a useful utility that offers an easy way to create, read, and manage email.
Over the years, Apple has undoubtedly improved its app. Recent updates showcased new features that you may not have known about. Take iOS 16 and iPadOS 16; for example, several enhancements to the application were announced in these updates, giving it a competitive edge over third-party email services.
In this guide, let me show you all the new features that will be available in the fall when Apple releases iOS 16 and iPadOS 16 to the public, as well as many other useful tips that will allow you to use the Mail app on your iPhone to the fullest.
1. Use Smart Search to Find Email in iOS 16
One feature that received the most significant update in app search. Smart Search offers more relevant and complete results by using synonyms and correcting typos in search terms. It also provides smart search suggestions, offering a richer view of your overall content offerings before you even start typing.
This feature is available to everyone. However, typo correction is only available in English.
2. Email follow-up
Mail has added a tracking feature that moves emails you send on top of your inbox to remind you to send an additional email to a person if you don’t get a response from them.
The app detects emails that you have indicated that you are waiting for a response to. In such letters, the option to continue appears. Clicking on it will take you to the “Create”interface with the recipient’s email address already filled in for you.
3. Insert rich links in your email
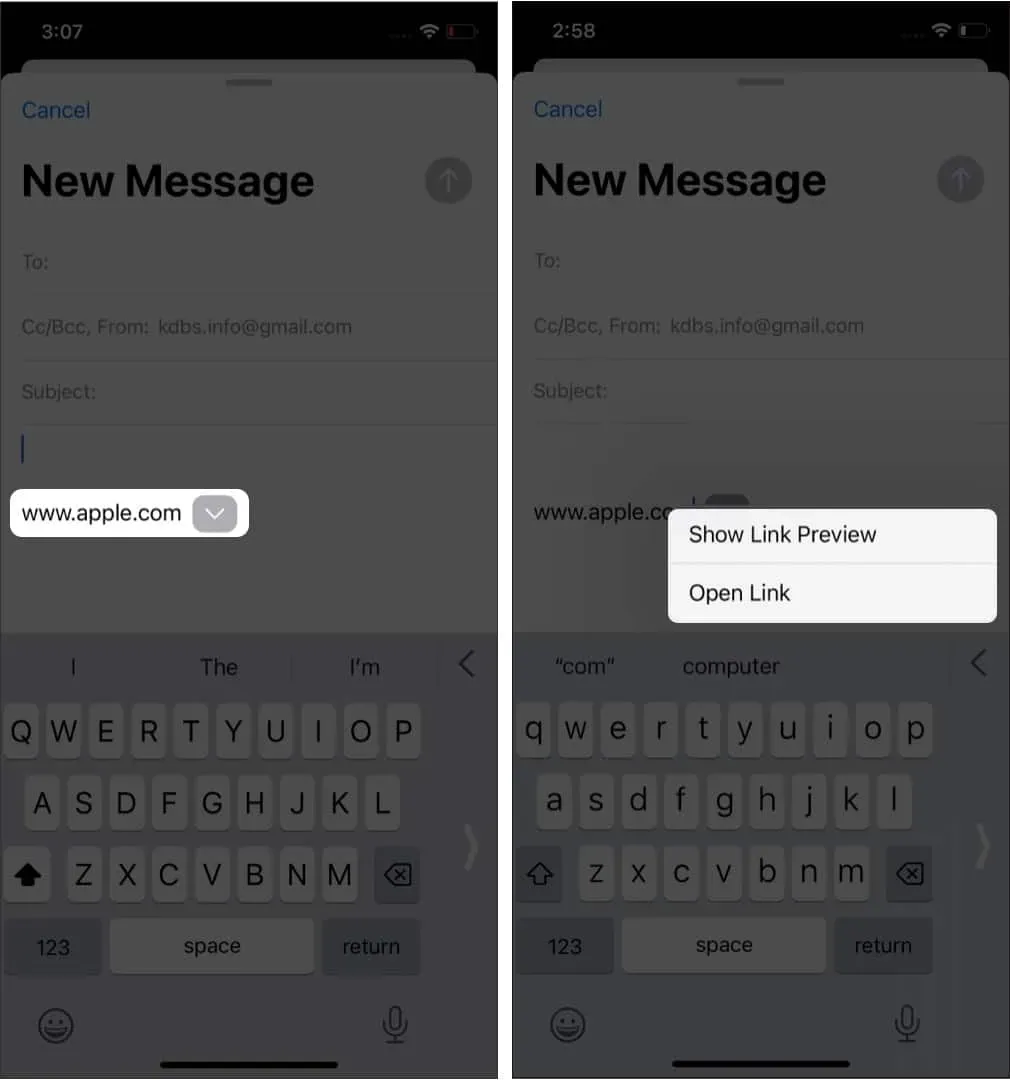
Apple has added rich links to Mail. You’ve probably seen this feature in Messages, even if you don’t know what it’s called. Rich links show you a preview of a website or content that someone has sent you without clicking on the link.
To turn a normal URL into an expanded link, enter the URL → select the arrow from the drop-down menu and click Convert to Expanded Link.
4. Send your messages later
Scheduling your emails to be sent at a later time is a highly requested feature from users. There are times when you’ve written an email but want to send it later to make sure the person can read it and reply to it.
Just press and hold the submit button and select one of the available preset options. You can also select “Send Later”and enter the exact date and time you would like your email to be sent. Before it’s sent, you’ll find the email in your “Send Later”mailbox on the list along with other folders like “Unread”and “Starred”.
5. Cancel Sending Emails on iPhone or iPad
Undo Send is another requested feature that Apple added to the stock Messages & Mail app after years of user requests. This allows you to cancel sending an email a few seconds after you hit the send button.
The default is 10 seconds, but you can set it to 20 or 30 seconds. You can also disable this feature. We covered this in detail in our article on how to unsend emails on your iPhone in Mail.
6. Remind yourself to read or reply to an email.
We’ve all done it. We reviewed the email and clicked “Unread”to save that blue dot in the mail – a visual reminder that tells us we should reread it and respond.
With a new feature in Mail, you can now ask it to remind you to read an email later when you have the time and attention to do so.
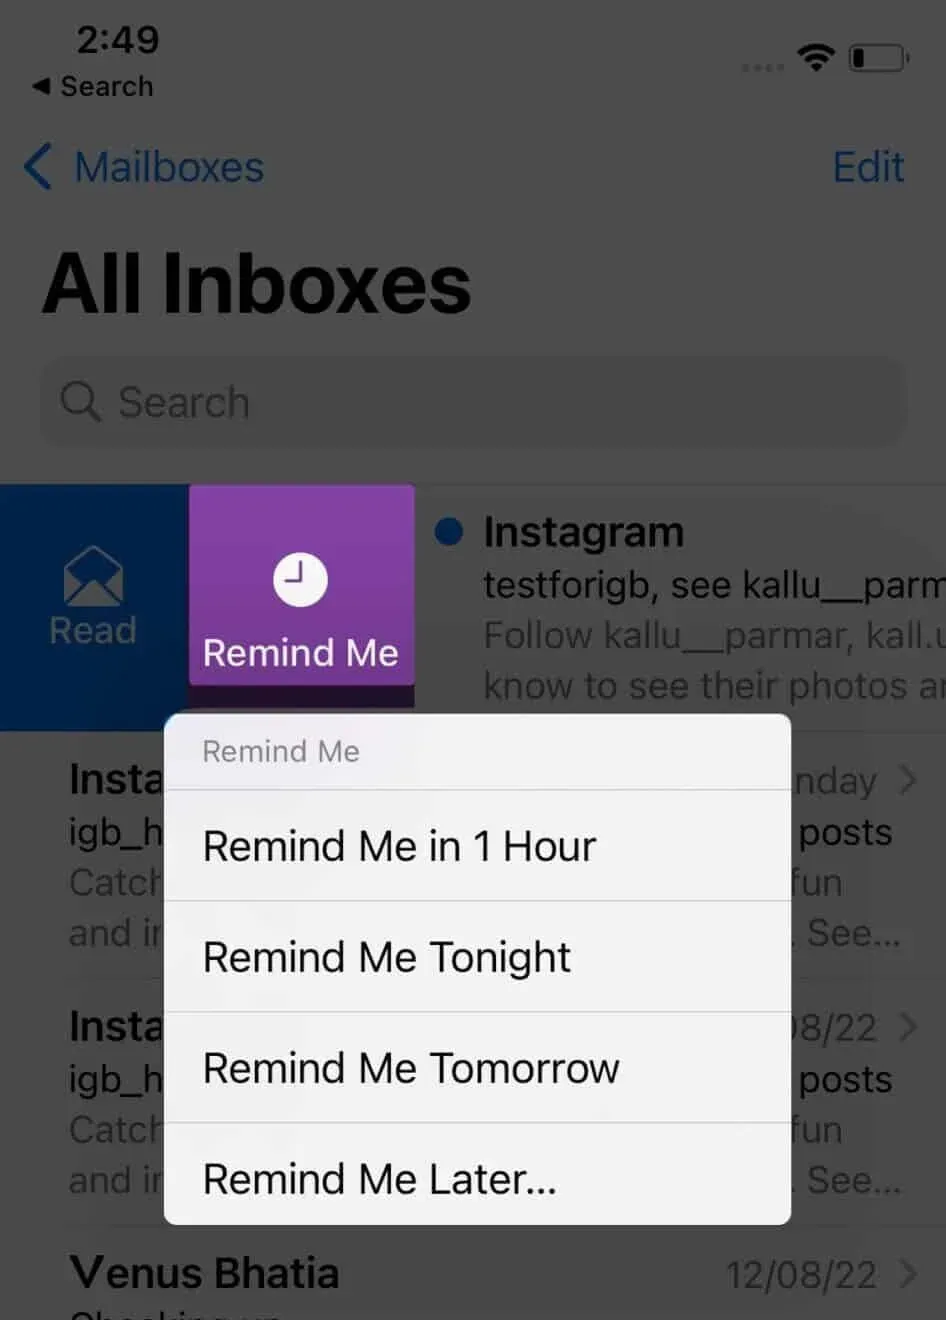
To do this, simply select the email you want to be reminded of and swipe right. Tap Remind → select Remind me in 1 hour, Remind me this evening, or Remind me tomorrow. Select “Remind me later”if you want to schedule it for a specific time and date.
7. Get notifications for missing attachments and recipients
There is nothing more embarrassing than sending an email and forgetting to add the main recipients to it. It’s worse when you forget to add an attachment. One of the major updates to Mail is the ability to intuitively notify you of a missing attachment or recipient.
8. Format email text – bold, italic, underlined, etc.
Formatting highlights words and makes them better. Using this, you can highlight important parts, underline, change the text color, increase or decrease the font size of the mail, and more. Here’s how to do it all.
- Highlight the text and tap the arrow. Then tap BIU and select Bold, Italic, or Underline.
- Or, after selecting text, press Aa at the top of the keyboard to see all the formatting options (as shown in the image below).
9. Add Multiple Email Accounts
Most of us use more than one email account. This keeps the distinction between family, business, office and other communications. The iPhone Mail app lets you add multiple email accounts, be it Gmail, Microsoft, Yahoo, Outlook, or a custom service.
Go to iPhone Settings → Mail → Accounts → Add Account. That’s all! You can check out our detailed guide on how to add multiple email accounts on your iPhone.
10. Set Default Email Account on iPhone
After adding multiple email accounts, you can set one of them as the default account. When you click on an email from a web page or app, it opens in the Mail app with the default email section “From:”.
11. Use swipes to perform various actions in the iOS Mail app.
The Mail app has intuitive swipes that allow you to conveniently perform handy actions such as deleting, flagging, archiving, marking as unread, and more. Interestingly, these swipes also work when you’re inside an email.
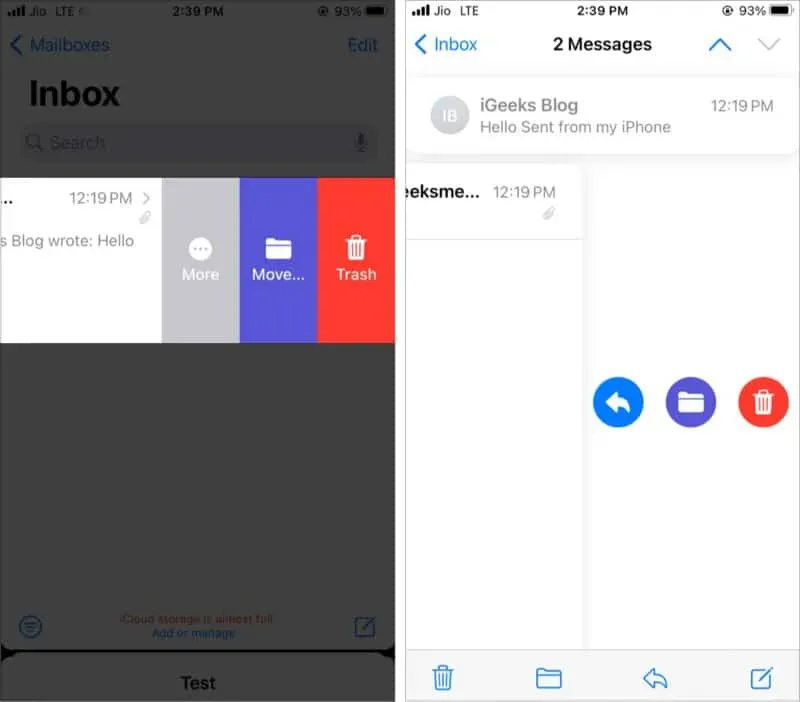
To set up swipes, follow these steps.
- Open iPhone Settings and tap Mail.
- Tap Swipe Options.
- Now select Swipe Left or Swipe Right.
- Choose one of the options.
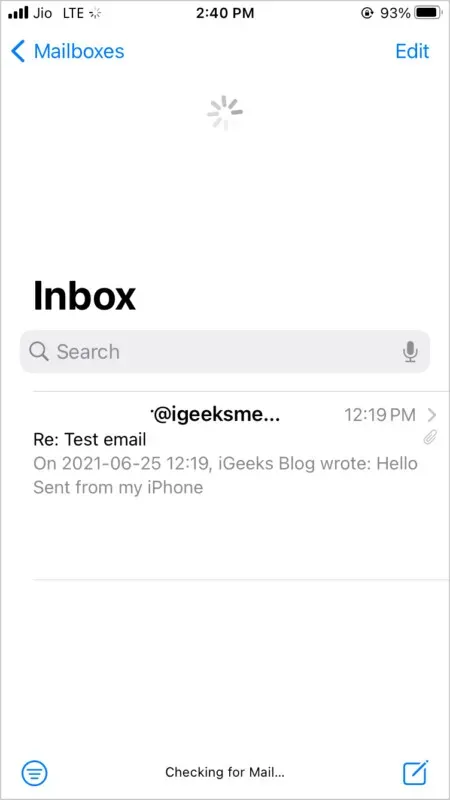
Cool Tip: Swipe down on the Inbox screen to refresh your emails.
12. Use Smart Mailboxes on iPhone
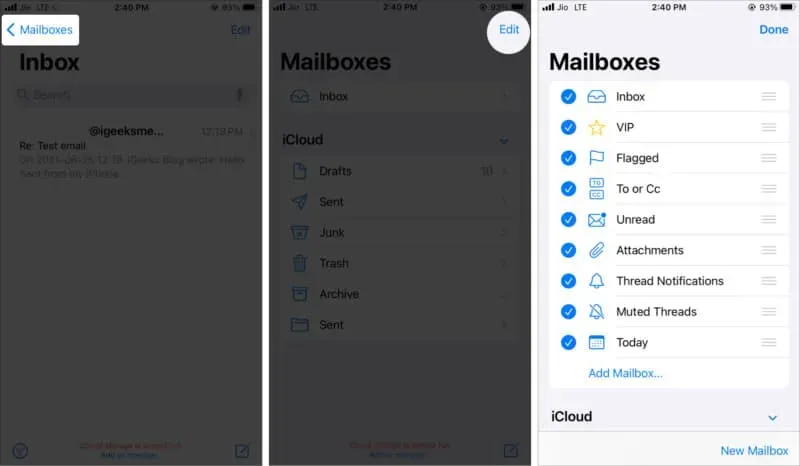
Using this, you can add options for mailboxes that have emails that belong to that category. For example, the “Today”smart inbox shows you all the emails for the day. Similarly, the Attachments smart inbox contains a list of emails with PDFs, files, images, and more. Here’s how to use it.
- In the Mail app, tap <Mailboxes in the top left corner.
- Tap Edit.
- Tap to enable the desired smart mailboxes.
- You can also change the order by clicking on the hamburger icon (three lines) and dragging it up or down.
- Click Finish to add mailboxes.
- Tap a mailbox to view all emails that match the description.
13. Minimize drafts to free up space in the Apple Mail app.
We’ve all been there when we write an email and then go back to the inbox to see something else (a fact, a quote, or something from previous emails).
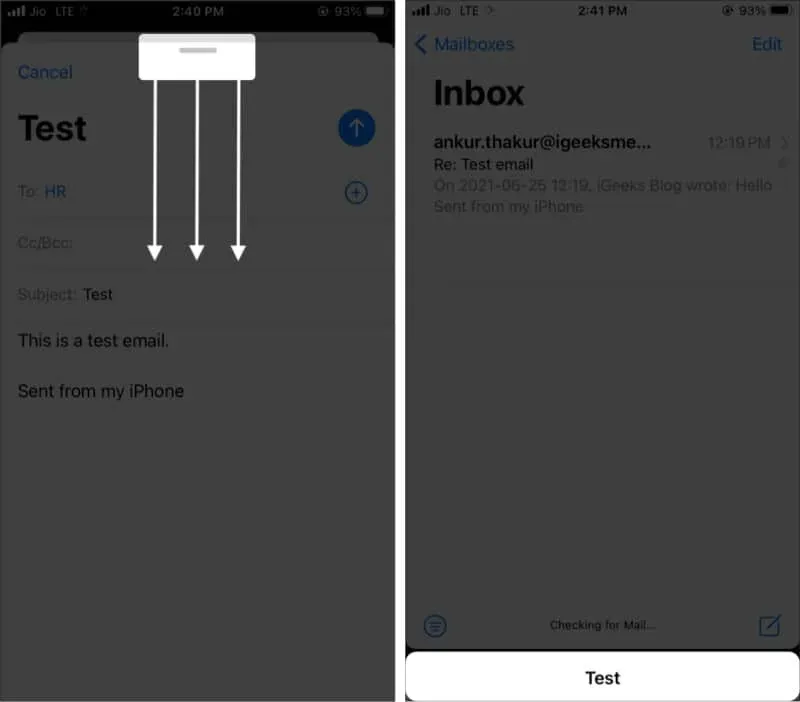
In this case, you can minimize the compose screen by swiping down from the top where the tiny horizontal line is. This way you can minimize multiple drafts. To return to it again, tap the collapsed bar at the bottom of the Mail app screen.
14. Add photos, videos, attachments and even drawings!
It’s really cool and useful. In addition to photos, videos, and attachments, you can also draw something in the Mail app and send it.
- When typing a new email or replying in the Mail app, tap anywhere inside the input field and use the arrow to see the Insert Photo or Video option.
- Touch < in the upper right corner of the keyboard to see more options. From here, use the photo or camera icon to insert an image.
- To add documents, tap the paper icon and select the Files app.
- Tap the icon you see below to instantly scan documents and attach them to an email.
- To draw, tap the pencil icon. Click Done→Insert Picture to attach it to your email.
15. Sign PDFs or mark up attachments from your email app.
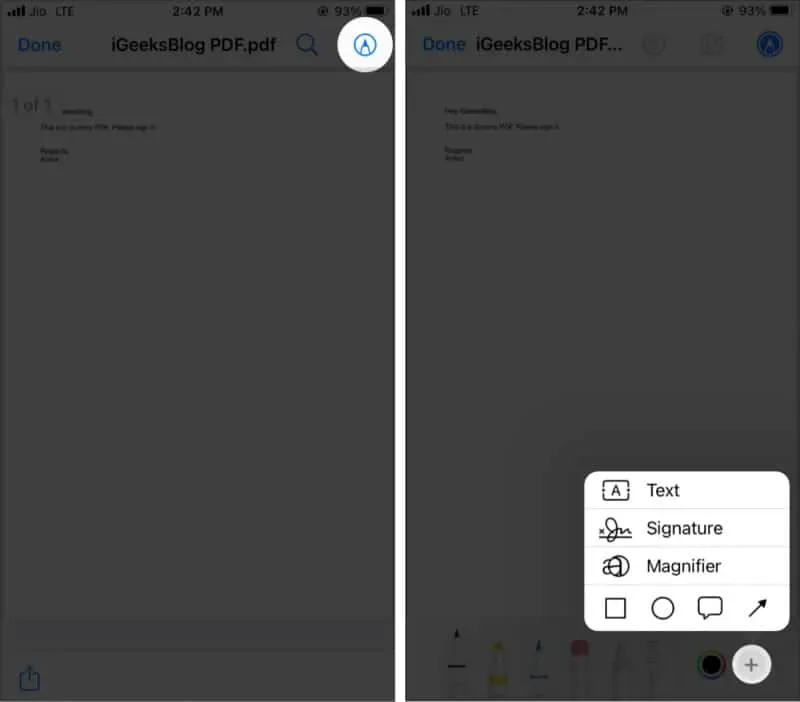
- Tap the PDF you received in the Mail app.
- Then tap the pencil icon in the top right corner.
- In the lower right corner, tap the + icon and select Signature.
- Now use the existing signature or add one (as shown below).
- Finally, click Done and choose an answer, save to the Files app, etc.
16. Set up your digital signature on iPhone
“Sent from my iPhone”is the default signature for the iPhone Mail app. On an iPad, it’s “Sent from my iPad.”
But you can easily change it to whatever you want. For example, your name, phone number, job title, website, etc. Learn how to set up a simple or HTML email signature here.
17. Stop using message threads
I’m not too fond of email threads, as they often cause confusion and make a new thread email a bit difficult to read. So, here’s how to turn off email threads.
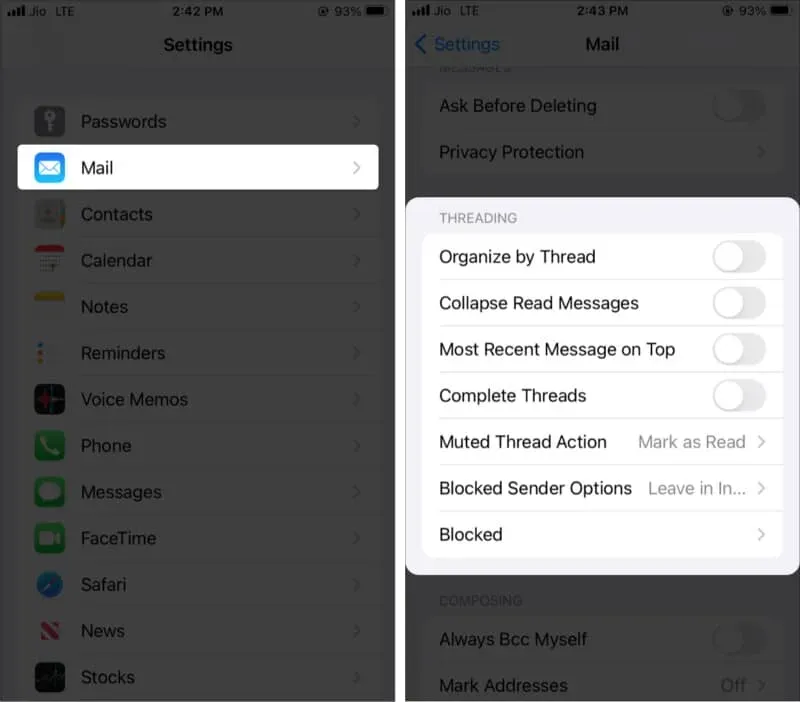
- Open iPhone Settings and tap Mail.
- Scroll down to the THREADING section and disable all options.
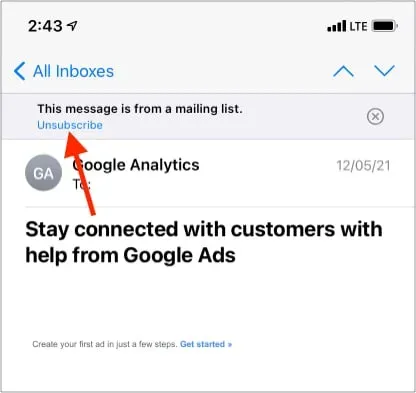
18. Quickly unsubscribe from mailing lists
You will see an unsubscribe option in several emails that will allow you to easily say goodbye to the mailing list. Click “Unsubscribe”and confirm in the pop-up window.
19. Add Contacts to VIP in iPhone Mail App
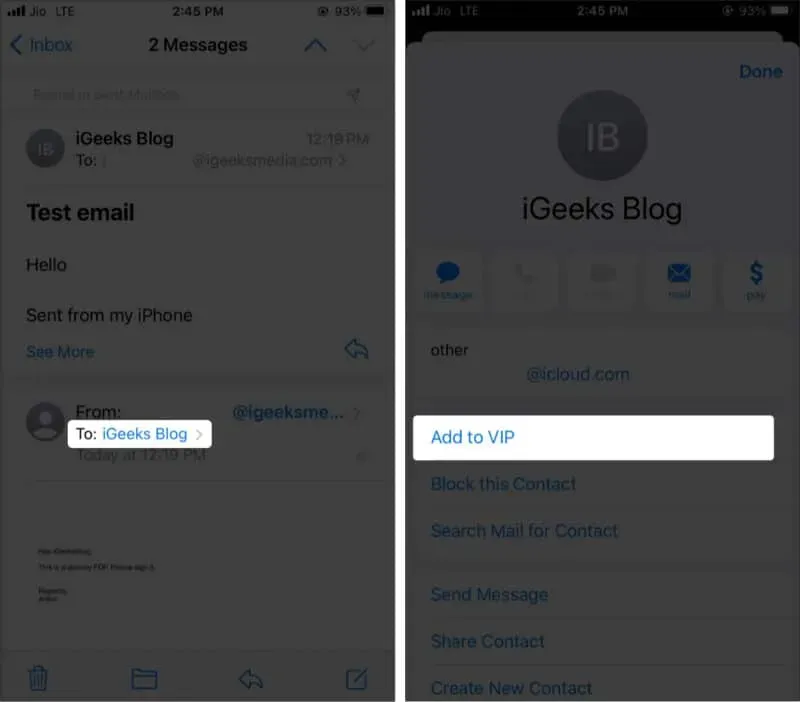
Are there contacts that require your most attention? You can highlight this by adding them to the VIP list. Also, using the smart inbox, you can view all VIP emails in one place. Here’s how to add an email as a VIP.
- Open an email and tap the name next to From or To:.
- Click “Add to VIP”→ “Done”.
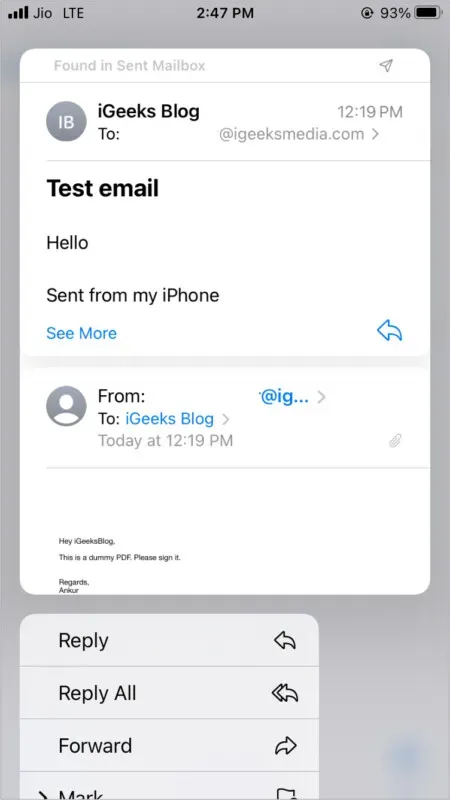
20. Long press to preview content
When you’re in your Inbox, Drafts, Sent Items, or other similar sections, press and hold an email to see what it’s about. Touch an empty area to return.
21. Preview More Content in the iOS Mail App
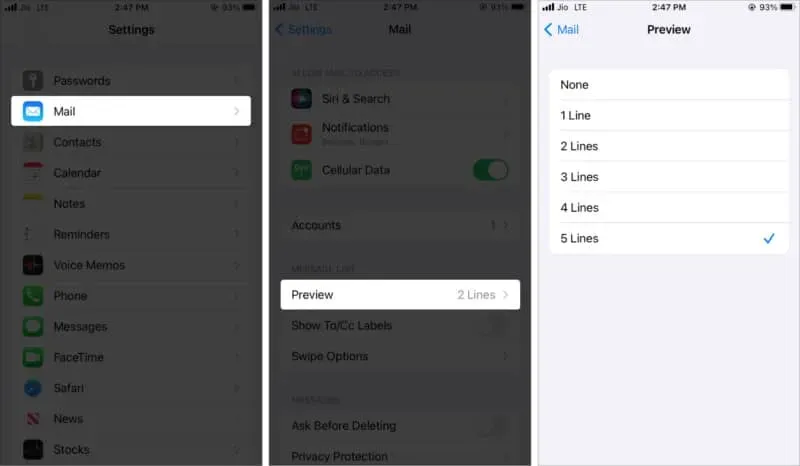
By default, you see about two lines of each letter in the list. But you can change this to five lines, which will allow you to read more email without actually opening the email.
- Open iPhone Settings and tap Mail.
- Tap Preview.
- Choose one of the desired options.
- If you don’t see the changes right away in the Mail app, force close it and reopen it.
22. Use Mail like a pro with Siri and Siri Shortcuts
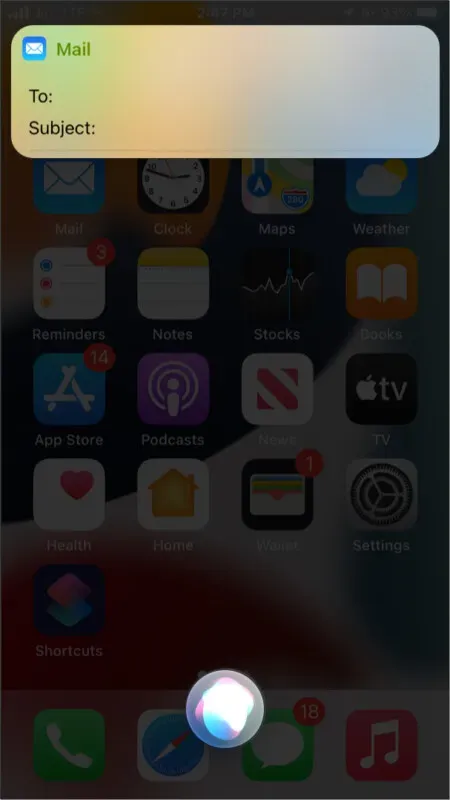
You can use Siri to send emails by simply calling the voice assistant and asking it to “send an email.”
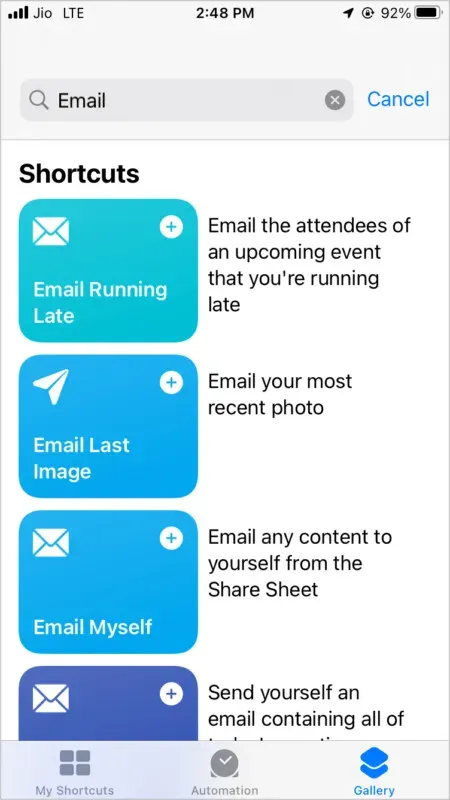
In addition, the Shortcuts app has several email tricks that you can use to get things done quickly. You can learn how to use the Shortcuts app here. After that, tap Gallery in the Shortcuts app and swipe down to open the search bar. Here, enter your email address to see some shortcuts created by Apple.
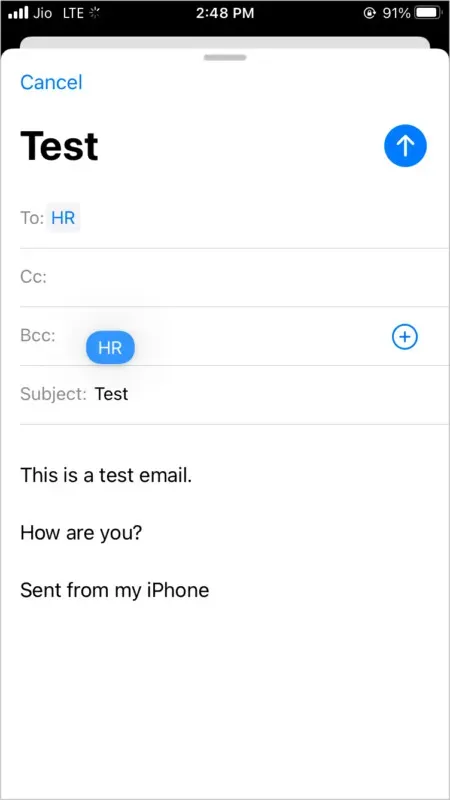
23. Drag the email address from “To”to “CC”or “Bcc”.
Instead of entering an email address in the “To:”section, you can use it in the “CC”or “Bcc”section. Easy! Press and hold the typed letter and drag it down. You can even drag it to the compose email section.
24. Shake iPhone to Remove Junk
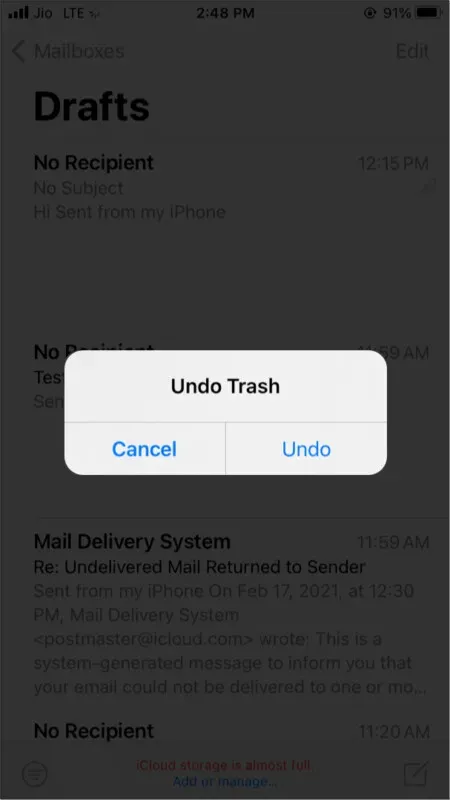
Place an email in the trash but want to return it right away? No problem. Shake your iPhone and press “Cancel”.
25. Convert email to PDF
- Open an email and tap the left-curved arrow.
- At the bottom, tap Print.
- Place two fingers on the print thumbnail and expand it.
- Tap the Share icon in the bottom left corner.
- Then click “Save to Files”or share it with other apps.
26. Tag, move and delete multiple emails at once
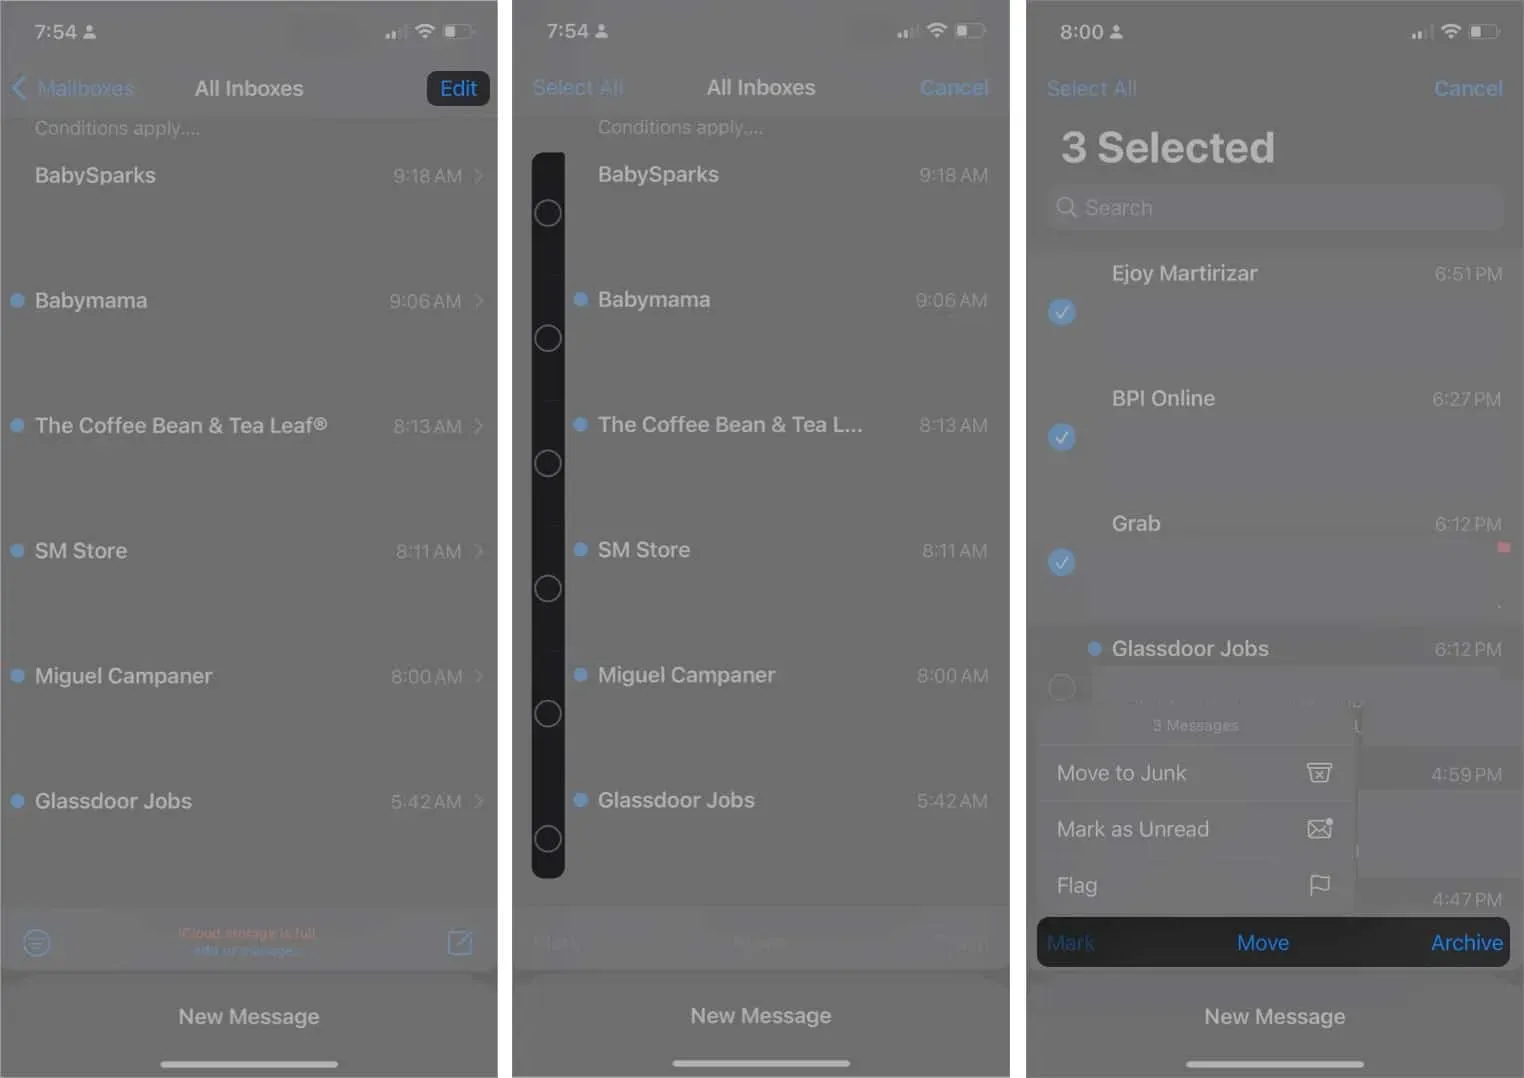
If you want to perform actions on multiple emails at the same time, you can batch select them. Select Edit and tap the circle next to the messages you want to select, then take action by tapping Mark, Move, or Archive.
27. Remove Autocomplete Suggestions
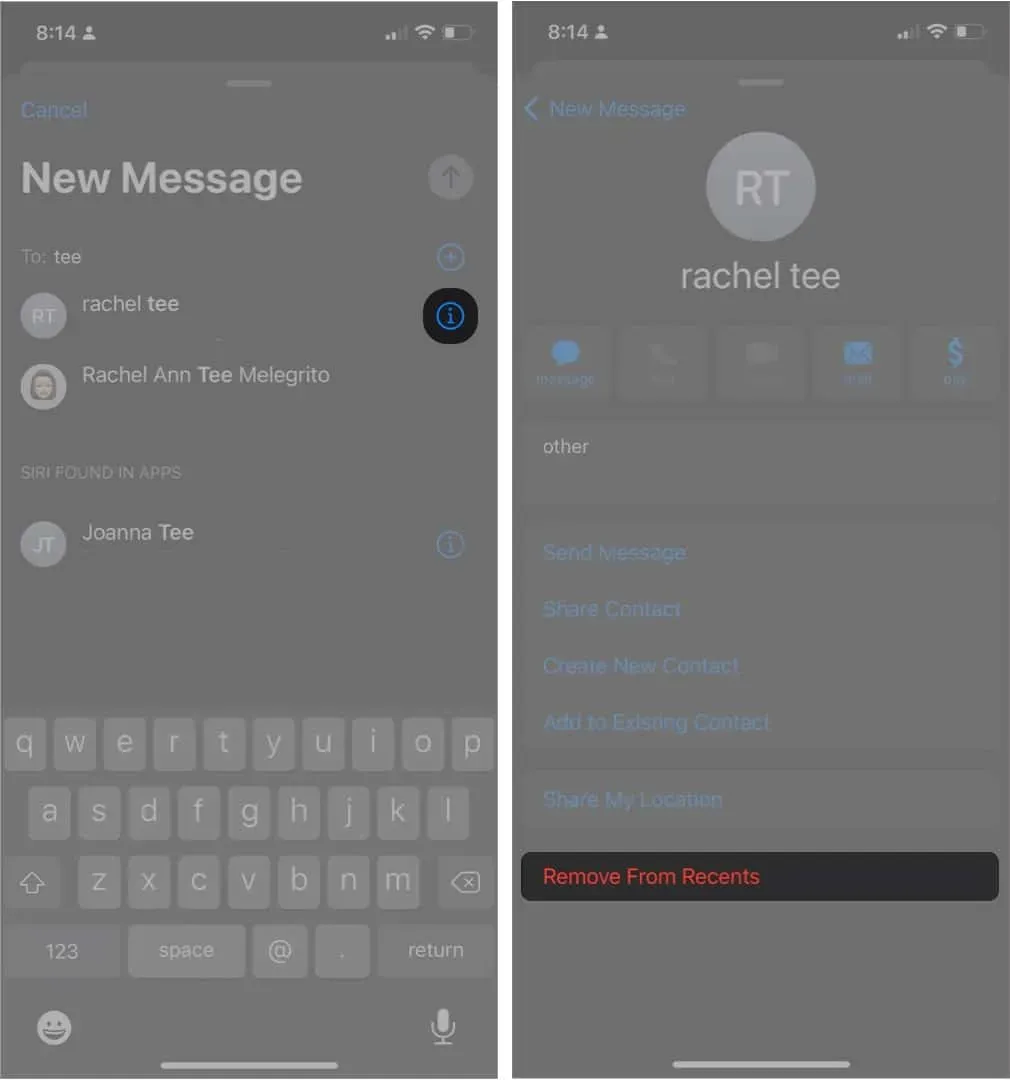
Sometimes we make typos when entering email addresses in the “To:”field. The sad part is that Mail tends to remember them and automatically suggest them when you send your successful email. There is an easy way to remove it:
- Compose your email → enter the address you want to delete.
- When the offer appears, click the Info button (i).
- Select Remove from recent.
28. Save the letter as a draft
If you created your mail but decided to finish it later, you can simply click Cancel → Save Draft when you’re done, just go to the Drafts folder and pick up where you left off.
29. Print your emails
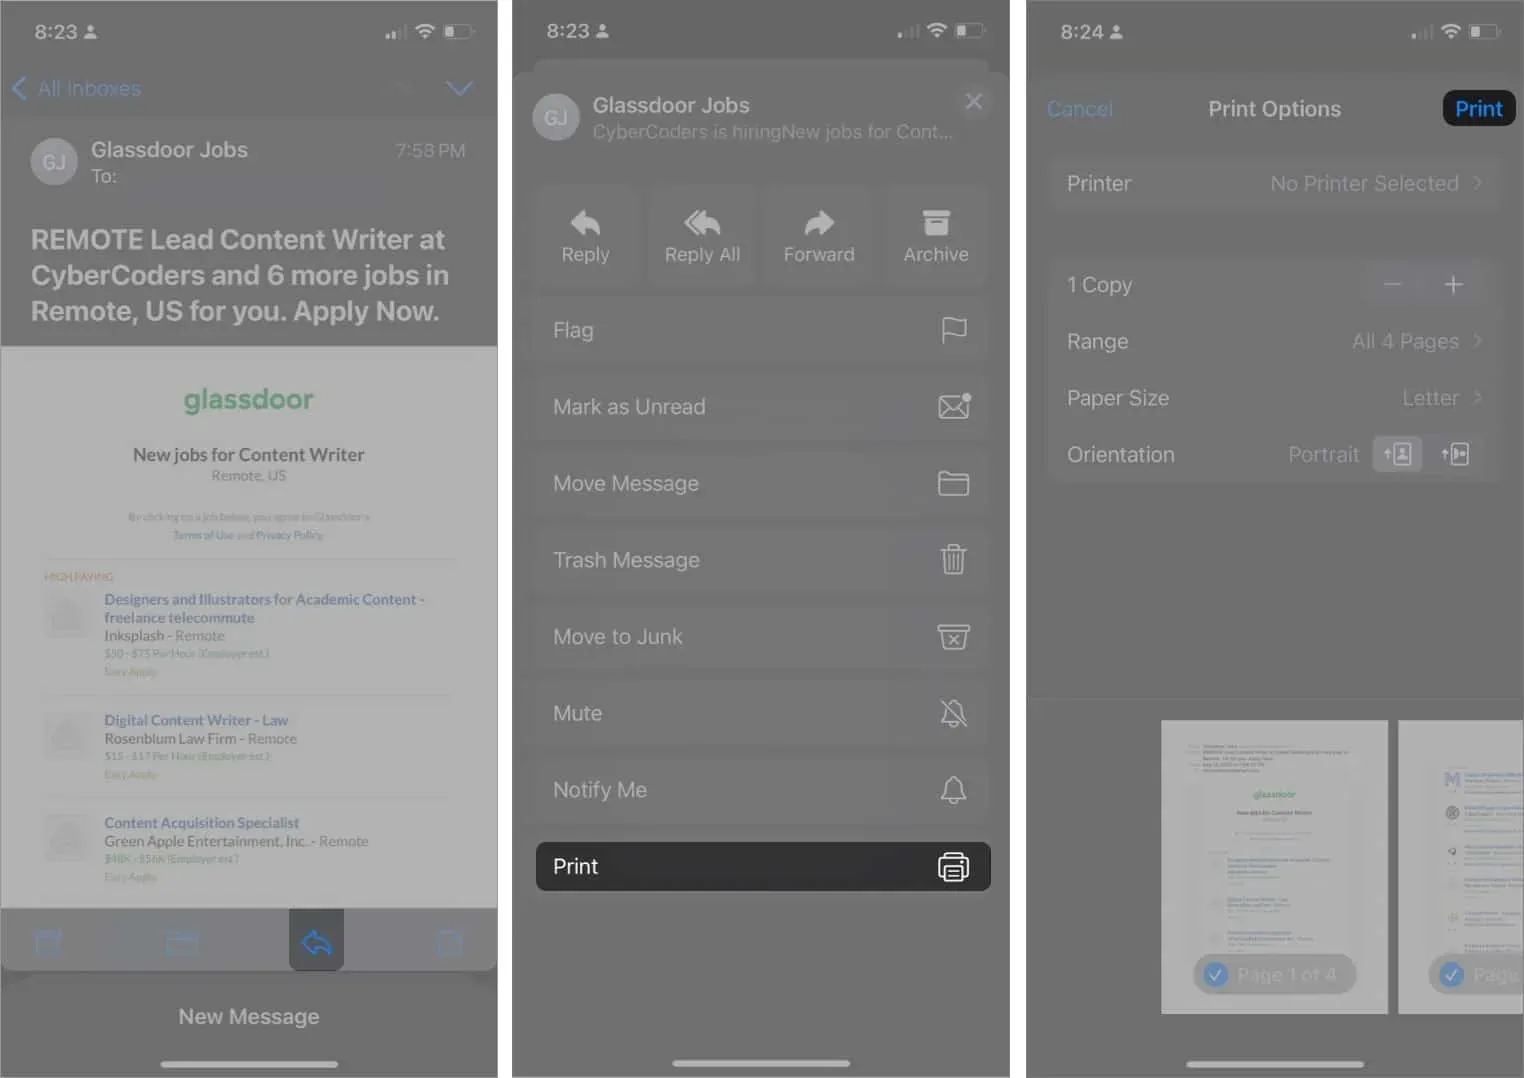
Did you know that you can also print emails directly from your iPhone? You will need an AirPrint compatible printer. To start printing:
- Open Mail → open the letter you want to print.
- Tap the Reply icon → Print.
- This will take you to the printer options. Set up the details and select the printer you want to print from → Print.
30. Create different signatures for different email accounts
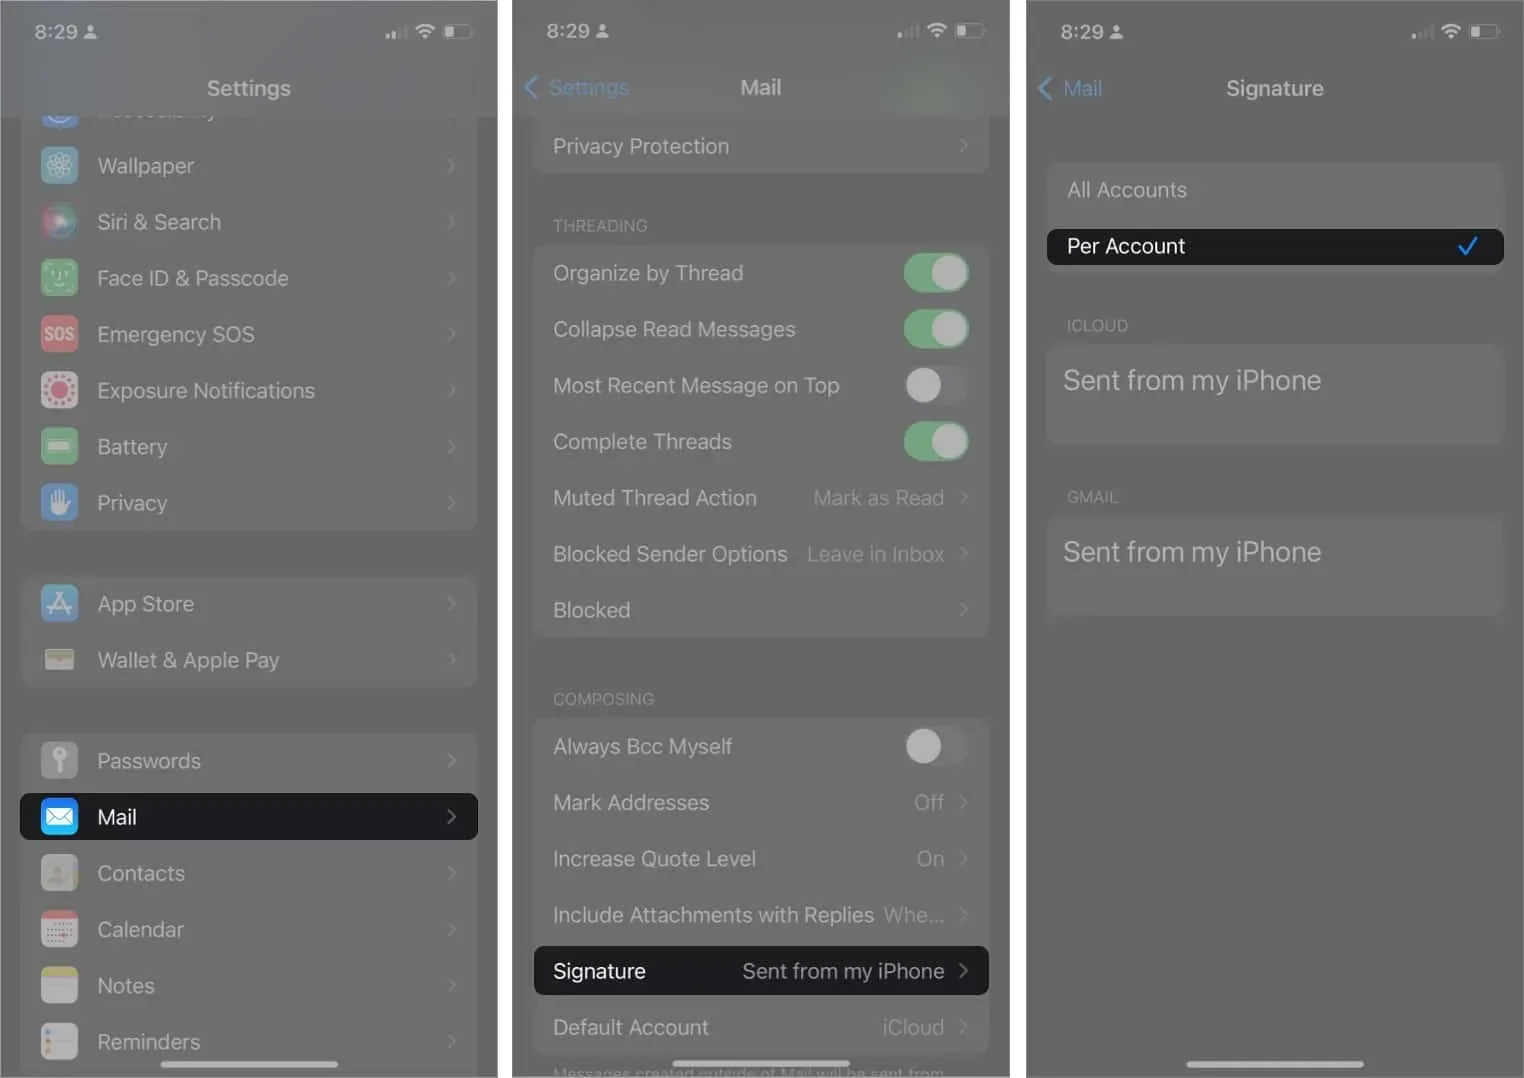
Most of us have more than one email account connected to Mail. While you can use the same signature for all of your emails, you can also create different signatures for each account. Just go to Settings → Mail → Signature.
If you have multiple accounts, you should see an option called “Per Account”. Selecting this option should bring up several of your accounts, each with its own field where you can enter unique signatures.
31. Block and unblock senders
Sometimes you want to prevent senders from sending you emails, especially if they don’t stop sending you messages. This automatically moves new messages they send to the trash.
32. Disable Email Notifications
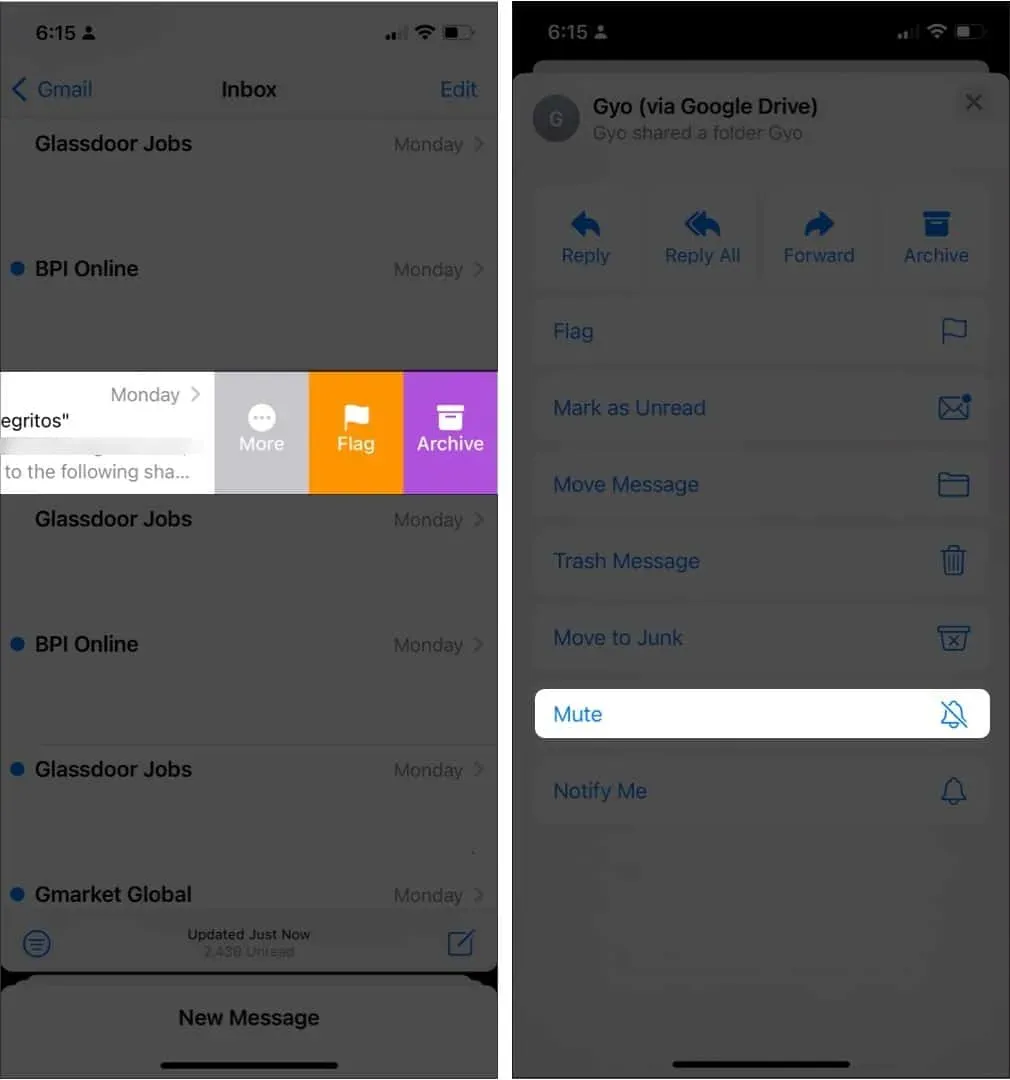
Email subject lines often clutter up notifications. If you want to hide an email thread, you will no longer receive notifications about that thread:
- Go to Mail and swipe to the left of the email thread you want to disable.
- Select More (…) → Mute.
You can also organize your email threads to make them easier to follow and less cumbersome.
33. Get notifications for email replies
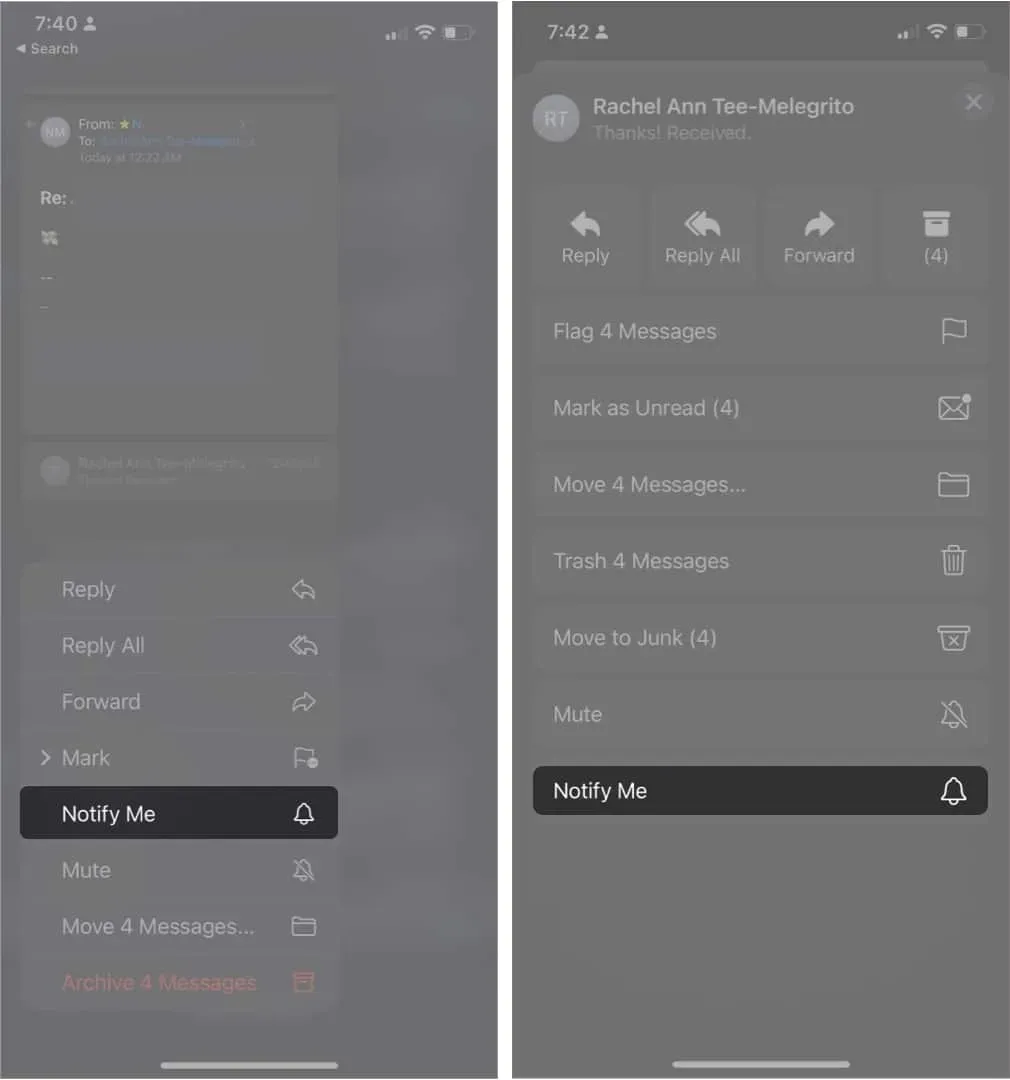
If you’re someone who replies to emails or threads frequently, getting notified every time someone replies would be great for you. To be notified of replies:
When reading email:
- Open the email.
- Tap the Reply icon → select Notify me.
Alternatively, hold down an email → select “Notify me”from the context menu.
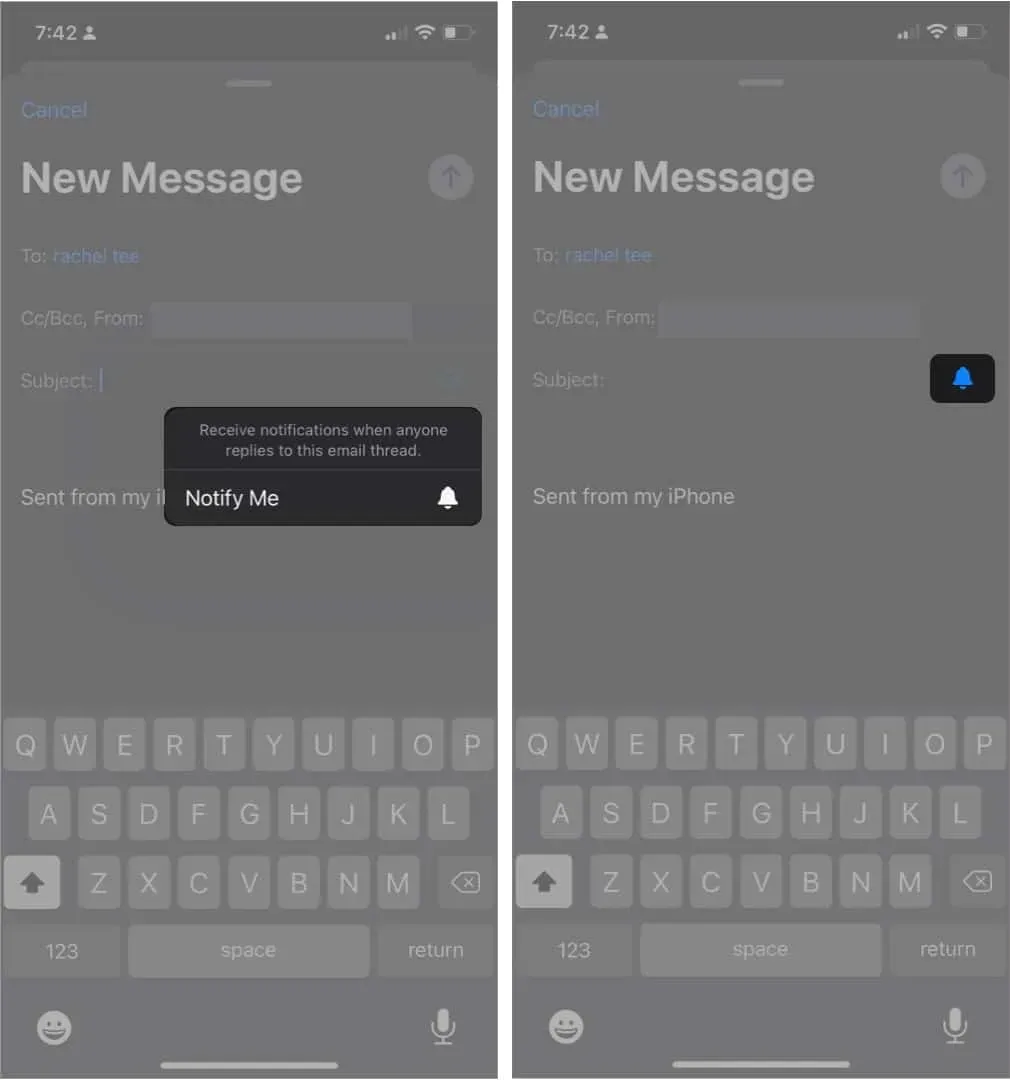
When writing an email:
- Go to compiling.
- Tap the Subject field → tap the bell icon.
34. Protect your email activity
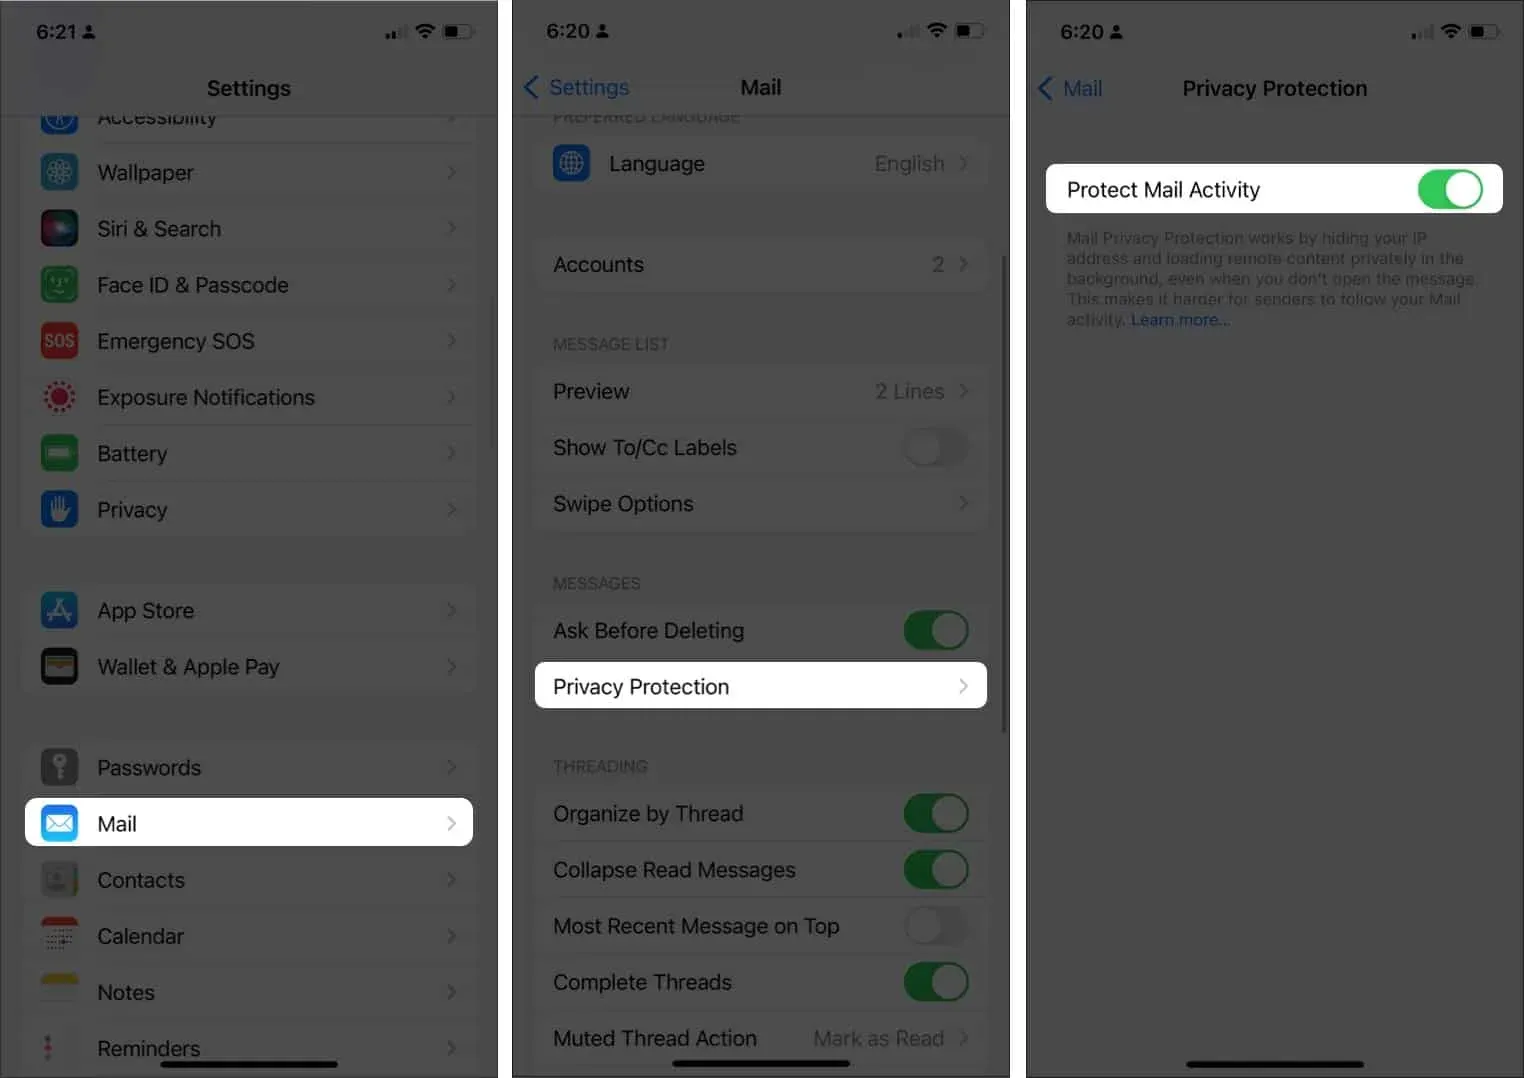
Advertisers, marketers, and sites that send you email may receive some information about your activities in the Mail app. They can use this information to find out if and when you opened the app, or where you are.
Apple’s privacy protection hides the device’s IP address, so it can’t associate your email activity with your IP address. It also downloads all your deleted content in the background through two separate relays to ensure no one can identify you and the deleted Mail content sent to you.
To enable this:
- Go to Settings → Mail.
- Select “Privacy Protection”→ enable “Protect Mail”.
35. Hide your email address
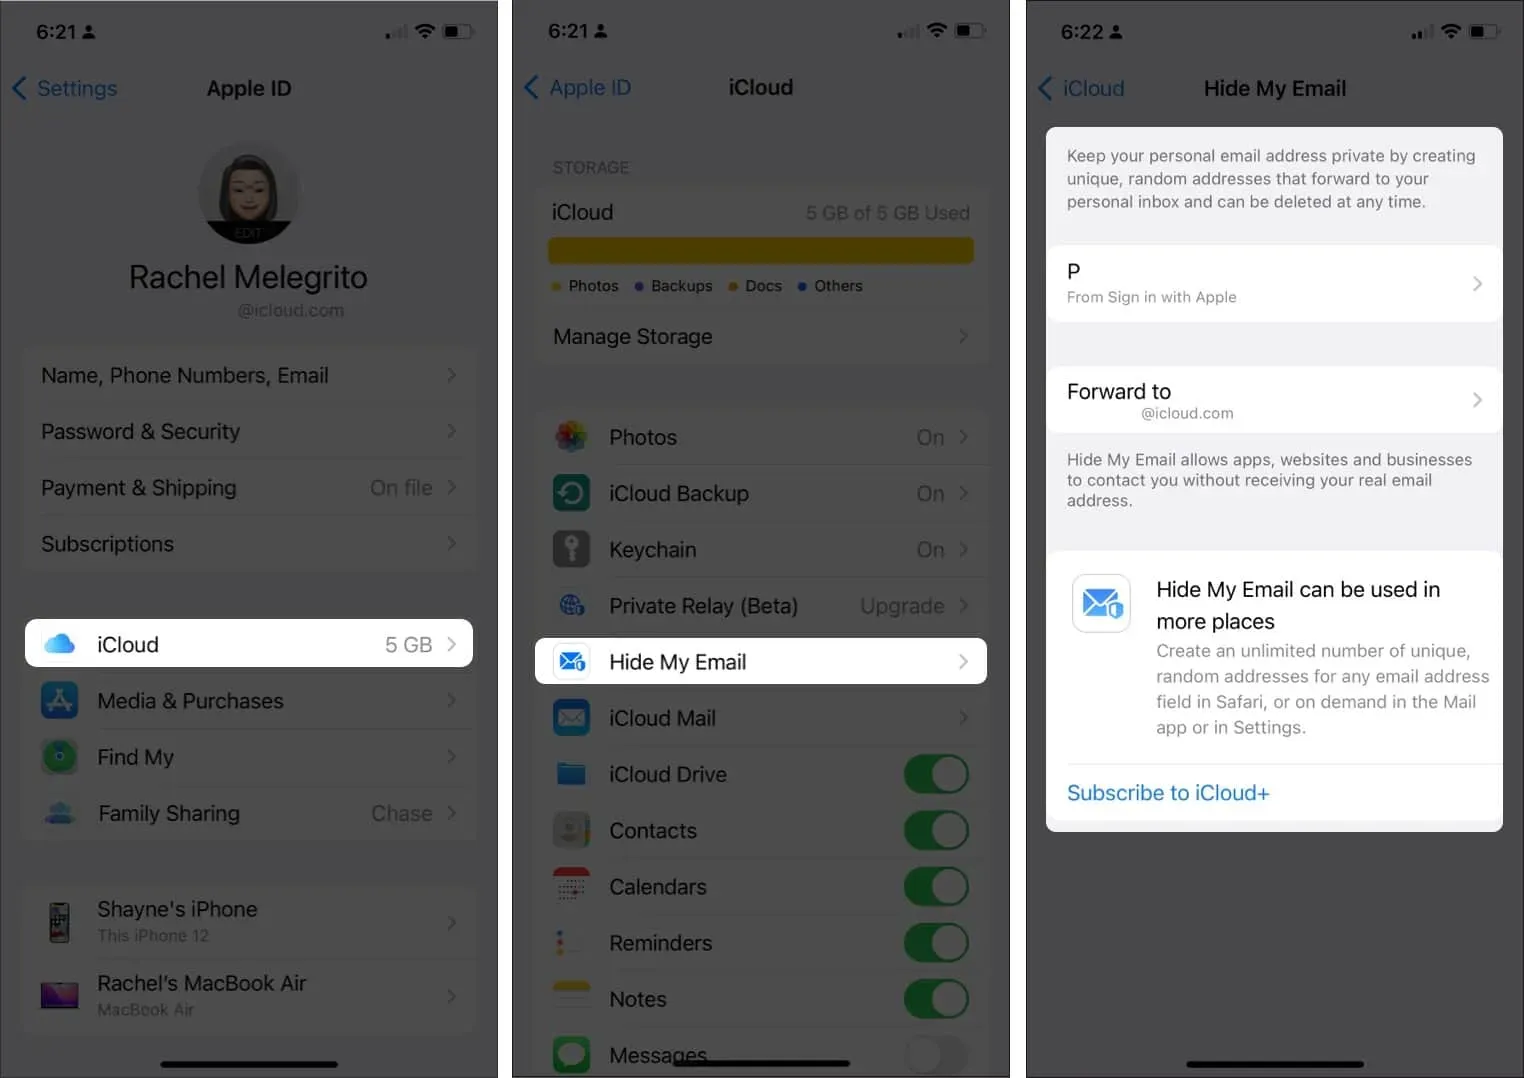
One of the things I hate about email is spam. One way to reduce it is to use a different email address, and Apple lets you do that. The “Hide My Email Address”feature allows you to sign in to apps and websites using a random email address.
This feature is only available to those with a paid iCloud+ subscription and devices running iOS 15 or iPadOS 15 or later. To enable this feature, go to Settings → [your name] → iCloud → Hide My Email.
Select an address or create a new one by clicking “Create a new address”. All emails sent to these random emails are forwarded to your actual email address.
36. Respond Instantly with Quick Actions
If you want to perform actions a little faster, you can save a few taps by using quick actions. In Mail, hold a message in your inbox to view its contents. A list of options will also appear, allowing you to perform quick actions such as replying to or forwarding an email.
37. Color your emails
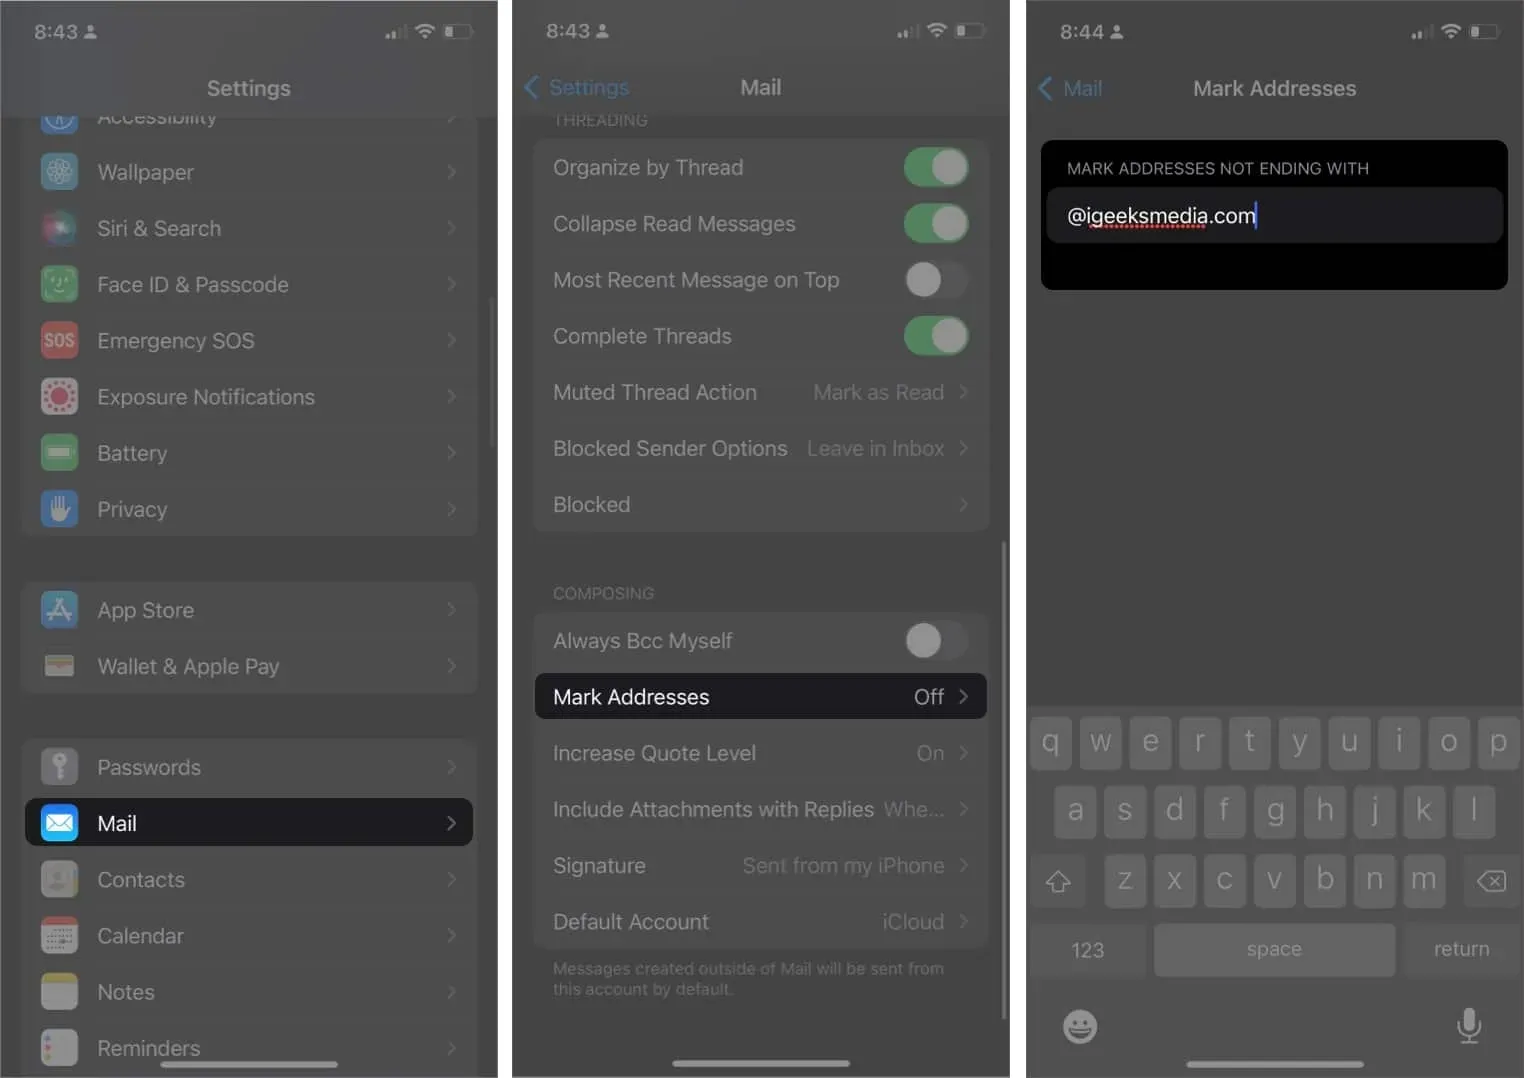
Another useful but lesser-known feature of Mail is the ability to color-code email addresses by domain. What it does is that people with email addresses from the same domain (usually from the same workplace) will appear in blue in the “To:”field, while other emails will appear in green. This will prevent the email from being accidentally sent to the wrong person.
Do it:
- Go to Settings → Mail.
- Select Mark Addresses → enter the domain you want to keep blue.
You can also use the same method to colorize your emails on Mac. Apart from this method, you can also colorize your emails in Mail on your Mac using rules.
Completion…
Although it doesn’t look like it, Mail is a feature rich application. Its features are comparable to those of renowned email service providers such as Gmail. Explore your email app with this extensive list of tips and tricks. Have we missed anything? If yes, please comment them so we can add them here!


