
Any Microsoft Surface device can be a full laptop or a handy tablet. It can be hard to figure out which style – laptop or tablet – is best for you, but taking screenshots on Surface devices is pretty easy. Let’s learn how to take screenshots on Microsoft Surface devices for free.
How to take a screenshot on Surface laptops/tablets
- Use the power and volume buttons
- Print screen (use the PrtScn key on your keyboard)
- Scissors (for Windows 10)
- Fragment and sketch
- Scissors (for Windows 11)
- Use pen surface
- Xbox Game Bar
- Third Party Applications
- Web browser extensions
1. Use the power and volume buttons
If you don’t have time to read the entire manual and want to take a screenshot immediately, use your Surface’s power button and volume button.
1.1 Surface models with Windows logo button
Older Surface devices have a Windows button on the screen. Used for taking screenshots.
- Navigate to the screen you want to capture.
- Press the Windows logo button and volume down button at the same time. If that doesn’t work, press the Windows logo + volume up button at the same time.
- The screen will flash, indicating that you have taken a screenshot.
- Navigate to the Screenshots folder (This PC > Pictures > Screenshots) to find the screenshot.
1.2 Surface models without the Windows logo button
For these Surface models, taking screenshots is as easy as with any smartphone or tablet.
- Open the screen you want to take a screenshot of.
- Press the power button + volume up button together.
- Your screen will flash, which means that a screenshot of the entire screen has been taken.
- Screenshots are saved in a subfolder of your Pictures folder (This > Pictures > Screenshots).
1.3 Does this method work?
Pressing physical buttons is the fastest screen shot on Microsoft Surface devices. This is because you don’t need to plug in a keyboard or open any app.
But there are a lot of things you can’t do with this option:
- It does not allow you to select a portion of the screen to take a screenshot of.
- You cannot select a name, location, or image format.
- It would be helpful if you pressed the physical buttons each time to take screenshots so you can’t quickly take multiple screenshots. Taking multiple screenshots is possible, but not as fast as other methods such as Print Screen (method 2).
- Pressing the side buttons of the tablet every time to take a screenshot is tiring for some users.
- There are no editing options right after taking a screenshot.
2. Print screen (use the PrtScn key on your keyboard)
Using Print Screen has been a popular method for taking screenshots on Windows computers for decades. On Surface devices, you take a screenshot by pressing the PrtScn key on the Type Cover or in combination with any other key.
While you can do this with the on-screen keyboard, this method is effective if you’re using a Surface with a keyboard. Some older Surface models don’t have a PrtScn button, so check the very top line of the Type Cover. However, if you are using a keyboard from another manufacturer, it will have a Print Screen key.
The Print Screen method allows you to take two types of screenshots.
- Screenshot of the whole screen
- Snapshot of the active window.
2.1 Take a screenshot of the entire screen
- Stay on the screen you need to capture.
- Press the Windows logo keys and PrtScn at the same time on the Surface keyboard, or press the Fn and PrtScn keys at the same time.
- The screen may or may not flicker. Either way, go to This PC > Pictures > Screenshots to see if a screenshot has been saved.
- If not, press the shortcut keys again. You should also try pressing the Windows + Fn + PrtScn keys at the same time.
2.2 Take a screenshot of the active window only
- Hold the window to be captured in front.
- Press ALT + PrtScn together.
- Confirm with the Pictures Library (This PC > Pictures > Screenshots).
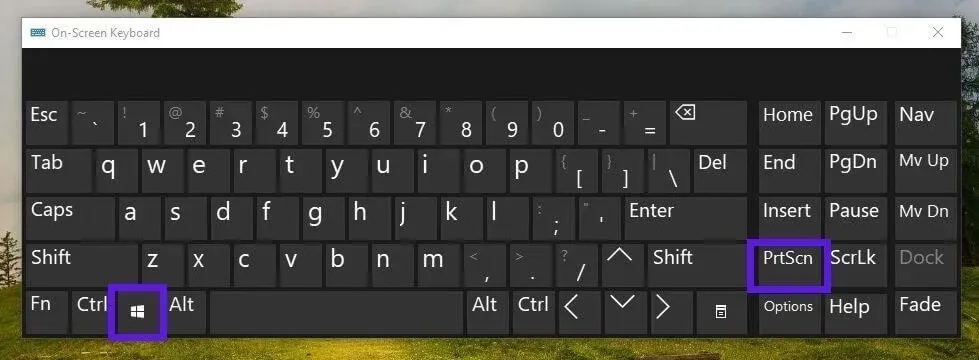
2.3 Using the on-screen keyboard
Use the OSD if you don’t have a Surface keyboard and want to take screenshots using the Print Screen method. However, there are better ways to take screenshots without a keyboard (Snip & Sketch for Windows 10 and Snipping Tool for Windows 11).
- Open the start menu, type “on-screen keyboard”and launch the app.
- On your keyboard, press the Windows logo key + PrtScn key or Fn key + PrtScn key to take a screenshot.
2.3 Is this method suitable?
The physical button method described in the first section is a modern alternative to the Print Screen method. Because both methods do the same thing – take a screenshot of the entire screen and save it in the “Pictures”folder. But if we compare the efficiency, then the Print Screen method is still better. Because:
- Pressing the Print Screen key is easier than pressing the physical button on the tablet (Surface).
- You can take multiple screenshots without delay. Just keep pressing keyboard shortcuts and screenshots will automatically save without interrupting what you’re doing.
- This is the fastest and most reliable way to use Surface with a keyboard.
But like the physical button method, its speed comes at a price.
- You cannot select a part of the screen to take a screenshot,
- No editing tools right after taking a screenshot. You can navigate to the folder and open the screenshot using any editing tool.
- It does not allow you to choose the location, format, and name of the screenshot.
For tools that allow you to do the above things, check out methods 3, 4, 5, and 7.
3. Scissors (for Windows 10)
The Snipping Tool comes preinstalled with Windows 10 and is generally a decent tool for taking screenshots. In this section, we’re talking about the Snipping Tool in Windows 10, not the updated Snipping Tool in Windows 11 (go to Method 5 for that).
Let’s learn how to use the Snipping Tool on Windows 10 Surface devices:
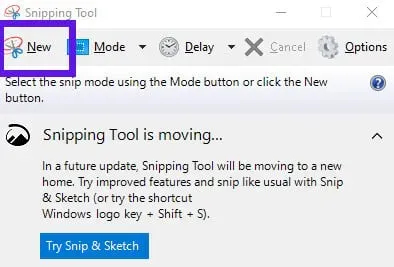
- Click/tap start menu, enter.
snipping tool‘ and open the application. - It has several screenshot capture modes: free-form snip, rectangular snip, window snip and full-screen snip.
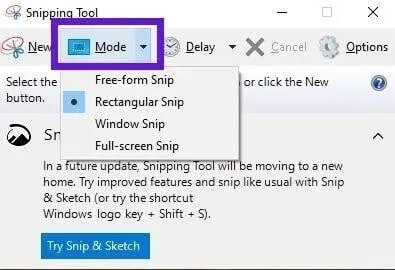
- Free-form Snip allows you to select any part of the screen of any shape, while Rectangular Snip mode allows you to select a part of the screen for screenshots in rectangle variations.
- With Window Snip, you can take a screenshot of any active window.
- When you select “Full Screen Snapshot”, it instantly takes a screenshot of the entire desktop.
- We will choose Rectangular Snip.
- Select New.
- Now click and drag the mouse cursor to select the part of the screen to take the screenshot.
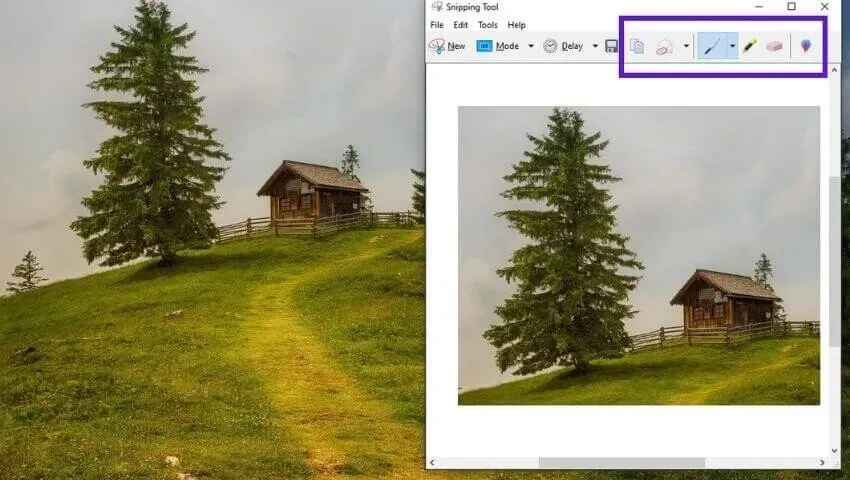
- The screenshot will open in the Snipping Tool where you can complete a few tasks.
- Edit and annotate a screenshot with a pen, highlighter, and eraser.
- The screenshot is copied to the clipboard so you can paste it into any chat. To copy the edited version, click the copy icon (double page icon) in the toolbar. To send an email using your default email client, click the email icon in the toolbar.
- If you want to print it, click File > Print.
- Select the floppy disk icon to save the screenshot, or choose File > Save.
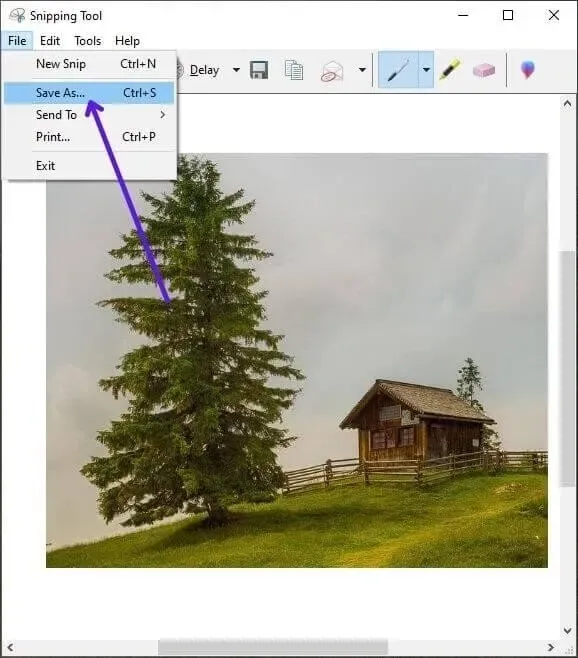
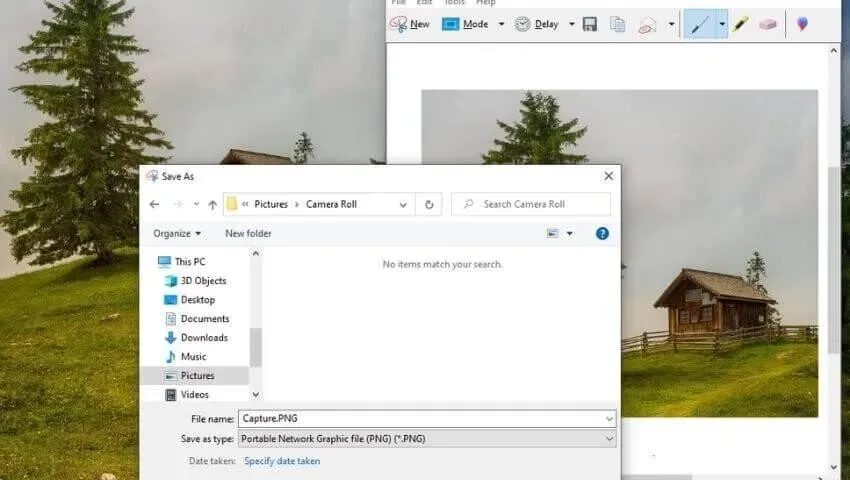
- Choose any location, name and format for the screenshot and save it. Images are saved in PNG format by default, but you can also choose JPG, GIF, and MHT format. If this is confusing, click Save and find your screenshot in your Pictures folder.
3.1 Take screenshots of drop-down menus with delay option
Screenshots of some menus and lists are difficult to take because they disappear as soon as you open the screenshot tool. In the Snipping Tool, you use the delay feature to take screenshots of those tricky menus.
- Open the start menu, type.
snipping tool‘ and open the application. - Select “Delay”and choose “5 Seconds”.
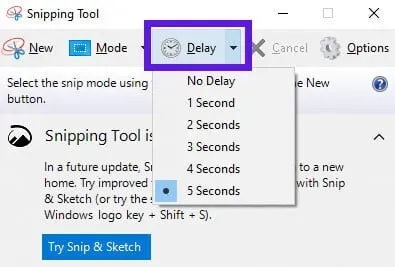
- Now select “Create”and quickly open the screen you want to take a screenshot of.
- Wait for the Snipping Tool to freeze the screen.
- When the screen is frozen, select a part of the screen or the active window to take a picture.
- It will open with the Snipping Tool where you can edit and save it.
3.2 Is Snipping Tool the best screenshot app for Windows 10?
No, it’s not. The Snipping Tool in Windows 10 has many benefits, but it still lacks in some areas. Good things about it:
- Select any part of the screen without capturing the entire screen.
- Edit or mark up the screenshot before saving.
- Paste the screenshot anywhere, as any screenshot you take will be copied to your clipboard.
- Select a folder, name, and format for the screenshot.
- Take screenshots of drop-down menus with the “Delay”option.
But it has some disadvantages:
- The Delay option is handy for capturing dropdown menus, but Snip & Sketch and the Snipping Tool (on Windows 11) can do it without the Delay option.
- The Snipping Tool is not designed to take multiple screenshots in a short amount of time. For this, it is better to use the Print Screen method.
4. Snip and sketch
Snip & Sketch is the best preinstalled screenshot app for Windows 10. If you don’t find it installed on your Surface, open the Microsoft Store, search for “Snip & Sketch”and install it.
4.1 Capturing part of the screen with Snip & Sketch
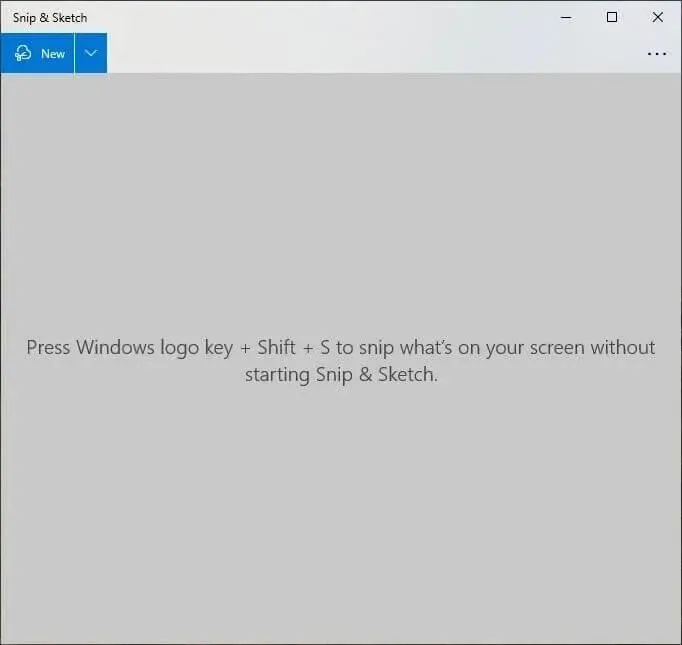
- Open the start menu, type.
snip & sketch‘ and run the application. - Click New or press the Windows logo keys + SHIFT + S at the same time.
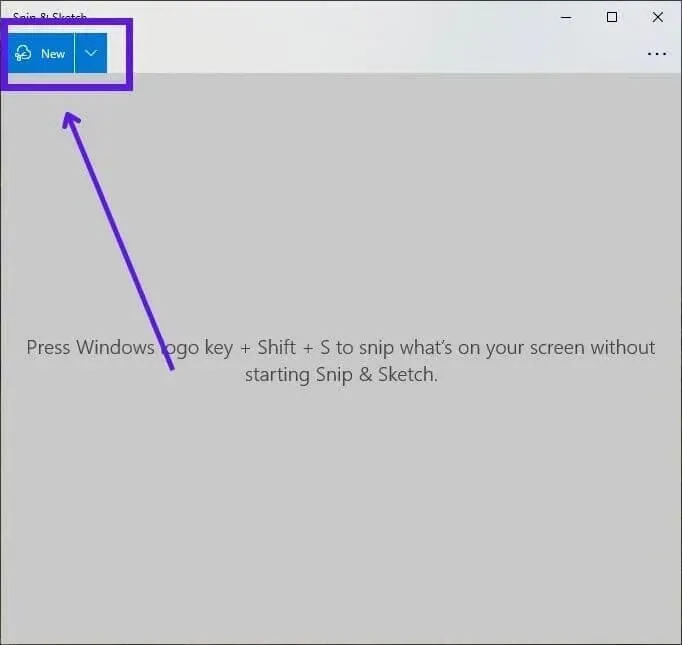
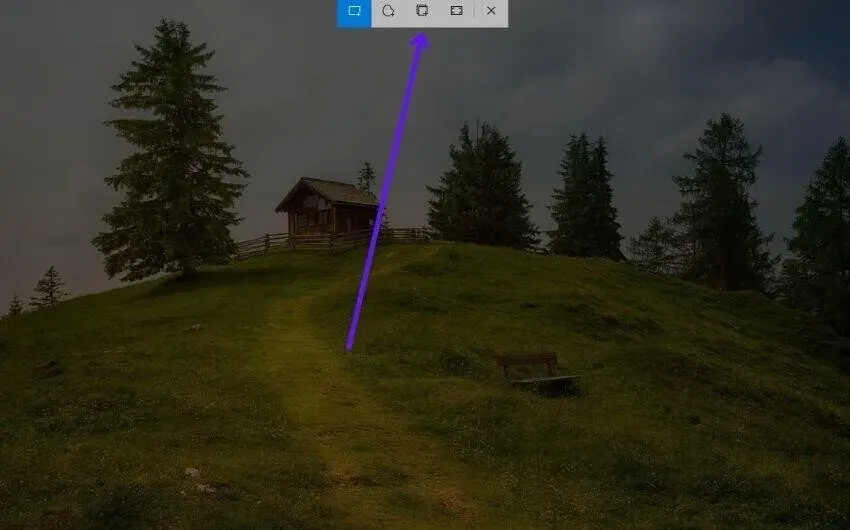
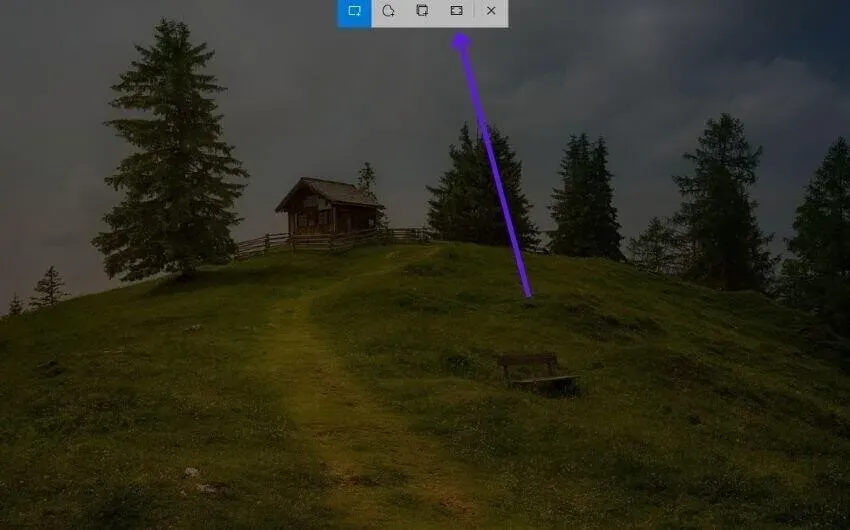
- A dark overlay appears on the screen with multiple screenshot options at the top center of the screen.
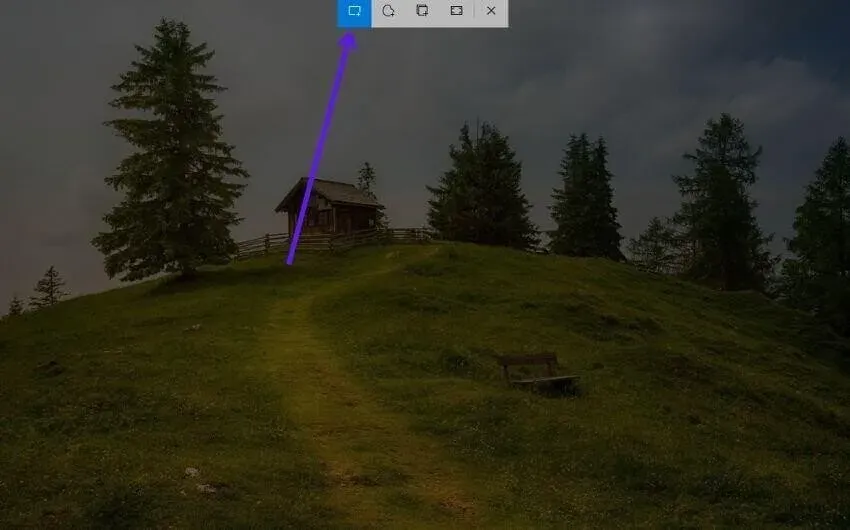
- Select Rectangular Snip to select any part of the rectangular screen, or select Freeform Snip to select any area of the screen of any shape.
- Click, hold, and drag the crosshair cursor to select the area to take the screenshot.
- You will then see a screenshot notification.

- When you access the notification, the screenshot will open in Snip & Sketch.
- For annotations, use the editing tools in the toolbar, including the handwriting tool, ballpoint pen, pencil, highlighter, eraser, and crop tool.

- To copy or share a screenshot, click the arrow button on the toolbar, or copy the image by clicking the two-page icon.
- To save a screenshot, select the floppy disk icon.
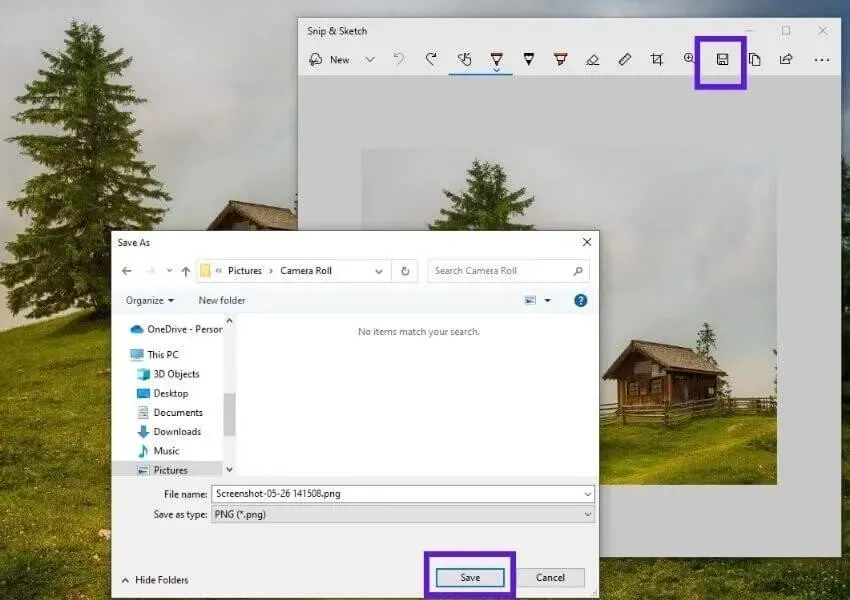
- Choose any location for the screenshot, write any name you want, and choose any format you want. You can also leave everything as it is. Click Save.
4.2 Take a screenshot of the active window
You can take a screenshot of the active window in rectangular slice mode, but you have a faster way with Windows slice mode.
- Open Snip & Sketch and select Create.
- Select the Windows Snip option at the top center when the screen is frozen. It’s third from the left.
- Click/tap on the window you want to capture.
- The screen that you see in the notification will be taken.
- When you open it, it will show editing options before saving.
- Edit and save the screenshot.
4.3 Capture full screen screenshot
- Press Windows logo + SHIFT + S to open Snip & Sketch options.
- Select the Full Screen Snapshot option right before the close (X) button.
- Selecting the option will take a screenshot of the entire screen.
- Edit the screenshot using the available tools and then save it by pressing CTRL+S.
4.4 Open Snip & Sketch from Action Center (Windows 10)
If you don’t want to search for Snip & Sketch every time, sign in to the app from Notification Center.
- Tap the far right corner of the taskbar, or if you’re using Surface as a tablet, swipe left from the right corner to open Action Center.
- Select Screenshot.
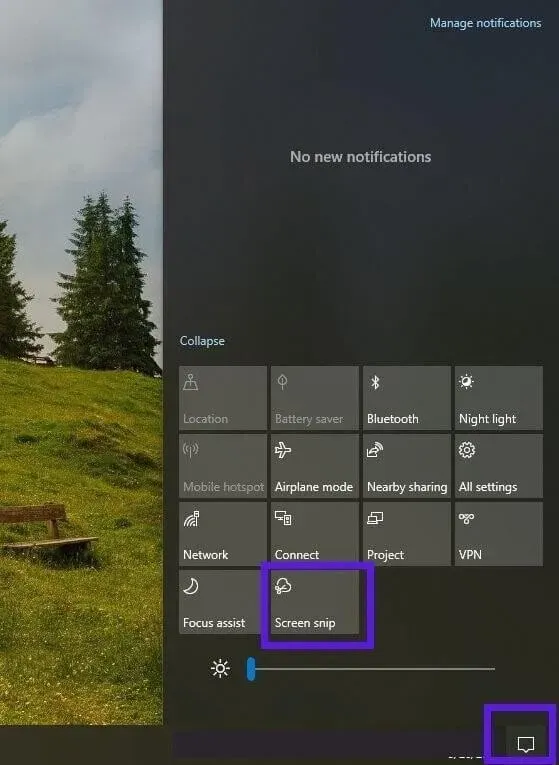
- It will freeze the screen with a black overlay and you will see the Snip & Sketch screenshot options at the top of the screen.
- Take a screenshot, edit it, and save it as instructed in the previous sections.
4.5 Is Snip & Sketch the best screenshot tool?
Snip & Sketch has a lot of good stuff.
- You can take a screenshot in any way you like. Select a portion of the screen, take a screenshot of the active window, or take a screenshot of the entire screen.
- It allows you to select a folder, name and image format.
- You can edit the image before saving it.
- The screenshot is copied to the clipboard for instant sharing on the web.
- Snip & Sketch allows you to take screenshots of drop-down menus and lists. Just open the menu, press the shortcut key to open Snip & Sketch, and freeze the screen. Select the screen area for the screenshot.
The only thing Snip & Sketch can’t do is take multiple screenshots instantly. Using the Print Screen method or the Xbox Game Bar to take second-by-second screenshots of something.
5. Scissors (for Windows 11)
In Windows 11, Microsoft combined the Snipping Tool and Snip & Sketch and called it the Snipping Tool. This is because the name Snipping Tool is more popular, although Snip & Sketch is the best app.
5.1 Updating a snippet and sketch
If you open Snip & Sketch and the same app similar to Snip & Sketch from Windows 10, your app will not be updated.
Update the app to get the new Snipping Tool app.
- Open the Microsoft Store.
- Type “Snip & Sketch”.
- Select Snip & Sketch from the list.
- Click the “Get”or “Update”button.
- After the update, whether you open the Snipping Tool or Snip & Sketch, a new Snipping Tool will open.
5.2 Take screenshots with the Snipping Tool
- Open the start menu, type.
snipping tool‘ and run the application. - When the app opens, press the button labeled Rectangle Mode to bring up a small list of screenshot modes.
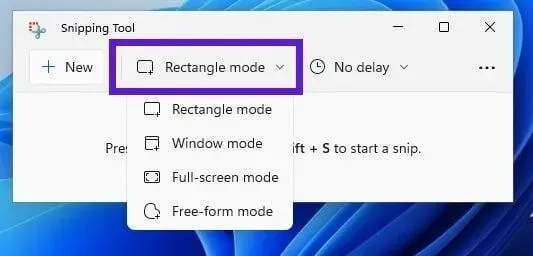
- Take screenshots of rectangular objects in Rectangle mode. Use windowed mode to capture snapshots of active windows. Select full screen mode if you need to take a screenshot of the entire screen. Finally, freeform mode allows you to select any portion of the screen in any shape.
- After selecting the mode, click “Create”.

- Select the screen area for the screenshot.
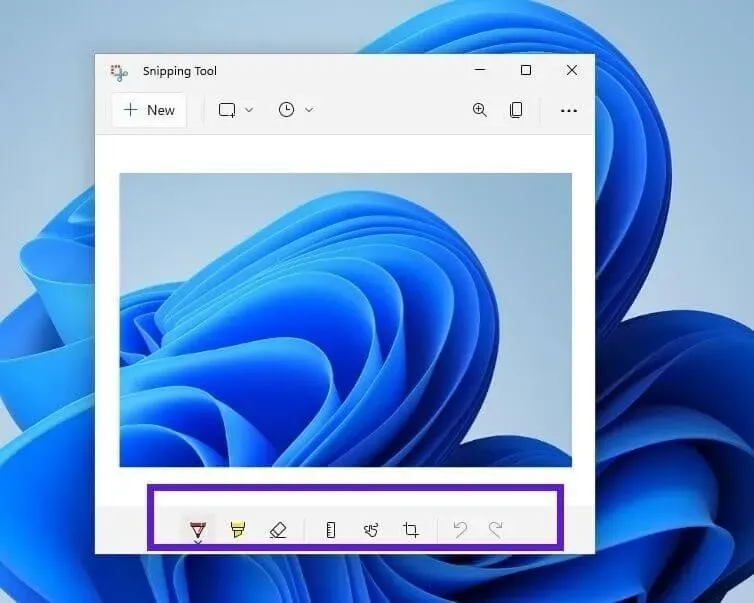
- The screenshot will open in the Snipping Tool where you have many options.
- Edit the screenshot using the tool in the toolbar at the bottom of the window.
- Select the two page icon next to the magnify icon in the upper right corner of the window to copy the screenshot to the clipboard.
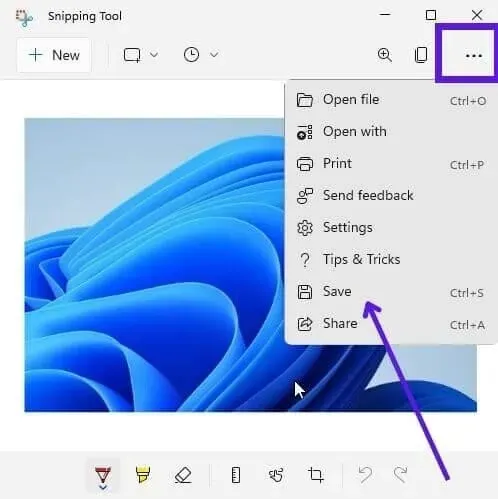
- You can also share a screenshot by selecting the three dots in the top right corner and selecting “Share”.
- To save a screenshot, press CTRL+S or click on the three dots in the top right corner and select Save.
5.3 Use keyboard shortcuts
The fastest way to capture screenshots with the Snipping Tool is by pressing keyboard shortcuts.
- Open the screen you want to capture.
- Press the Windows logo keys + SHIFT + S at the same time.
- A dark coating will appear on the screen.
- Take a screenshot.
- It will open with the Snipping Tool where you can edit, copy, share, print and save it.
The Snipping Tool in Windows 11 is a great screenshot tool that does everything a good screenshot app should do. This is useful for both Microsoft Surface laptops and tablets.
- Select part of the screen, active window, or full screen.
- Choose the location of the screenshot along with its name and format.
- Edit the screenshot before saving.
- Paste the screenshot into something before saving it because it is copied to the clipboard when you take a screenshot.
- Take screenshots of complex drop-down menus and lists by freezing the screen (Windows logo + SHIFT + S) or using the Delay option.
As with Snip & Sketch, the only downside we could find is that it can’t take screenshots uniformly every second. For example, it is not possible to take screenshots of every second of a video or game using the Snipping Tool.
6. Use the Surface Pen
Microsoft Surface and Surface Pro devices ship with the Surface Pen. If you use the Surface Pen a lot, you can also use it to take screenshots.
- Raise the screen to be captured.
- Double-click the eraser button on your Surface Pen to take a screenshot of the entire screen.
- The screenshot will open with Snip & Skitch or the Snipping Tool, where you can edit and save it.
6.1 Edit Surface Pen options
You can change the options if you want to save the screenshot to OneDrive or choose any other option. Please note that the options displayed will vary depending on the Surface model you are using:
- Open the Start menu and go to Settings.
- Go to the “Devices”section.
- Select Windows Pen and Ink.
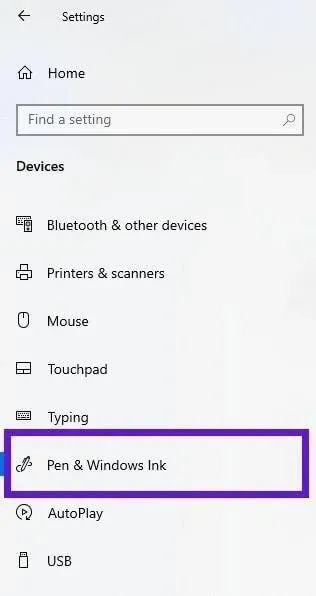
- Choose what happens when you click the Surface pen once or twice.
7. Xbox Game Bar
Xbox Game Bar is designed for gamers as it allows you to take screenshots and record your screen while you play. It also comes preinstalled on Surface, Surface Pro, and Surface Book.
- Go to Settings > Games > Xbox Game Bar to see if it’s turned on.
- Now open the start menu, type.
game bar‘And select an application. - If you see only one widget at the top of the screen, click the camera icon on it.
- The Capture widget opens. Click on the camera icon to take a screenshot.
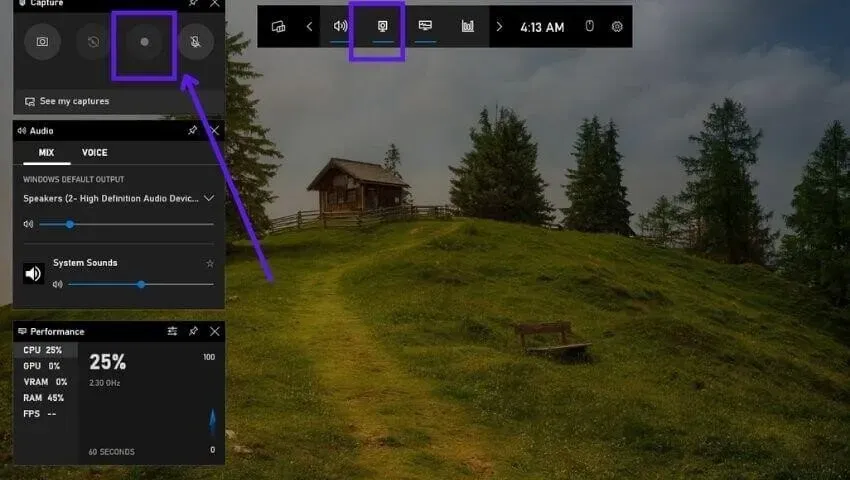
- You will see a notification that a screenshot has been taken.
- Screenshots via Game Bar are saved in This PC > Videos > Captures.
Screenshots from the Xbox Game Bar are taken instantly, as is the Print Screen method. It only takes screenshots of the entire screen and automatically saves them to a folder. This is useful for gamers who want to take screenshots without interrupting the game.
If you are looking for an option that allows you to edit the screenshot before saving, select any part of the screen, and choose a folder for the screenshot, then use methods 3, 4, 5 and 6.
8. Third Party Applications
Some users need additional options that are not available in the above mentioned tools. If you are one of them, look for several applications on the Internet.
8.1 Installing Screenshot Apps from the Microsoft Store
- Open the Microsoft Store.
- Enter “screenshot”in the search field.
- Find free apps and install them.
8.2 Install Android Apps on Window 11 Surface
Android apps are focused on touch screens. So, if you mainly use Surface as a tablet, look for Android apps. Here’s how to install Android apps on Windows 11:
- Open the Microsoft Store.
- Enter “Amazon Appstore”in the search box.
- Install it and run.
- The Amazon Appstore has apps for Android. Find any app you want on it and install it.
8.3 Obtaining Screenshot Applications from the Internet
You can also install screenshot programs the traditional way – by searching Google and installing apps. But if your Surface is running Windows 10 S Mode or Windows 11 S Mode, you won’t be able to install apps from anywhere other than the Microsoft Store. You may need to disable S mode to install apps from the web.
Note. Exiting S-mode is irreversible.
- On Windows 10, go to Settings > Update & Security > Activation > Go to the Store (If you see a Windows Update option, don’t click the Go to Store option below it). On Windows 11, go to Settings > System > Activation > Go to Store.
- The Microsoft Store will open with the Switch Out of S Mode app.
- Click “Get”.
- Once the app is installed, S mode will turn off.
Now to install applications from the web:
- Open a web browser and go to Google.
- Find free screenshot tools for Windows.
- Install a few of them to test them out.
9. Web browser extensions
Taking screenshots in a web browser is more convenient with extensions because screenshot apps don’t allow you to capture the entire web page. At the same time, many web browser extensions allow you to take screenshots of an entire web page.
9.1 Setting a screenshot in Google Chrome, Opera, Microsoft Edge and other Chromium-based browsers
- Open a web browser and go to Google.
- Search for “Chrome Web Store”.
- Open the store and find “screenshot”in it.
- Click More Extensions to see more.
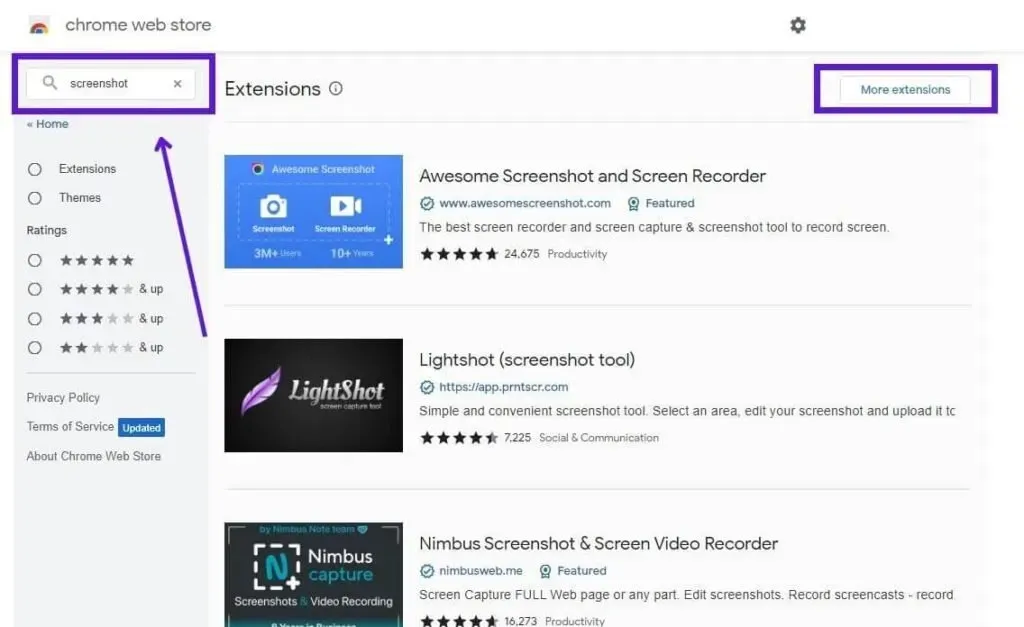
- Find various screenshot extensions and install a few.
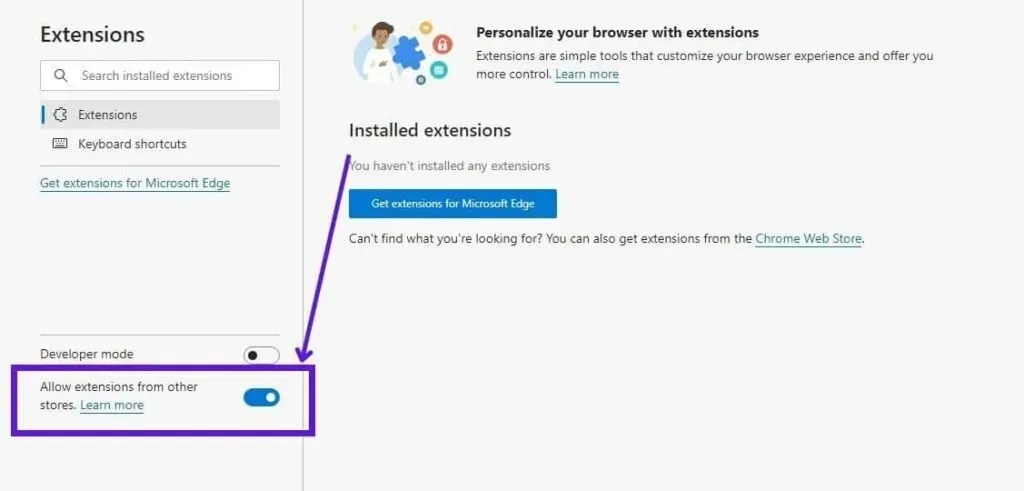
If you’re using Microsoft Edge, follow these steps before installing extensions:
- Go to the three-dot menu > Extensions > Manage extensions.
- Turn on “Allow extensions from other browsers”in the sidebar.
9.2 Finding Screenshot Add-ons in Firefox
- Open Firefox and visit Google.
- Search for “Mozilla add-ons”.
- Open the Mozilla Web Store and search for screenshot add-ons.
Conclusion
You have many options for taking screenshots on Microsoft Surface devices. Read the guide above and use the method that suits your style.
FAQ
How to take a screenshot on Microsoft Surface?
Take a screenshot on Microsoft Surface with the following options: – Press the Power button + Volume keys or Windows button + Volume keys. – Use the Snipping Tool or Snip & Sketch. – Press the Windows key + PrtScn key at the same time.
How to take a screenshot on the surface using the keyboard?
With a Surface keyboard, it’s best to use the PrtScn key if your keyboard has one.– Press the Windows logo key + PrtScn key or Fn + PrtScn keys to take a screenshot of the entire screen.– The screenshot will be saved to This PC > Pictures > Screenshots.
Can you take a screenshot on Surface Pro?
You can take a screenshot on Surface Pro with Xbox Game Bar.– To turn it on, go to Settings > Games > Xbox Game Bar.– Open the Start menu, type game bar, and launch the app.– On the widget at the top of the screen, click the camera icon.– The widget on the left will open. Select the recording icon (solid dot) to start capturing the screen.
How to take a screenshot on a Surface tablet?
On Surface tablets, you can take screenshots by pressing the power button + volume up or volume down buttons. If your Surface has the Windows logo, press the Windows logo and volume up or volume down buttons at the same time.