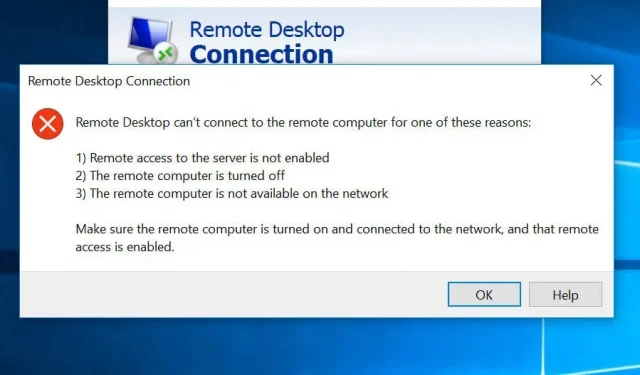

Connecting to a remote computer has become commonplace in today’s society as many businesses have moved to work from home. This, however, can cause many technical complications, including common errors such as “remote desktop cannot connect to the remote computer”.
The most common cause of the “Remote Desktop cannot connect to the remote computer”issue.
Before proceeding, make sure your internet connection is working and you are logging in with the correct credentials as these are the two most common causes of this problem. Apart from these two, there are other reasons for this problem.
- Windows update
- Antivirus
- Public network profile
Windows update
The Remote Desktop (RDP) capability is often broken after a Windows update or update because one of the recently downloaded files can interfere with RDP.
You must manually detect and correct the underlying problem.
Antivirus
Antivirus software can sometimes completely or partially block RDP, resulting in the “remote desktop cannot connect to the remote computer”issue.
The good news is that this inaccuracy is easy to see. Disable your antivirus and try connecting again. If you can, you’ve found the source of the problem!
Public network profile
As a precaution, if you have a public network profile or network group, your computer may disable the Remote Desktop feature.
While this is not a complete list, it does represent the most common ones. The main problem is to solve the “remote desktop cannot connect to the remote computer”problem.
How to solve the problem “Remote Desktop cannot connect to the remote computer”
There are several solutions to this error, so try them one by one until the problem is resolved. This is especially true when the root cause of the problem is unknown.
- Change your firewall settings
- Review your permissions
- Allow remote desktop access.
- Reset the password
- Check the status of the RDP services.
- Enable host IP address
- Explore Group Policy
- Examine the RDP listener port.
- Change network characteristics
- Change the network settings.
1. Change your firewall settings
This is one of the easiest fixes for the “remote desktop cannot connect to the remote computer” error. Turn off the firewall and see if you can connect to the remote computer; if yes, then you found the problem.
Here are the procedures to solve this problem.
- Click “Allow an app through Windows Firewall”from the Start menu. Control Panel > System and Security > Windows Defender Firewall > Allowed Programs is another option.
- Find the “Change Settings”button in the upper right corner of the page and click it.
- You will see a list of applications that are allowed or denied by your firewall. Keep scrolling through the options until you get to “Remote Desktop”. Check the boxes for private and public.
- Close the window and try again. You should now be able to connect to the remote computer if the problem is with the firewall.
2. Check your permissions
To access a remote system via RDP, you must be a member of the local Remote Desktop Users group. This group is empty by default and only admins can add people. Check with your administrator if you can connect using RDP.
3. Allow remote desktop access.
Remote Desktop Connection (RDC) connects your computer to a remote computer over the Internet. If this feature is disabled, you will not be able to connect.
To see if it’s blocked and allow if it is,
- Type “Allow Remote Desktop Connections”in the Start menu.
- Look for the “Change settings to allow remote access to this computer”option.
- Click “Show Settings”next to it.
- Check the box next to “Allow Remote Assistance connections to this computer.”Click Apply and then OK.
These procedures will enable your computer’s RDC.
4. Reset your password
If you log in regularly, your credentials are saved. However, the same credentials can be used when connecting to a different computer, which can cause problems. Make sure you are using the correct credentials for the correct machine.
To recover your credentials,
- Connect to Remote Desktop. It should be in the start menu.
- Enter the IP address of the machine you want to connect to.
- You can change or delete credentials if they have already been saved.
- Make the necessary adjustments.
- This will either reset or change your ID/Password credentials.
5. Check the status of the RDP services.
The “Remote Desktop cannot connect to the remote computer”error message may appear if RDP services are not enabled on either the local or remote computer.
Check if the following services are running on both machines;
- Remote Desktop Services (RDS) (TermService).
- Remote Desktop Services User Mode Port Forwarder (UmRdpService).
You cannot connect to a remote computer if UmRdpService has been disabled by Centralized Group Policy. Start these services if you have administrator rights, or ask an administrator to do so. You may also need to reboot your system after starting this service.
6. Include host IP address
Sometimes Windows will refuse to connect to hosts whose IP addresses are not stored in your hosts file. So, if this is your first time connecting to a computer:
- Launch Command Prompt. To open it, go to Run and type –
cmd. - cd C:/Windows/System32/Drivers/etc. This will display a list of all hosts on your computer.
- If you can’t find the machine you want to connect to, open this file in notepad and manually enter a new IP address.
- To do this, enter notepad hosts.
- After opening the file, put the IP address at the end, save and close it.
If you look in your host file, you should see the host’s IP name.
7. Learn Group Policy
Incorrect Group Policy settings can be the source of the “Remote Desktop cannot connect to the remote computer”issue.
To check and change (if necessary):
- Type
gpedit.mscin the Run box (Windows key + R). - Connections can be found by going to Computer Configuration > Administrative Templates > Windows Components > Remote Desktop Services > Remote Desktop Session Host > Connections.
- Look for the “Allow users to connect remotely using Remote Desktop Services”setting.
- If this setting is currently disabled, change it to Enabled or Not Configured.
- Paste the RDGClientTransport key.
This is a technical repair, so proceed with caution.
In this option, you’ll change the registry entry to require RDP to use RPC/HTTP connections rather than HTTP/UDP connections.
For this
- Outdoor running; pressing Windows + R and type Regedit. Enter the Enter key.
- HKEY_CURRENT_USER > Software > Microsoft > Terminal Server Client
- Go to the right pane, right-click and select New > DWORD (32-bit value).
- This option should be named “RDGClientTransport”.
- Double-click the file you just created. Its characteristics will be displayed and it will be checked whether the data value can be set here.
- Enter the number 1.
- Close the Windows Registry by clicking OK.
8. Check the RDP listener port.
Then check the RDP listener port. If you don’t change it, Remote Desktop will use port 3389 by default. You won’t be able to connect if another program is using the same port.
To check the remote desktop port, follow these steps:
- Press Windows + R and then in the dialog box type
regedit - HKEY_LOCAL_MACHINE > System > CurrentControlSet > Management > Terminal Server > WinStation > RDP-Tcp
- Examine the “PortNumber”value in the right window.
- If the value is 0x00000000d3d, it means that the default port is set to 3389.
- Please change it to 3388 and connect to the remote computer with the new port.
9. Change network characteristics
The root of the connectivity issue could be network settings, as Windows sometimes blocks public networks as a security measure. So, set your privacy settings to private and see if that works.
For this:
- Go to Control Panel > Network and Internet tab.
- Launch Status.
- Select “Edit connection properties”from the drop-down menu. Look for it on the right panel.
- When this window opens, select the “Private Radio”option.
- HKEY_LOCAL_MACHINE > SYSTEM > MANAGEMENT > TERMINAL SERVER > WINSTATIONS > RDP-Tcp
– Check the “PortNumber”value in the right pane.
- If the value is 0x00000000d3d, it means that the default port is 3389.
- Change it to 3388 and use the new port to connect to the remote computer.
10. Change network settings.
Since Windows may periodically restrict public networks as a security measure, network settings can be the source of the connectivity issue. So, change your privacy settings to private and test them out.
To achieve this goal:
- Go to Control Panel > Network and Internet.
- Launch Status.
- From the drop-down list, select Edit connection properties. Find it on the right panel.
- When this window opens, select the “Private”radio button.
Conclusion
The “remote desktop cannot connect to the remote computer” problem is a common one, but there are several solutions because the causes can be very different. Your best strategy is to try each method until you find one that solves your problem, even if it can be a little time consuming.