

It’s easy to blur or cross out faces and sensitive information found in your images on the iPhone – just use Apple’s markup tool for all your obfuscation needs. Video is not so easy. iOS doesn’t have built-in features to blur, edit, or otherwise hide people, objects, and text in videos, but we’ve found a free solution that does the job well without watermarks.
For professional obfuscation with face and object tracking, you usually have to transfer the video to your computer and use expensive programs like Final Cut Pro or ScreenFlow. When editing on your iPhone, there is a very tricky way to hide content in iMovie, but you’re better off using third-party apps that have blur effects and face pixelation. The only problem is that most of them have watermarks, hidden in-app purchases, or ridiculous subscription costs.
We reviewed over 20 iPhone apps available on the App Store, and only one of them stands out for its ease of use, no watermarks, no in-app purchases, and no subscriptions, and it’s called Blur-Video.
Reasons to Use Blur Effects in Your Videos
You should never be too careful when sharing your videos with family and friends via MMS or iMessage; Moreover, your general audience on social platforms such as Instagram, Snapchat, TikTok and YouTube.
The person in your video may not want their face to be covered up on the internet. More importantly, videos can contain personal information such as social security numbers, license plates, addresses, and phone numbers, which can lead to identity theft or invasion of privacy. Even COVID-19 vaccination cards contain sensitive data such as dates of birth.
Sharing sensitive information such as your address, phone number, family names, vehicle information, passwords, work history, credit status, social security numbers, date of birth, school names, passport details, driver’s license numbers, insurance policy numbers, loans, credit/debit card numbers, PINs and bank account information are risky and should be avoided.
Install the app
Blur-Video was developed by Alan Cashway of Honk Honk Punch. All of its apps have in-app purchases that unlock full functionality – everything except Blur-Video. And as we said before, there are currently no watermarks or subscriptions. Of course, this can change at any time, but right now it’s all free and without watermarks.
There are in-app ads that pop up from time to time to help with development costs, but they’re not overly annoying when you consider the value the app provides.
- App Store Link: Blur-Video: Censor with Blur Editor Tool (Free)
Allow access to your videos
The app will ask you to access your camera roll in Photos the first time you open it. Tap “Allow Access”then either “Select Photos”if you want the app to only show certain videos, or “Allow Access to All Photos”which makes it easier to use in the future. Blur-Videos may also ask you to track your activity, which is not required to use the app.
Change video selection
If you select only your favorite videos, you can add more videos or switch to all videos later. For example, after clicking “Start”to view available videos, you might be prompted to “Choose more photos”or “Keep current selection.”If not, you’ll find a “Manage”button at the top that opens up a list of “Select More Photos”or “Allow Access to All Photos”actions.
When you select more videos, the app’s built-in photo picker appears where you can add or remove access to any of your videos. Choosing to switch to all content will open Blur-Video in settings, where you can change your preferences or edit the selected content that Blur-Video sees.
Change the quality and format
Since you won’t be able to change the settings after adding blur to your video, you can first go to the settings to change the quality and make sure the file type is what you want. To do this, tap the settings icon in the upper left corner of the Start page. You can then choose between low, medium or high video quality and MP4 or MOV export. Remember, the higher the quality, the larger the file size.
Select video to edit
After closing the settings page, click “Start”to open the video selector and select a video from the list. Review the “Change video selection”section in step 2 above if you don’t see what you want. Also remember that you must record a video before using it here – Blur-Video does not have a built-in camera.
Add blur or pixelation
You can add a blur or pixelate effect by clicking the “Add Blur”button at the bottom, which will result in a circular blur overlay on your video. To adjust its position, press and hold the orange circle and drag it to the desired location. To create multiple blurs, click the Add Blur button again.
Blur-Video uses Gaussian blur by default, so if you want pixel blur, you’ll need to hit the “Pixelate”button at the top to switch. If you have multiple blurs, they will all be of the same type.
Change strength and shape
To change the amount of blur or pixelation, use the Strength slider at the top. As with the blur type, changing the strength affects all blurs if there is more than one; You don’t have the option to change the individual degrees of blur.
In addition, the application allows you to change the size of the blur and even its shape. Touch and hold the arrow buttons, then drag it to the side or to the blur side to increase or decrease its size. To change the shape from a circle, click the Rectangle button on the toolbar to switch to a square. Dragging the arrow button will also change the shape of the blur from a circle to an ellipse or from a square to a rectangle.
Change the duration
You might want to make sure the blur doesn’t happen outside of the scene where you want it. To do this, click and hold on the gray ends of the blur in the timeline. Then drag them in or out to shorten or lengthen the clip. You can also click and hold on the entire blue clip until the gray ends disappear, and then move it up or down the timeline to get it in the right place.
Track faces and other objects with keyframes
If the person or object you’re blurring is moving, you can use a keyframe to make the rectangle or circle follow. To do this, pause the video where the person is moving, tap Keyframe, and move the blur wherever you want. The keyframe will appear as a diamond on the timeline. If you let the video play, you’ll see the blur slowly move to the position you choose.
We recommend waiting until the element is further from the original blur point and pressing the keyframe button. You may need to experiment a bit before you get comfortable.
Keyframing can be a little tedious if you have videos with people constantly moving. The more the object moves, the more keyframes you will need. In my example, I had over 20 different keyframes to follow the man’s face for about 13 seconds. Hopefully Blur-Video will include an auto-tracking feature to automate the process, but the manual way works just fine.
Save and share your video
The last step is to just save it. Once you click Save, Blur-Video will save the video as a new clip in the Photos app. You can also share it right after it does so using the share button, which brings up your iPhone’s share sheet, where all the usual share and action extensions are.
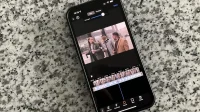
Final product
Once the app has finished saving the video to your iPhone, you can play it from the Photos app. Your video will have a blurry or pixelated effect after the object or objects you wanted to hide. In the example below, the man’s face was blurred throughout the video.