

Is your PlayStation 4 constantly disconnecting from Wi-Fi? Are you worried about the constant shutdown? Well, we’ve got you covered! Here’s how to fix a PS4 that keeps disconnecting from the router.
Why does PS4 keep disconnecting from the internet?
Smooth and uninterrupted gaming is every gamer’s dream, and in such cases, losing the game just because of Wi-Fi connection problems creates havoc.
However, if you’re having trouble connecting to the Internet while setting up your wireless network, you can think of a variety of reasons that could be causing the disconnect.
First and foremost is interference from other devices connected via the same Wi-Fi device, including PS4 hardware issues.
How to fix when PS4 keeps disconnecting from WiFi?
To understand the problem, you need to consider the nature of the problem’s extreme, which makes you wary of connection problems!
We are here to bring you the best solutions to your PlayStation shutdown issues.
Hence, if you want to solve all your signal problems, dive into this blog and find out how to quickly troubleshoot and fix the permanent blackout!
Below is a list of the most common problems and how to resolve them with step-by-step instructions:
Solutions to Fix PS4 Keeps Disconnecting from WiFi
- Perform a Wi-Fi connection test on PS4.
- Select Manual Wi-Fi Frequency Band
- Update the firmware of your Wi-Fi router
- Update the PlayStation Firmware
- Uninstall and reinstall the game
- Change your PS4 DNS settings.
- Set up a static IP address (stable) for your PlayStation
- Rebuild Database on PS4
- Reset PS4 Console and Router to Factory Defaults
- Connect your PS4 with Ethernet cable connections if you’re still having connection issues
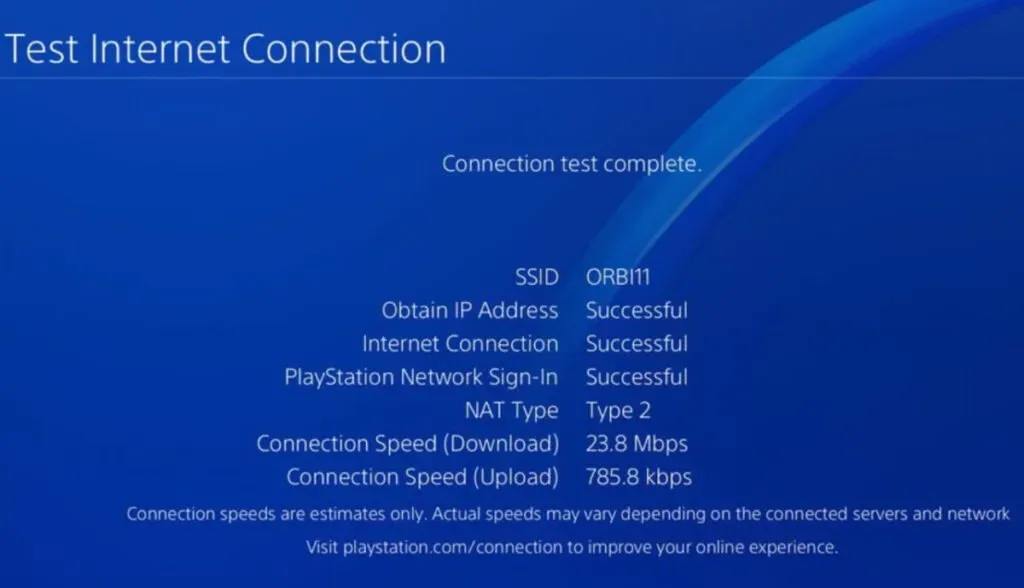
1. Test Wi-Fi connection on PS4.
Sometimes disconnection occurs due to a temporary lack of communication between the PS4 modules and Wi-Fi. In the event of such a failure, it is advisable to perform a connection test. Here is how you can do the same:
- Go to Ps4 settings (don’t forget to place your router 5-6 feet away from your PS4 console while testing).
- Then select “PS4 Network Settings”and open “Test Internet Connection”.
This connection test determines if the Internet is working at all and actually displays the download speed. (If the download speed exceeds 25 MB/s, it is safe to assume that there is no problem with the Internet connection)
2. Select a manual Wi-Fi frequency band.
As many users pointed out, the automatic selection of the strap function in the latest PS4 models (for example, PS4 Pro) is one of the reasons for disabling by default.
Older models tend to support 2.4GHz, while newer devices support 2.4GHz and 5GHz (PS4 Pro supports 5GHz).
The new model always switches between frequency bands to use the faster one. Which also causes some games to freeze and even lose the Wi-Fi connection for a few seconds.
Here’s how to fix it:
- Navigate to the settings on the PlayStation 4 home screen.
- Then select “Network settings”and click “Internet connection settings”.
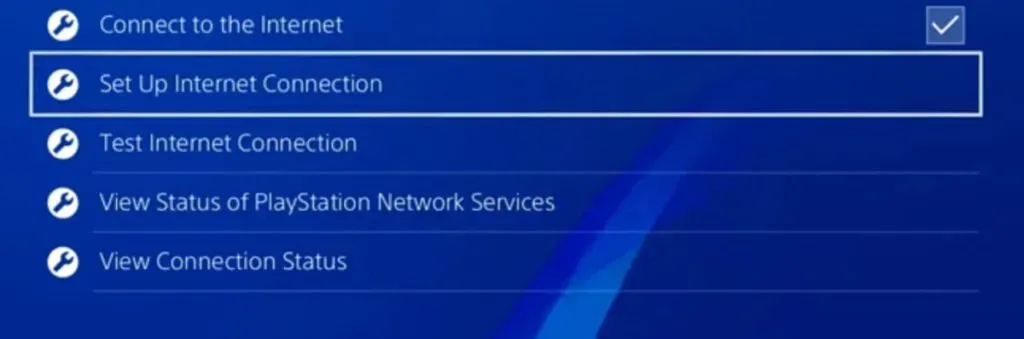
- Click “Use WIFI”.
- Finally, after pressing Easy, find the Options menu at the bottom of the screen.
- Now, for your convenience, select the 2.4GHz or 5GHz band under Wi-Fi frequencies.
3. Update the firmware of your Wi-Fi router.
Outdated firmware on your router may be causing your PlayStation 4 to disconnect from WIFI. Therefore, it is recommended to check for updates.
Here is how you can update the firmware:
- Open the router’s web portal from the web page.
- Then select the “Tools”option.
- Now select the “Firmware”tab. However, you will find an option similar to Check for the latest firmware.
- Thus, select the option button labeled “Check now”. Then and there you will know if a firmware update is available or not.
- Finally, reboot your router after a successful update.
4. Update the PlayStation firmware.
Just like with a router, outdated firmware on your PS4 is also causing Wi-Fi connectivity issues. However, you can check for PS4 updates very easily.
Here’s how you can update your PlayStation:
- Open your PS4 settings.
- Then select the Update System Software option.
- By clicking the Update Now button, we can check if an update is available.
- Finally, install the update and configure your router settings.
5. Uninstall and reinstall the game
Sometimes it even depends on the game you are playing. Some games download malware with them that creates problems and plays an active role in turning off Wi-Fi from the PlayStation.
In this case, it is better to uninstall and reinstall the desired game you are playing.
Here’s how to fix and initialize PS4 games:
Steps to re-initialize a game on PS4
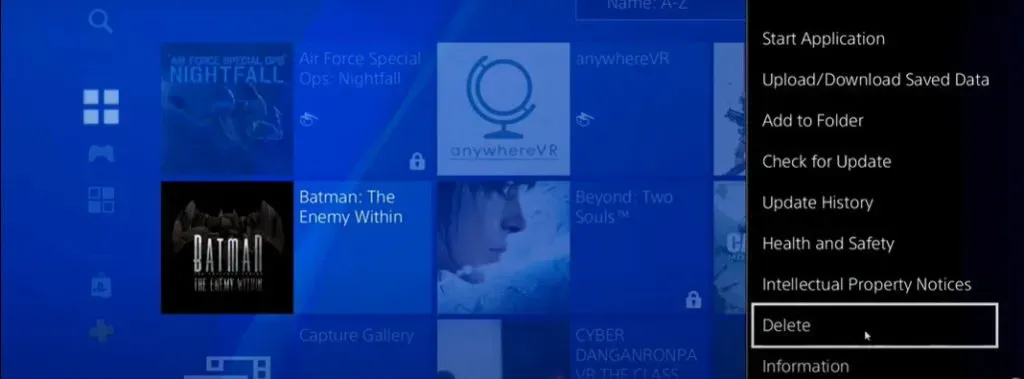
- On PS4, go to the games section and select the game from the menu.
- Then press the options button available on the PS4 controller.
- Now select Remove from the menu. Then delete the game by clicking Confirm.
However, after uninstalling the game, you can reinstall it using the physical disc. You can also re-download it from the PlayStation Store.
6. Change PS4 DNS settings.
Basically, changing your PS4’s DNS (Domain Name System) settings will increase your internet speed. Hence, changing the basic DNS settings will resolve the connectivity issue.
The good news is that there are many more efficient DNS available on the Internet. Thus, you can choose the most suitable option.
(Our recommendation: Cloudflare or Google DNS)
Steps to Change PS4 DNS Settings:
- Open Settings on PS4. Then click on the “Network”option.
- Now select “Internet connection setup”.
- Then choose Wi-Fi and select “Custom”.
- Now select the “Automatic”option from the IP address settings menu.
- Select Do not specify for the DHCP host name.
- Then click “Manual”in the “DNS Settings”section.
- Enter (8.8.8.8) for Google Primary DNS and enter (8.8.4.4) for Google Secondary DNS.
- Then click “Automatic”for MTU settings.
- Now select “Do not use”in the “Proxy Server”section. Finally, click “Test Internet Connection”.
7. Set up a static IP address (stable) for your PlayStation.
The PlayStation 4 comes with a dynamic IP address. Whenever you reboot your router, your Internet Service Provider decides to assign you a new address, and the dynamic IP addresses are thus changed.
However, static IP addresses will never change as they are more stable.
Here’s how to change your local IP address (Note: this doesn’t change the public IP address).
Steps to Change IP Address on PS4
- On PS4, go to Settings, then select Network.
- Then click View Connection Status.
- Now write down the IP address before moving on.
- Later, pay attention to the subnet mask, default gateway and return to the previous menu.
- Now go to “Setting Up an Internet Connection”then select the “Use Wi-Fi”option.
- Then select the “Custom”option and select “Manual”.
- Store the first three digits of your IP address as usual and choose any digit of your choice as the last digit (from 2 to 255).
- Now enter the default gateway and subnet mask we asked you to write down.
- Then click “Automatic”for MTU settings.
- Now select “Do not use”in the “Proxy Server”section. Finally, click “Test Internet Connection”.
8. Rebuild the database on PS4.
Well! PS4 database recovery is the best solution to fix any software error. We can rebuild the database on PS4 like this:
- Turn off the Playstation.
- Now press and hold the Power button for 10 seconds. Hence, the PS4 will boot into Safe Mode.
- Then use a USB cable to connect your Dualshock 4 controller to your PS4.
- Now press the PlayStation button on your controller. Then select Rebuild Database using the X button on the controller.
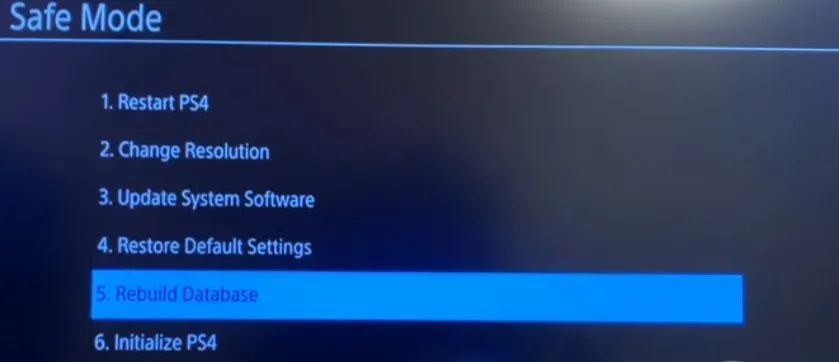
- The PS4 will now boot up automatically. (This may take some time)
- Finally, sign in to PlayStation Network and select Connect Wi-Fi.
9. Reset your PS4 console and router to factory default settings.
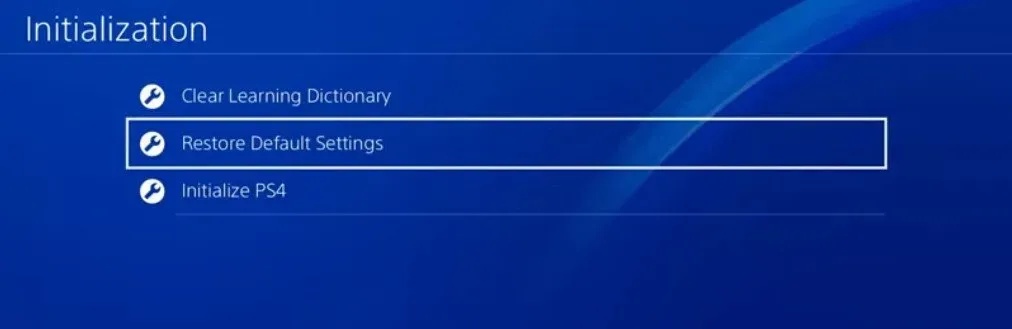
If nothing works on your PS4, one of your best options would be to reset your router and PlayStation to factory defaults. However, this process may also erase most of the data, including the games you have downloaded.
10. Connect your PS4 using Ethernet cable connections if you are still having connection problems.
Ultimately, if the above solutions didn’t work for you, try the last and best option. The only option available is to connect the PS4 with an Ethernet cable.
Ethernet cable connection provides faster internet connection than PS4. Therefore, it enhances gaming performance more than wireless devices.
How to Connect PS4 Using Ethernet Port
- Connect an Ethernet cable to the Ethernet ports on your router and then to your PS4.
- Now turn on your PS4 and router.
- Go to “Settings”on PS4.
- Then select the “Network”option and go to “Setting Up an Internet Connection”.
- Now click “Use a LAN cable”and finally select the “Easy”option.
Conclusion
Also, PS4 internet connection issues can be hectic, but we hope our guide has covered the most common and rare issues. However, if you still don’t know how to fix PS4 that keeps disconnecting from Wi-Fi, our top 10 solutions will guide you through troubleshooting.
In the meantime, you can also contact Sony Support for further assistance. We wish you great gaming days!
FAQ
How to fix frequent Wi-Fi connection loss on PS4?
First of all, check the basic cabling, DNS settings, firmware issues, router placement, etc. If the issue still persists, check for hardware and software issues.
Ps4 keeps disconnecting from Wi-Fi when turned off?
Check for firmware updates on your PS4 and router. Outdated firmware may affect automatic connection.
How can I use a LAN cable to work on PS4?
All you need is to connect the PS4’s LAN port to your router with a LAN cable. Then change the settings to “Use network cable on PS4”.
How do I connect my PS4 Pro to a 5GHz Wi-Fi network?
Change the settings on PS4 pro consoles manually. Change the frequency band to 5GHz on PS4 Pro from now on.