
Screenshots are undoubtedly a boon for those Android users who want an easy way to take a screenshot of a specific part of the screen and share it on the go. But have you thought about screen recording? Isn’t that the best way to take a screenshot?

Unlike screenshots, screen recording captures more content on the screen in video format. It is also part of the system apps in the quick settings of LG, Samsung, Xiaomi, OnePlus, etc. And it is easy to use. We know that you must have wondered how to record screen on Android as it is the most used operating system.
In this article, we will discuss all possible ways to record screen on Android. And not only that, but also other important information.
So, let’s start without further ado.
Why do you need a screen recorder?
Before moving on to how to record a screen on Android, let’s answer the question – why do you need a screen recorder. It is the most useful screen capture tool.
Screen recording is responsible for creating a video from the screen. But that’s not all. There are other important reasons why you need a screen recorder. Below are some of the common ones.
1. Effective demo
As mentioned above, a screen recorder is an effective tool for showing what you saw on your device screen to others. For example, if you want to show the video editing process, you can record the screen while doing it on your device. It will record all steps and processes. And you can share this video with anyone. Isn’t that cool?
And the best part is that you can watch the video tutorials as many times as you want.
2. Create a short video
As in the example above, we have explained that screen recorder can be a short explanation. For example, you wanted to capture a scene from a movie or video. You can do it with the screen recorder on your phone and share it with others.
3. Use to report bugs
If you encounter any error or error while using your phone or any application, you can always record them from your screen with a screen recorder. You can then share the post with a developer so they understand the problem and suggest a solution.
Again, to demonstrate the solution, the developer can also use a screen recorder to record the solution needed for your bug.
4. Use to Record Meetings
Meetings are now hosted online everywhere, saving valuable time and increasing convenience. The screen recorder also plays an important role here.
You can record meetings, webinars, school lectures, etc. and view them later. These are the kind of notes that you will take during the process so that you can be more present in the moment and not just write something.
5. Record gameplay
Currently, online gaming is the most common activity that people do on phones. And they use a screen recorder to record gameplay to share later. This can be used to explain the game to others. Or, in some cases, they upload these videos online among their subscribers or followers.
Similarly, there are several other cases where a screen recorder comes in handy for both the recording device and the target user.
Why use the built-in screen recorder?
There are several third-party applications created for each purpose, the same is true in the case of screen recording. Then why should anyone prefer a built-in voice recorder to them?
Here is the answer.
Violation of confidentiality is possible in the case of third-party applications. Hence, if you want to keep your device data safe, you should always enable your device’s built-in screen recording app.
Now there is no built-in recorder in older versions of Android. Hence, in this scenario, you will have to rely on third party applications.
How to enable hidden screen recording in Android 10?
Although the latest versions of Android have a default screen recording app, mostly in the notification bar, it is not enabled by default.
Following are the steps required to enable the hidden screen recorder in Android 10.
- Enable Developer Options
This is an important step to enable USB debugging, which is required for the process of connecting your phone to a PC later on. Follow the steps below to enable developer options.
- Open the Settings app on your phone.
- Click on the System/About phone option.
- Click on the About Phone tab by scrolling down. Some models have this option right at the top of the settings.
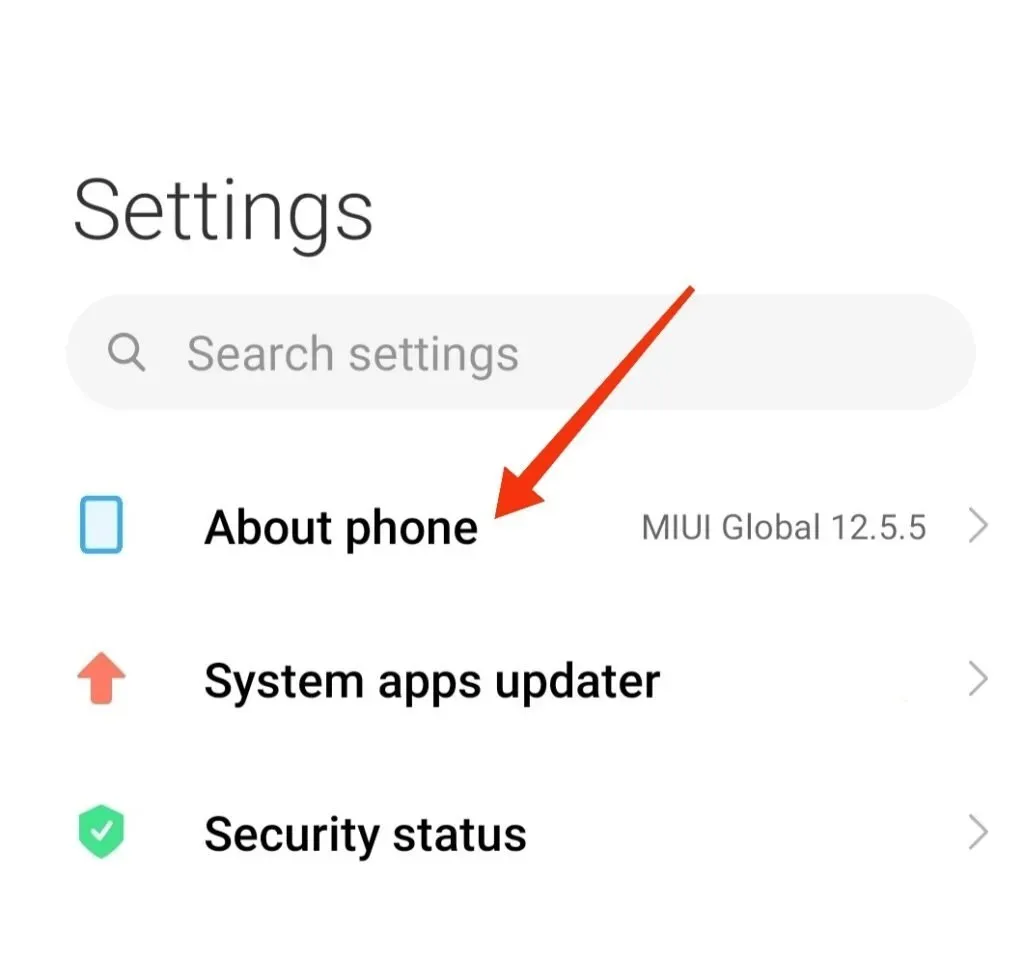
- Note the build number. Alternatively, find the version number.
- Click on the number seven times.
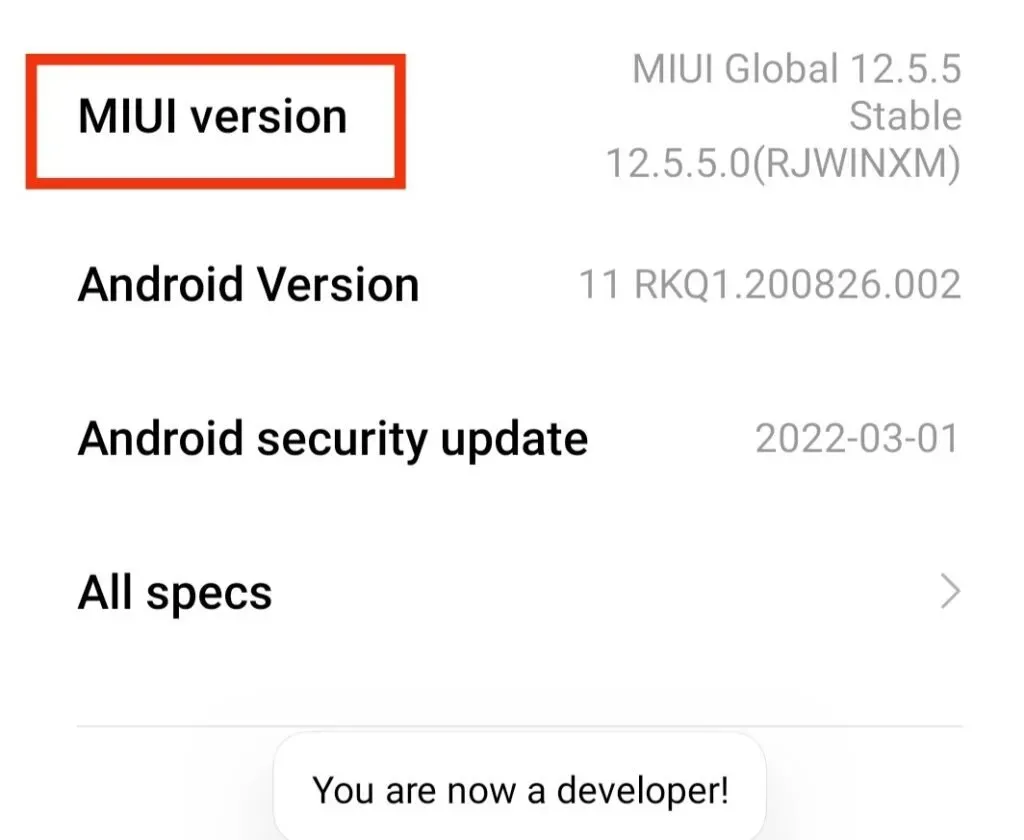
- Return to the System tab.
- You will now find Developer Options.
- Enable USB Debugging
After enabling developer options, you can enable USB debugging. To do this, follow these steps.
- Open your phone’s settings.
- Click on the System tab.
- Open Advanced Settings.
- Enable USB debugging by clicking “Developer Options”.
- Install the Android SDK Platform
You need to install Android SDK platform from Google Android Developer tools according to your desktop operating system.
- Use the ADB command
After installing the Android SDK platform, you can move on to the next steps.
- Open the platform-tools folder on your PC.
- Enter cmd in the file path field.
- A command line window will appear on the screen.
- Connect your phone to PC with a USB cable.
- Type adb devices and hit enter after connecting your phone.
- Type this command and press Enter. In ADB shell settings set global settings_screenrecord_long_press to true,
- The above command will add a hidden screen recording application to the power menu of the device.
- Use the built-in screen recorder
If you don’t know how to use the screen recorder on your device, you can follow these steps:
- Press and hold your phone’s power button. It will take a screenshot and then tap on the screenshot option.
- You have to choose whether you want to record the voiceover or not.
- You need to agree to the warning that appears on the screen.
- Click on the “Start Now”option and proceed with the screen recording process.
By default, all your screen recordings are saved in the Gallery app.
What is the standard way to record screen on Android device?
You can record screen with or without sound. And below are the steps required for this.
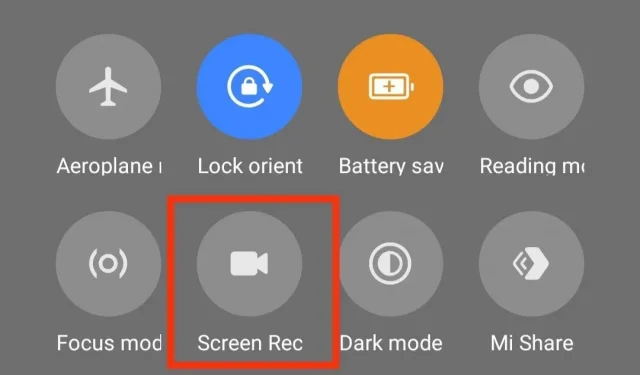
- Swipe down on the notifications panel on the lock or home screen. Here you will find the screen recording app.
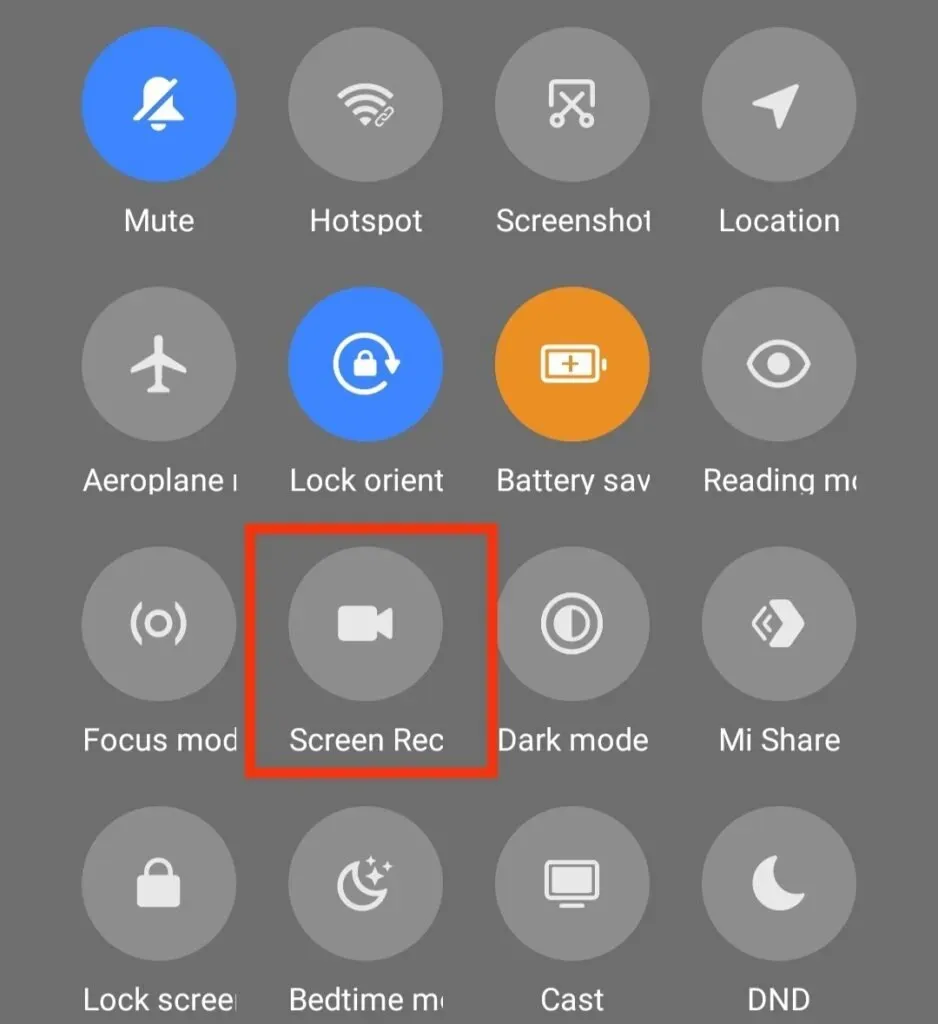
- If you are using the app for the first time, it may not appear there. In this case, tap the pencil icon to customize the notification panel. Find the screen recorder icon and drag it up. Click the tiny arrow to close this and the app will appear in the quick settings menu.
- Swipe down again on the notification bar.
- Click on the screen recording icon. It has a video icon.
- Choose whether you want to record the screen with or without sound. Also, you can customize it if you want the app to detect when you tap the screen or not.
- Start recording by clicking on the “Start”button.
- Click on the “Stop”option when you’re done recording.
- The recording will be saved in your main Gallery app among other files.
You can also edit the screen recording while editing screenshots.
9 Best Third-Party Screen Recording Apps for Android
As mentioned above, not all versions of Android support the screen recording feature. Several third-party screen recording apps for Android devices are specifically designed for this.
Some of them are free and offer advanced features. We have mentioned 9 best such apps to help you.
- AZ screen recorder
- Mobizen Screen Recorder
- Google Play Games
- ADV Screen Recorder
- Super Screen Recorder
- Screen Recorder by InShot (XRecorder)
- Screen Recorder V
- Vidma Screen Recorder
- Apowersoft Screen Recorder
1. AZ screen recorder
You may have heard of AZ Screen Recorder as it is one of the best screen recording apps. It provides several additional features for screen recording at no extra charge.
This includes resolution selection from 240p to 1080p, frame rate from 20 FPS to 60 FPS, bitrate from 1 Mbps to 12 Mbps, choice of audio recording (internal or external), taps, setting a timer to 60 seconds, and more. other. more.
These were the main features that support screen recording and some of its additional features are:
- Merge two or more videos.
- Create a slow motion video.
- Add your own audio to the video by replacing the original.
- Change the playback speed from 1/3 to 3x.
- Advanced ways to stop recording. For example, by shaking or turning off the phone.
- Add text to video.
- Export video as GIF
You can use the app for free or purchase the premium version. The premium version offers additional benefits, including no ads.
2. Mobizen Screen Recorder

Mobizen is another screen recording app that provides basic and a few additional benefits. Hence, it is among the worthy applications. You can have all of the following features or benefits with this application.
- You have options for different resolutions from 240p to 1080p.
- You can select different data rates from 0.5Mbps to 12Mbps.
- There are different frame rates, from 5FPS to 60 FPS.
- Other features are also available, such as video editing options, countdown options, face camera options, touch recording options, etc.
You can record your android screen without any watermarks, timers or air circles as this app also has a clean recording feature. Not only that, if you’re using the app offline, you can always replace the app’s watermark with your own.
You can track the time by looking at the length of the video. Most of its features are free to use, but if ads annoy you, the Premium version can also solve this problem.
3. Google Play Games
Google Play Games is another great game that comes preinstalled on most Android devices. While most don’t know that it can be used for screen recording, surprisingly it does! If you don’t have it on your phone, we highly recommend it, especially if you are looking for a Game Play screen recording.
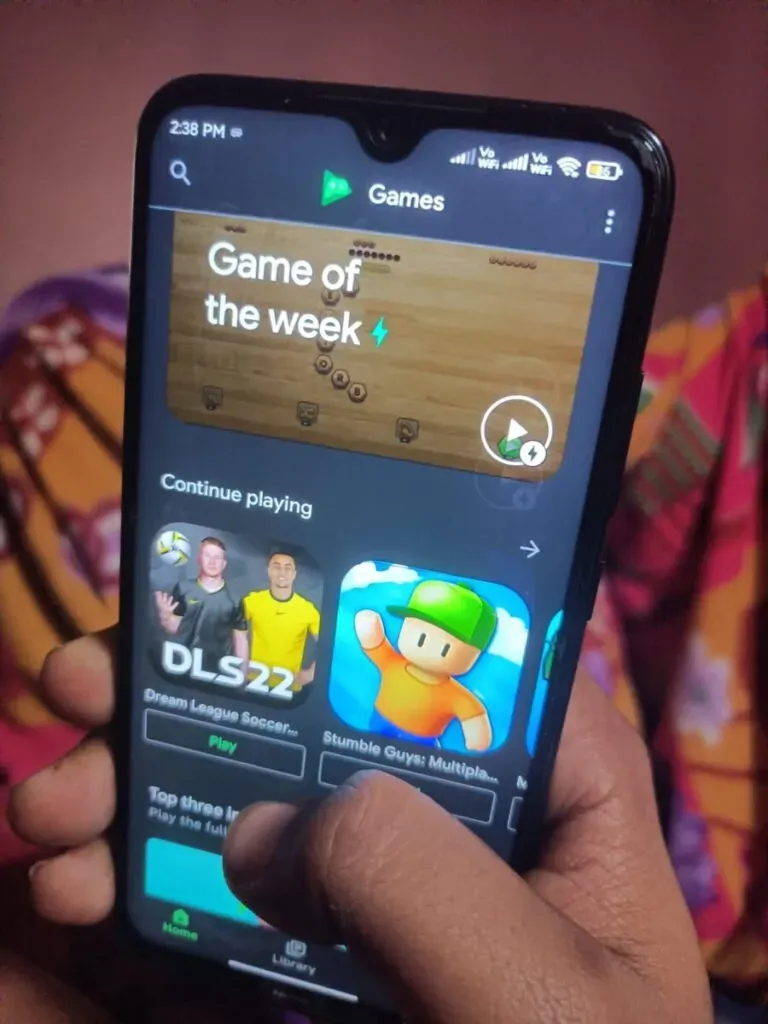
However, it also has certain limitations. For example, it can only record a few apps on your phone.
The main advantage of this app is the Face Cam feature. It will help you to view the record of each game in Google Play. To do this, follow these steps.
- Open the Google Play app on your device.
- Find your game in the app.
- In the upper right corner of the screen, tap the “Record”icon.
- Select the video quality you want to record the screen in. There are two options – 480p and 720p. The latter will use more data.
- Next, you need to start the game and the recording will start.
4. ADV Screen Recorder
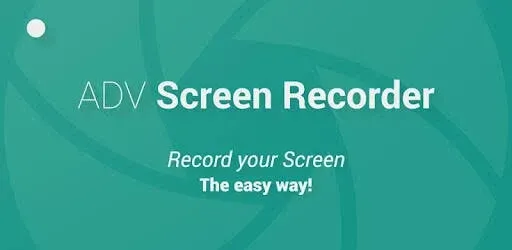
If your device doesn’t have a built-in screen recording app, this ADV Screen Recorder is a good option to check out. This is one of the simplest applications. Just install it, click to record, and that’s it. But the icing on the cake is the additional features it offers along with all the basic ones.
Some of the interesting features:
- You can choose frame rate, bit rate and video resolution which can be customized.
- If you want to highlight text or something in a video, you enter text on it.
- You can use both the front and rear camera while recording the screen after it is paused.
And as soon as you finish the recording process, stop it. And then you can save it to storage and edit it later when it’s convenient for you.
5. Super screen recorder
Although we do not offer the above tools for professional purposes, Super Screen Recorder is the best application for professional users. This app is free to use, it does not watermark any recordings, and there is no root time or time limit for screen recording.
You can use this app to create Full HD videos.
This app offers the following features.
- Live Streaming: You can stream live on multiple social media platforms.
- Brush Tool: You can draw on the screen by touching it.
- Video editor: cut/crop video, merge video, add background music, compress video, rotate video, doubling voice, trim video area, adjust video speed, you can remove video watermark.
- GIFs Maker: You can convert video to GIF.
So, not only can you record screen with this app, but you can also do many more things. And it is for this reason that this application is highly recommended for professionals. You can download this application from the Google Play store.
6. Screen Recorder by InShot (XRecorder)
Inshot is one of the best video editing apps that is mainly used for editing cutscenes, videos, images, etc. There is also a screen recording app known as Xrecorder by InShot. It has a simple user interface making the whole process easy.
This application has a unique drawing feature that you can use to mark areas while recording on the screen. And this feature is responsible for its popularity among users.
Other than that, below are some of the features offered by this app.
- You have full control over the video quality.
- You can choose the resolution and bitrate of the file (small or large).
- It supports multiple audio features.
Thus, we can conclude that XRecorder is the best screen recording app with amazing features and you should try it.
7. Screen Recorder V
This Screen Recorder V app is similar to AZ Screen Recorder in terms of settings. It has been installed by over 50 million people. And hence, it is well known among Android users. You have the following when it comes to recording quality.
- Resolution: 240p to 2K,
- Bitrate: 2 Mbps to 15 Mbps,
- Frame rate: 24 to 60 fps.
But some features are only available to paid users. And besides these basic functions, some other functions:
- It has touch gesture function.
- It also has a countdown feature that gives you 3 seconds to start recording.
- You can record both types of audio, internal and external, during screen recording.
- There is no watermark on the recording of this application.
- You can use your own watermark from your gallery to add it to your posts.
- You can stop the recording from the notification bar or the overlay toolbar.
8. Vidma Screen Recorder

The main reason why most users prefer Vidma Screen Recorder is that its features are available for free. The free version of this app offers the following features:
- Resolution up to 1080p.
- You can adjust the bitrate.
- You can set a countdown of 10 seconds before recording starts.
Additional features of this app include:
- Shake your device to stop recording.
- You can hide the current notification.
- You can allow touches to be visible in recordings.
- You can set the timer, etc.
We value this application the most because it is the easiest to use. You don’t need to grant multiple permissions. Install the app and start recording. Hence, if you are trying out the screen recording feature for the first time, this is the best option.
9. Apowersoft Screen Recorder

Apowersoft Screen Recorder might be another app in the whole list because of its 1440p recording feature. Not only that, the lowest resolution this app offers is 360p. At the same time, most of the apps on the list offer 240p as the lowest resolution.
It offers bitrates from 1Mbps to 12Mbps and frame rates from 24fps to 60fps. You can easily find your entries on your device as they can be given prefix names.
You can also customize the floating recording icon to be more organized. You can also use touch gestures.
However, this application has an important flaw that affects its users the most. And that is, you can record the internal sound. Therefore, only external audio is recorded with this application.
So, these were the top 9 third-party Android screen recorders.
How to edit screen recordings on Android?
We have discussed all the ways to record screen on Android. But what if you want to edit it? Is there a way to edit screen recordings on Android? Yes, indeed, there are several ways to edit screen recordings.
Editing may remove any information that could lead to a security or privacy breach if leaked. Or maybe you just want the video to be more fun, exciting, and interesting.
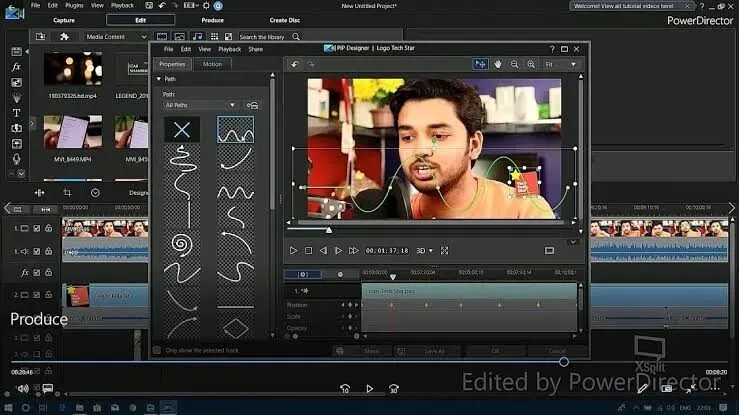
Common cropping and cropping effects can be easily done with the built-in Android app. But when it comes to advanced editing, you have to download an additional app. And we think PowerDirector is the best app for you. It allows you to use the following features:
- Crop, zoom, crop and pan your recording.
- Add captions to the recording.
- Add arrows.
- Add sound bytes and voice-overs to recordings.
- Add effects and stickers to videos.
If you have no previous experience, this is also the best app for you to start.
Following are the steps of some major changes with this application.
To add pan and zoom to a screen recording:
- Upload screen recording to PowerDirector app.
- Add video to the timeline.
- Touch the video in the timeline and touch the pencil icon to edit.
- Click on select Pan and Zoom.
- For scaling, motion selects a start and end position.
- See the result in preview and make any necessary adjustments to the zoom movement.
To add a voice-over to a screen recording:
- Drag the blue line on the video where you want to add a voiceover. This should be where you want the sound to start from.
- On the left toolbar, tap the media icon.
- Open the Music tab.
- In the right corner, click on the microphone icon.
- On the left side, press the REC button.
- Then start talking.
- To stop audio recording, click on the record button.
- You can save, reshoot or delete as you wish.
- You can also change the duration of a clip by dragging the edges.
To add text captions to a screen recording:
- Click on the overlay icon on the left side.
- Select the Default option on the Text tab. This will allow you to adjust the text size, placement, and font.
- Click on the text in the entry to edit it.
- Drag it on the video preview to change its position.
- You can change the length of the caption by adjusting the edges of the text on the timeline.
- Repeat these steps to add as many labels as you like.
The PowerDirector app is free to install and can be used for clips, videos and more. Therefore, you should download it immediately and start editing your posts.
Conclusion
By now, you must have understood all the options and ways to record Android screens. And we hope we have solved your question on how to record screen on Android.
You should always consider using the built-in screen recorder to record your screen as it is safer to use. Third party applications may lead to privacy violations. But if you still prefer them, you can choose the best, based on your convenience, from the list above.
Frequently Asked Questions (FAQ)
Does Android 10 have a built-in voice recorder?
Yes, Android 10 has a built-in screen recording feature. It should be in the menu of your device; if you can’t find it, it might be hidden in the main menu. You can follow the steps above to find hidden built-in apps.
What is the best screen recorder for Android?
The above list mentioned some of the best screen recording apps for Android such as AZ Screen Recorder, Screen Recorder by InShot (XRecorder), Vidma Screen Recorder, Google Play Games and more. Although the best app to use would be the built-in screen recorder app on your phone.
What versions of Android don’t have a built-in screen recorder?
Versions of Android prior to 10 may not have a built-in screen recorder. Or older versions may not have this app.