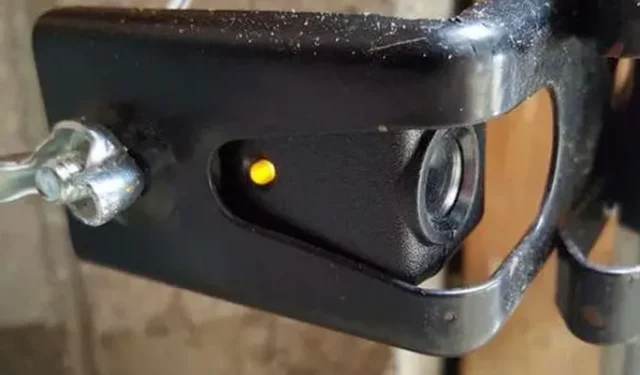

If you are seeing “Amber Light on Garage Door Sensor”there may be a problem with your security sensors if you are having trouble closing but not opening your garage door. These sensors are used to make sure nothing is preventing the lower door from closing.
Garage door sensors can make your door open but not close because they only affect the closing of the door. Because of their location, they are often pushed around, moved around, or covered in dust, dirt, or leaves in the garage.
How to fix yellow light on garage door sensor?
- Remove anything that interferes with the security sensors.
- Sensor Alignment Problem
- Problem with damaged or broken sensor wires
- Replacement of obsolete sensors with new sensors
1. Remove objects that interfere with the safety sensors.
If the green blinking open light comes on, the problem may be that the safety sensors are blocked or misaligned. However, faulty security sensors and wiring can also cause the garage door sensor to turn amber.
- These sensors use an infrared beam of light to prevent garage doors from closing in order to identify objects in the space between them.
- The door will not close if something interferes with these two sensors because it blocks the infrared light beam.
- Everything in between must be removed.
2. Sensor alignment problem
An alignment issue is probably to blame if nothing is interfering with the garage door sensors. When the sensors show a yellow light on the garage door sensor, the problem may be that the sensors are not aligned.
- You need a wrench and a tape measure. Using these tools, do the following:
- Make sure your garage door sensors are at least 6 inches off the ground.
- The exact height at which this garage sensor is located must be measured and recorded.
- Measure the exact height of the second sensor there. You will need to make adjustments if the height is not the same as the other sensor.
- For a second sensor, as needed, simply use a wrench to remove the wing nut and raise the sensor to the same level as the first sensor.
- After following these instructions, the garage door opener should work normally and a beam of infrared light should appear.
- If the problem persists, the green light flashes and the yellow garage door sensor light is still on. You should explore alternative options.
- One possible cause could be a spider web or other clogging of the sensor lens with dirt or debris.
- If you see dirt on the lens, clean it and you should be good to go.
3. Problem with damaged or broken sensor wires
Garage door sensors must function properly. But if the problem with the amber light sensor on the garage door persists, there may be a wiring problem.
- Most of the wiring going through the walls won’t be visible to you, but you can inspect the wires you see.
- Inspect the two wires going to the two sensors to make sure they are not disconnected or damaged.
- Just reconnect the wires if you see them broken, but turn off the garage door opener first.
- You will need to buy new wires if the old ones are worn or damaged.
4. Replacement of obsolete sensors with new sensors
The problem is with the sensors if you have checked the wiring and the wires are ok but the garage door opener is still not working. Sensors can fail after extended use, just like any other electronic device causing a yellow light on a garage door sensor.
- The most common causes are age, exposure to water, and prolonged sun exposure.
- You don’t need prior experience to complete the process of replacing obsolete sensors with new ones.
- Once you have your wrench and new garage door sensors, you are ready to replace them.
- These sensors are affordable and you can easily find them on Amazon at any home improvement store.
When replacing sensors, the following steps are performed:
- Disable your garage door opener immediately.
- Use a wrench to remove the wing nuts from the garage door sensors.
- Just disable the sensors and remove them.
- The new sensors should now be attached to the same location. Make sure they are the same height.
- Finally, attach the sensors to the garage door by tightening the wing nuts with a tool.
What does the yellow light on the garage door sensor mean?
The presence of an amber light on the garage door sensor indicates that the reverse safety sensors are misaligned or blocked, preventing the signal from getting through. Until the problem is fixed, your garage door will not close.
Why is one garage door sensor green and the other yellow?
1. Offset sensors
Garage doors have two sensors, one of which is responsible for transmitting an infrared beam, and the other for receiving a signal to open or close the door.
- When both sensors are working properly, their garage door yellow light sensor and green LEDs emit constant illumination.
- If no backlight is produced, one or both sensors are faulty.
2. Broken or dried wires:
If the sensors are aligned correctly but the door does not open, there may be a wiring problem. First check the wires of both sensors to see if there are broken wires hanging down.
- Dry wire aging sensors can also cause poor wire connections.
- Make an appointment with an electrician to fix damaged wiring.
- See if you can fix the yellow light sensor on your garage door.
3. Sensor failure
If the problem persists, one or both sensors are faulty. The cause may be wear and tear, exposure to bright sunlight, or even old age.
- You will need to replace the damaged sensor with a new one that you can install yourself or call an electrician.
What shade of light should garage door sensors have?
Transmitter and receiver are two different types of sensors.
Both have a built-in LED that should light up when connected to a power source.
- When both sensors are working properly, the receiver’s LED will only glow green.
- The transmitter sensor LED will only turn yellow on the garage door sensor.
- There must be a problem with the power supply if there is no light.
- Other colored indicators may indicate sensor problems if visible.
How are garage door sensors reset?
- Keep pressing and holding the garage door button
- Manually open the garage door
- Change the location of the sensors
- Your garage door has a button mounted next to the wall of the door; You must do this in order for the door to close.
- Continue holding the garage door button until the door closes.
- The sensors will be disabled while you hold the button, allowing you to open the door without being detected.
- See if you can fix the yellow light sensor on your garage door.
2. Manually open the garage door
- You can close the door by pressing the button on the wall, but you might consider using the manual method to open or even close the door.
- First, pull the motor cord that is attached to the ceiling.
- This will disconnect the door from the chain that controls how it opens and closes.
- You can open and close the door by lifting or pulling it down.
3. Change the location of the sensors
- The next step is to remove the sensors and wires connecting them from the two sides of the garage door and place them next to each other.
- By doing this, you will be able to operate your garage door like you used to with a remote control.
How to know if the garage sensor is working
1. Object blocking sensors
- The infrared beam from your sensors can be blocked by a small object such as a stray bucket, a child’s toy, or even paint, which will activate the garage door opener’s safety feature.
- Check if the door works normally after removing any items.
2. Check their alignment and error codes
Assuming nothing is blocking the passage between them, make sure both lights are on.
Slowly adjust the safety eyes until the green or red LED (receive) lights up again and stays on.
- When the yellow light on the garage door sensor or the orange LED turns back on and stays on, the sensors have been successfully adjusted.
- Try closing the garage door normally again. If it closes smoothly, your problem was probably just a misaligned set of safety eyes on the garage door opener.
- Even after you have tried to level them up, one (or both) of these indicators will not light up.
- Check the troubleshooting LED on the garage door motor assembly located on the opening mechanism.
- A flashing LED on the engine block may have an error code.
3. Check Your Safety Sensors
It is possible to test your safety eyes directly through the engine block to check for damaged sensors or an invisible broken wire.
How to identify a damaged garage door sensor?
- Door height sensors.
- Get crates
- Sensor analysis
- Check the LEDs on the sensors.
- Cleaning the lens
- Watch out for things in the area.
- Check for moisture
- Check for any wire damage
1. Height of door sensors.
To determine the height of things needed to block garage door sensors, measure the height of the sensors. Be aware that if the sensors detect an object nearby, they will prevent the door from opening or closing.
2. Buy boxes
Purchase several boxes, ideally cardboard. Check the height of the drawers to make sure it is higher than the height of the door sensors.
Place the boxes next to the sensors in the garage doors. See if you can fix the yellow light sensor on your garage door.
3. Analyze the sensors
Make sure the door is open and turn on the opener. You have the option to press the remote control button or the close button located on the garage wall.
- If the garage door closes, the sensors do not work. Therefore, this is a bad sign.
- In this situation, you should either seek help from a technician or check opener alignment.
- The sensors work correctly if the door returns to the open position.
4. Check for any wire damage
The sensors may stop working if the wires are damaged. Check wires for damage or chewing.
- The sensor may fail if it gets too much moisture from rain or sprinklers.
- Sensors must be changed if the wire has been damaged.
5. Check the LEDs on the sensors.
There is an LED indicator attached to the outside of each sensor attached to the garage door. Turn on the power, then inspect each LED on both sensors.
- Any blinking LEDs indicate they need to be aligned in order to work properly.
- By tightening the screws holding the sensors in place, you can easily adjust them.
- Bend the bracket to tilt it back into place if the flashing is still active. If the LEDs continue to flash, contact a specialist.
- See if you can fix the yellow light sensor on your garage door.
6. Cleaning the lenses
Door sensor lenses are vulnerable to dirt, preventing them from working properly. Inspect the area for debris and cobwebs that could damage the sensor lenses. Use a soft, lint-free cloth to clean the lenses.
7. Watch out for things in the area.
- Test this to determine if the door will crush the box you placed in front of the sensor.
- If the door closes, look around for possible obstructions.
- Remove any animals, plants, or gardening tools from the doorway.
- Close the door to make sure it stays open, indicating that the sensors are working properly.
8. Check for moisture
The sensors may stop working if they are exposed to sprinklers, pressure washers, or direct rain. It is best to wait until they are completely dry before checking if they function properly.
Conclusion
Are there any problems with the operation of the garage door opener? Are you unsure about touch lights? What shade of light should garage door sensors have? The security sensors in the garage door opener may be causing it to malfunction.
After reading the article above, you will know about the “yellow light on the garage door sensor”. You should pay attention to the blinking lights of the opener. Flashing light codes will let you know if the safety sensors are misaligned or blocked.
FAQ
How to fix yellow light on garage door sensor?
Don’t worry if you notice a yellow light on one or both of the garage door sensors; this is very typical. Cleaning the lenses on both sensors and making sure they line up with each other is the easiest solution to this problem.
Why are the garage door sensors one light green and the other light yellow?
Regardless of alignment or obstruction, the yellow light of the transmitting sensor will continue to glow. (This means that this light will always be on, no matter what.) Adjustment is necessary if the green light of the receiving sensor is weak, flickering, or off (and there are no obstacles in the path of the invisible light beam).
Should both garage door sensors be green?
Typically, each sensor has an indicator light on. A red light on the other will indicate that there are no obstacles between the sensors and that they “see”each other. One will have a green light to indicate that the devices are on.
What color should garage door sensors be?
What shade of light should garage door sensors have? Green should be the receiving light and yellow should be the transmitting light. To eliminate the cause of the problem, you must also inspect the light bulb on the motor unit. To fix it yourself or with the help of professionals, you must first identify the problem.