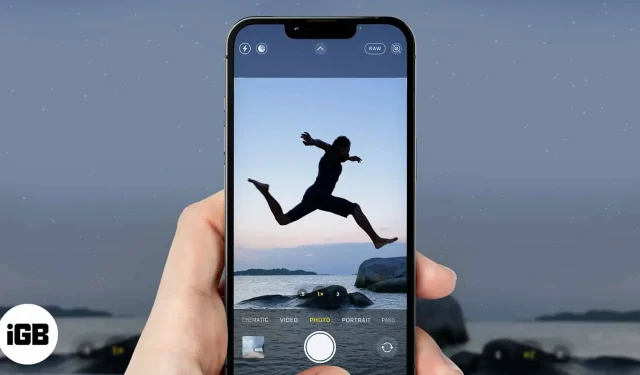

The iPhone Camera app has many features beyond simply taking pictures. Some of them are obvious and you are probably already using them. But when it comes to unlocking the camera’s full potential, I bet you haven’t explored it fully.
Whether you’ve just started using your iPhone or have been using it for a long time, here’s a rundown of how to use the iPhone’s camera, detailing hidden features you probably never knew about.
- How to open camera on iphone
- Basic iPhone camera settings
- Switching camera modes
- iPhone Camera Tips for PROS
How to open camera on iphone
Just tap the camera icon on the iPhone home screen. If you’re on the lock screen, just swipe left to open the Camera app.
Open Camera with Siri
You can also use Siri to open iPhone if you have it turned on. To launch the camera using Siri, unlock your iPhone and say “Hey Siri Camera.”Opening the camera with Siri can be useful when taking a selfie with a wireless remote control.
Basic iPhone camera settings
You are probably ignoring some camera settings on your iPhone. But they give your photo a professional touch when used correctly.
How to Always Use the iPhone Camera Flashlight
The iPhone has an adaptive camera flashlight that only works in certain conditions, such as a dark room. But the flashlight can sometimes glitch and not work when you need it the most. You may end up with poor quality shots because your camera’s flashlight decided to throw you away.
Luckily, you can turn on the flashlight manually. And it works even in bright light. To turn on the iPhone camera flashlight manually:
- Touch the small pointer in the middle of the top of the camera.
- Look down (right above the shutter) and you’ll see a list of options icons.
- Tap the flashlight icon (first icon from the left).
- Then select On.
- Select Flash Auto to return to default settings.
Change camera aspect ratio
- Touch the pointer in the middle at the top.
- Select the ratio icon (usually 4:3 by default).
- There you can select the selected aspect ratio. For example, you can choose “Square”for a one-to-one ratio. To use the entire iPhone screen, select 16:9 aspect ratio; this is useful for shooting tall subjects.
Use your iPhone’s camera timer to take steady shots
Pressing the shutter release can sometimes result in shaky, uneven images. You can enable the camera’s timer to get a breather between the touch of the shutter and the actual capture. You can also use this function to take remote pictures. Available time options: 3 s and 10 s.
With that in mind, the timer options vary depending on the version of your iPhone. Here is a complete guide to using the iPhone Camera Timer.
How to Switch to Live View on iPhone Camera
Live photos are short videos of events or moments. iPhone 6s and later models support this feature. Tap the round icon in the upper right corner of the camera to activate the live streaming mode.
Now tap the shutter to take a Live Photo. Live Photos are also editable, so you can customize them however you like.
Change color temperature
You can also change the color temperature while shooting. There are several color options available, but they are quite adaptive. I always prefer black and white temperature (mono) to get a vintage feel.
To change the color temperature in the iPhone camera:
- Touch the pointer in the middle of the top of the camera.
- Select the intertwined ring icon in the lower right corner.
- Swipe left on the options to select a color temperature option.
Switch between rear and front camera
The front camera comes in handy when taking selfies. Tap the camera switch icon to the right of the shutter to switch between the front and rear cameras.
Disable image mirroring for the front camera.
Pictures you take with the front camera are mirror images by default. This means that when viewed, it produces a mirror copy of yourself. Thus, right becomes left and vice versa.
By following these steps, you can disable this feature by default to get a non-mirror image on the camera output:
- Open iPhone Settings → Camera.
- Then turn off the mirror front camera.
Switching camera modes
The iPhone camera also has many camera modes. However, your choice of each mode depends on what you want to achieve.
Use slow motion for quick video effect
Have you seen these fast moving video effects? You can take your picture using the time-lapse feature on your iPhone camera.
Here’s what you can do to start creating slow motion videos:
- Scroll horizontally through the mode options above the camera shutter and stop at time lapse.
- Tap the shutter and point the camera at the subject you want to capture.
- Tap the camera shutter to start time-lapse photography.
Make slow motion video
Next in the mode options is the slow motion function. By enabling this feature, you can create slow videos naturally without manually slowing down the video. After selecting the Slo-Mo option, you only need to focus on recording video as usual. The iPhone camera handles slow motion for you.
- Select Slo-Mo from the mode options above the camera shutter.
- Touch the red shutter to start recording video.
- Then click again to stop.
Switch to video mode
Tap Video in the menu above the shutter to switch your iPhone camera to video mode. Now tap the camera shutter to start recording. Tap the shutter again to stop video recording.
Also, you can record a video by pressing and holding the camera shutter after opening the iPhone camera. This is always useful for short videos. Release the shutter to stop video recording.
To photograph
Typically, the options to the right of the Photo mode are the various photo modes, while the options to the left are the video modes.
By default, the Camera app opens in Photo mode. Otherwise, you can select Photo from the options above the shutter to switch to picture mode. Tap the shutter to click the image.
Use portrait mode on your iPhone camera
The portrait mode of the iPhone gives a special effect, especially when shooting with the front camera. While portrait mode is available on iPhone 7 and later, it works best on iPhone X and later. But be that as it may, with each release it gets better. For example, the iPhone XS Max, 11, 12, and 13 are better for portraits.
The concept behind the portrait camera mode is that it focuses on the target subject while blurring the background, creating a convincing result.
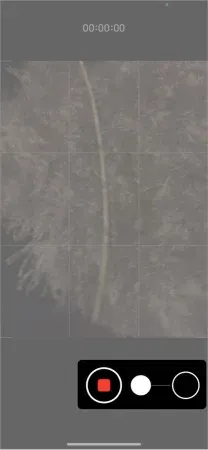
Switch to panorama mode
Panorama mode is ideal for capturing perspective images and covering a wider angle. So if you want to share the scenery with your friends, you can use the panorama mode. And if, like me, you shoot at night, you can use this feature during astrophotography.
To switch your iPhone camera to panorama mode and take pictures in perspective:
- Swipe left on the camera mode options and select Panorama.
- You will see a direction arrow along the line on the screen.
- Tap the camera shutter to start.
- Now carefully move your phone around the terrain you want to cover by keeping the arrow right on the center line.
- Touch the camera shutter once you have captured the desired perspective.
Use the cinematic mode of iPhone 13.
If you’re using an iPhone 13 and haven’t tried this feature, you’re missing out on a lot. Cinematic Mode is undoubtedly one of the best features introduced in the iPhone 13 lineup, thanks to the powerful A15 Bionic chip!
Cinematic mode allows you to use the auto-shift depth effect, blurring the background to make your video look like a cinematic camera. You have access to this feature when you open the iPhone 13’s camera. However, check out this Cinematic Mode guide to learn more about using it.
iPhone Camera Tips for PROS
While you’ve gone through the basic uses and modes of the iPhone’s camera, there are a few more tips that will make your iPhone camera skills top-notch. Take a look at the list below.
iPhone camera lock in video mode
A long press on the default photo shutter puts you in video mode, and releasing stops the video. However, you can lock the camera shutter in video mode to continue recording.
To do this, press and hold the photo shutter and drag it to the lock in the lower right corner. When you finish creating a video, press the stop button on the shutter to stop recording.
Take Macro Photo/Video on iPhone 13 Pro
The iPhone 13 Pro series has an additional focusing feature called macro photography. You do not need to manually switch to this mode. The ultra wide-angle lens of iPhone 13 Pro automatically adjusts as you get closer to your subject, allowing you to capture or record every detail of your subject in focus. Read this iPhone 13 Pro macro guide to learn more about this tip.
Use Apple ProRAW photos
Apple ProRAW photography is exclusive to the Pro iPhone 12 and 13 series. And if you’re a professional photographer, you’ll definitely want to take a picture. It allows you to take raw raw images on supported iPhone series. Invariably, using third-party apps or the iPhone itself, you can edit and customize them as you see fit.
Apple ProRAW photos are DNG files that allow you to customize the output of your photos. Many professional photographers prefer this format as most photo editing applications support it.
However, the Apple ProRAW format does not work with Live Photos or Portrait Mode. And you can’t use it while recording video. Also, note that ProRAW files are usually large and take up disk space. So you might want to consider having an iCloud+ backup plan if you’re using an iPhone with little storage.
You will need to go to your iPhone settings to enable Apple ProRAW. To learn more about using it, you can check out this detailed Apple ProRAW for iPhone 12 Pro guide.
Use burst mode for multiple shots
So, the burst mode allows you to take several shots in a row. However, this feature is not available on iPhones prior to iPhone XS and XR.
You can take pictures in burst mode by simply swiping the image shutter to the left of the screen (do not long press before swiping).
Disable or adjust the shutter sound
Sometimes you want to capture the moment without letting your phone announce it. In such cases, turning off or adjusting the camera shutter sound can help.
To customize the camera shutter sound, launch the camera app and go to Control Center (by swiping down from the top right corner). Now adjust the volume slider as you wish.
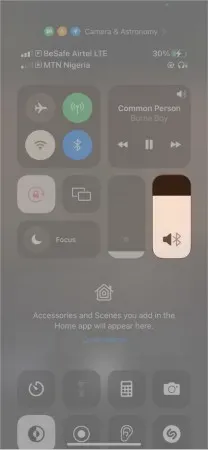
You can turn off the shutter sound by turning on the mute switch on the side of your iPhone. However, for privacy reasons, disabling the camera shutter is not supported in some countries.
Capture texts with iPhone camera
You can also use the live text feature if you’re using an iPhone XS, XR, or later. This is a text-only capture feature that allows you to scan texts on an object, such as a computer screen or a book, and share them with others.
Shoot ProRes video
ProRes is one of the much talked about features of the iPhone 13 and is only available on the iPhone 13 Pro models. As the name sounds, it is a high-definition video format that supports the convenient display of an 8k frame in full resolution.
One of the unique features of Pro Res quality video is that you can compress it while maintaining its quality. You can think of Apple Pro Res as the equivalent of Apple ProRAW. So it also doesn’t produce compressed output out of the box, but allows you to edit it to your liking without quality loss.
You need to activate Pro Res mode on your iPhone 13 Pro before you can use it. Here’s how:
- Go to iPhone settings → Camera.
- Tap Formats.
- Turn on the switch to the right of Apple ProRes.
Once activated, you’ll see it as a mode option in the top left corner when you open the iPhone 13 Pro’s camera. So, in the camera app, tap the ProRes banner in the top left corner to activate this format.
Note. ProRes mode is only available in regular video mode. You won’t see this option if you’re in cinematic video mode.
Use Smart HDR
Smart HDR (high dynamic range) is a feature of iPhone that allows you to save the best copies of identical photos. It works by blending multiple exposures taken from a typical iPhone camera sequence.
iPhone XS, XR and later support Smart HDR. And you can activate or deactivate it if you like. However, the best setting for Smart HDR is to remove the regular photo copies and keep the mixed resolution.
While this is usually the default setting on most iPhones, you need to make sure everything is in place:
- Open iPhone settings → Camera.
- Turn on Smart HDR. Then turn off “Keep Regular Photo”to avoid duplicate multiple photos on your iPhone.
Zooming in when taking a video or photo
If you need more focused coverage, you can zoom in while taking a photo or recording a video. However, the scaling capabilities on some versions of the iPhone are better than others.
To zoom in while taking a photo or recording a video:
Place two fingers (for example, thumb and index finger) on the screen. Then swipe them in the opposite direction, as if you are trying to expand the surface. You can also long press the shutter button and swipe it up during movie recording to zoom in on the subject in focus.
Control your iPhone camera with your Apple Watch
You can control your iPhone camera with your Apple Watch to get better results when you take remote selfies. This neat trick comes in handy when taking selfies and you don’t need to use the camera’s remote control. If you’re taking a group photo, you can set a timer on your Apple Watch and join the group.
Change video frame height
You can also change the frame height of the recording while creating the video. Adjusting these options either increases or decreases the video resolution. However, high resolution videos take up more disk space. So changing the frame height can help you if you have special needs – if you’re low on memory or need higher resolution video.
Do it:
- Go to iPhone settings → Camera.
- Select Video Recording: Choose your preferred resolution for your videos. Here you will see a list of resolution options. They increase as you go down the list.
There are many other creative ways to use the iPhone camera, depending on where your imagination takes you. Apple even included a multi-camera feature in iOS 13 and later. With this feature, you can pair your iPhone with a third-party app to capture multiple images at the same time on many cameras.
Do you feel like your iPhone’s camera is running slower? You can check out these fixes. Above all, enjoy making the most of your iPhone camera.
Have questions or comments? Let me know in the comments section below.