

Requirements to use Live Captions:
- Software: iOS 16, iPadOS 16 and macOS Ventura.
- Hardware: iPhone 11 and up. iPad with SoC A12 and above. Mac with M1 and up.
- Region: Live Captions is currently only available in the US and Canada.
Apple has continually made efforts to make iOS more accessible to people with special abilities. The 2022 Apple Developers Conference brought some long-awaited changes to iOS 16. The Live Captions feature is one such feature released in iOS 16, and here’s how you can use it.
What are live subtitles?
Apple has announced Live Captions for deaf and hard of hearing users. The term Live Captions can be confusing, so let me explain in simpler terms.
For example, if you are watching a local movie that is not in your native language, you would prefer subtitles to keep up with the conversations in the movie. Live Captions works in a similar way and can provide captions for multiple apps and services.
Take a look at the list below and find out where you can use Live Captions,
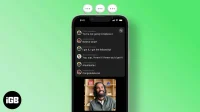
- Phone calls.
- FaceTime calls.
- Applications/services for video conferencing.
- Applications for social networks.
- Streaming media.
- Conversation with people.
Live Captions are generated on the user’s device, so you don’t have to worry about privacy.
How to enable/disable Live Caption in iOS 16/iPadOS 16
The Live Caption feature is currently only available in the US and Canada. Additionally, users need to update to iOS 16 Beta to use this feature. If you meet these requirements, here is how to enable or disable Live Captions.
- Open settings.
- Go to Availability.
- Tap the Live Captioning (Beta) option located under the Hearing section.
- On the next page, turn on the Live Captions toggle.
Source: D. Griffin Jones/Cult of Mac.
Follow the same steps and turn off the toggle in the last step whenever you want to disable Live Captions in iOS 16.
To enable Live Captions and Mac: System Preferences has been renamed to System Preferences with the macOS Ventura update. With the name change, the settings have also undergone a visual overhaul and now look similar to the iOS settings. You can follow the same steps on all three devices to use the Live Captions feature.
Enable Triple Click to activate Live Caption on iPhone, iPad or Mac
You can enable or disable Live Caption without going through all the settings each time. All you have to do is triple-tap the lock button to enable or disable Live Caption. Here is how to enable this shortcut,
- Open settings.
- Go to Availability.
- Tap the Ease of Access Shortcut option located under the General section.
- Go ahead and select Live Captions.
Add Live Caption to Control Center
Another way is to enable and disable Live Caption directly through the control panel. First, you need to create an accessibility shortcut by following the steps in the section mentioned above. Once you’ve done it
- Open settings.
- Click Control Center.
- Find accessibility shortcuts in the More Controls section and tap the green + icon.
- You can now find and use the accessibility shortcut that enables and disables live captions right from the Control Center.
How to enable/disable Live Caption for FaceTime and calls
Although Live Captions for FaceTime and RTT are enabled by default when you turn on the Live Caption feature. You can also manually enable or disable this feature. That’s how
- Open settings.
- Go to Availability.
- Tap the Live Captioning (Beta) option located under the Hearing section.
- On the next page, turn on the Live Captions toggle.
- In the Live Subtitles in App section, you can enable or disable the toggles for Live Subtitles in FaceTime and Live Subtitles in RTT.
I hope this article helped you enable Live Captions on your iPhone, iPad, or Mac. How much do you think Live Caption has improved? Let me know in the comments below.