
Were you unable to complete a work in progress because the error message “Automatic Repair cannot repair your computer”was preventing your Windows PC from starting? Such an error can cause an automatic recovery cycle and prevent you from accessing your important files and using your computer.
Our article will focus on the basic troubleshooting steps that restore your system and bypass such error messages. But first, let’s learn more about this error.
What does “Automatic Repair cannot repair your computer”mean?
Let’s say you boot the Microsoft Windows 10 or 11 operating system on your computer and the machine can’t start up more than twice in a row. In this case, the automatic repair tool attempts to scan for the error and restore the previous working state.
If the tool does not work correctly, one of the following errors occurs:
- An endless black screen that says “Preparing Automatic Repair”or “Diagnosing Your PC”.
- Due to the automatic recovery cycle, the percentage of progress in preparation for automatic recovery does not exceed a certain level.
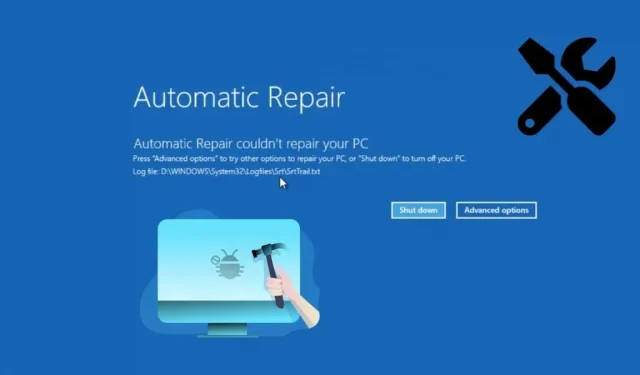
- The following message is displayed on a blue screen: “Automatic Startup Repair could not repair your computer.”Click “Advanced Options”to try other computer recovery options, or “Shut Down”to shut down your computer. Log file: C:\Windows\System32\Logfiles\Srt\SrtTrail.txt”.
After reporting the error, you can either click “Restart Now”to restart your computer, or access Safe Mode, BIOS settings, command prompt windows, chkdsk, and other handy tools with the “Advanced Options”button.
What does the automatic recovery tool do?
Automatic Repair is a Windows System Restore tool introduced in Windows 8 that diagnoses and fixes common boot errors. It usually activates automatically after two failed boot attempts.
When enabled, this utility will check for and attempt to fix any issues that are preventing your device from booting up through a series of diagnostic tests. Unfortunately, this tool sometimes gets stuck in an auto-recovery loop instead of resolving your default boot issues.
Why can’t Automatic Repair repair your computer?
Your device may be stuck in an eternal reboot loop and all saved data will be lost if the automatic recovery tool fails to repair your computer. Hence, it is necessary to understand the reasons why the automatic repair tool is unable to repair your computer as mentioned below:
- Missing system data files or corrupted file system or hard drive partitions
- Unusual error in MBR and changes in BIOS settings
- Unnecessary interference from recently installed third-party software or malware.
- Wrong entry in the Windows registry
- Trouble installing the latest Windows Update files
- File corruption in Windows Boot Manager
- Windows Recovery Environment not found
- Changing the Primary Boot Partition Letters
- Incompatible or defective hard drives and USB devices
How to fix that Automatic Startup Repair can’t repair your PC?
If you’re getting the “Automatic Repair couldn’t repair your PC”error, you’re among a few other Windows users who probably can’t think of any other method to fix startup issues and rely on automatic troubleshooters like this one. Luckily, this article provides several effective troubleshooting solutions listed below. Follow them in sequence until Windows boots:
- Restart your Microsoft operating system.
- Restore default Windows registry configuration from RegBack directory
- Rebuild MBR, fix boot and repair MBR using Bootrec Windows Recovery Environment.
- Run chkdsk to scan the disk partition for file system errors.
- Run the SFC Scannow and DISM utility in safe mode.
- Roll back to a working Windows image using System Restore
- Disable auto repair on boot from BCD settings
- Disable early launch antimalware protection in startup options.
- Disable Driver Signature Enforcement
- Delete the file causing the auto-recovery loop.
- Check the device and osdevice partition settings in the boot configuration data.
- Check the Windows boot priority in the BIOS boot menu.
- Change Disk Controller Mode in BIOS
- Enable the NX, XD, or XN security options in the BIOS.
- Disconnect and re-insert the hard drive
- Remove laptop battery
- Remove external USB devices
- Change RAM slot
- Restart your computer
- Update Windows with a Microsoft ISO File
Restart your Microsoft operating system.
Restarting a Windows 10/11 desktop that has been running for a long time is often the easiest way to fix situations where Automatic Repair fails to repair your PC. Rebooting deletes temporary files, refreshes memory, and restarts Windows processes. Follow the instructions below to perform a clean restart:
- If your Windows desktop is stuck on the Preparing for Automatic Repair or Diagnosing Your PC screen, a convenient way to start the recovery process is to force your computer to perform a hard reset.
- Hold down the power button on the CPU case or laptop until the Windows error message disappears and the PC brand logo appears. The download may resume without the auto-recovery screen appearing.
- Click the Shut Down button if you’re on a blue screen with a message that Automatic Repair couldn’t repair your computer. Restart your computer by pressing the power button again.
- If the reboot fails to fix your Windows system, proceed to the step below.
Restore default Windows registry configuration from RegBack directory
The Windows Registry is a database of configuration settings for various applications installed on your PC. If you encounter an AutoRecovery error that cannot restore your PC from a recent installation or Windows Update, follow these steps to restore your registry settings to the most recent backup:
Note. Windows has automatically disabled automatic registry backup since version 1803. So the RegBack folder can either be empty or contain multiple registry hives with no content in recent versions.
- First, we must access the RegBack folder inside the main Windows partition.
- Click the “More Options”button on the error message screen.
- Click Troubleshoot on the Choose an Option screen to see an extended list of options.
- Select “Advanced options”again to see other options besides “Reset this PC”.
- Click the command prompt button to open a command prompt window for advanced troubleshooting.
- You may be required to enter a username and password before opening a command prompt.
- Inside the command line terminal, we must navigate through the hard drives that have Windows 10/11 installed.
- Type
c:and press Enter to navigate to the C drive. Rundirthe command to list the directories. - Repeat the above step for d:e:f: until you find hard disk partitions where the Program Files, Program Files (x86), Users, and Windows folders are listed as directories. This is the partition where your Windows was installed.
- Type
cd \Windows\System32\configto navigate to the default registry folder. - Back up your current registry entries by running the commands below if you need to restore something after your computer boots:
-
MD backup -
copy *.* backup
-
- Type
cd RegBackto navigate to the registry backup folder and type dir to view the saved entries. - If there are no entries in RegBack or if there is a 0 next to each entry (as shown in the screenshot above, just enter
EXITand move on to other methods.
- Otherwise,
copy *.*..copy all directories from RegBack to the original registry. - Enter
Ato confirm overwriting all registry directories. - Type
exitand press Enter to continue loading the Windows operating system. - If the Windows startup error persists, continue to the next method.
Rebuild MBR, fix boot and repair MBR using Bootrec Windows Recovery Environment.
Automatic Repair cannot repair your computer if your Boot Configuration Data (BCD) was configured due to a recent change, or if you have a corrupted Master Boot Record (MBR) due to a malware or separate operating system installation. Follow these instructions to fix startup with the bootrec utility:
- Click the “Advanced Options”button on the blue screen “Automatic Repair cannot repair your computer”.
- Open the Troubleshoot menu and click Advanced Options to see an extended list of recovery options.
- Launch a command prompt window by clicking the icon as above.
- Select the user account name created for your computer, enter the account password (not the PIN), and click Continue to access your disk partitions.
- The command prompt must be opened in administrator mode.
- Enter the following commands and execute them in sequence:
-
bootrec /fixmbr -
bootrec /fixboot
-
- Note. If the fixboot command returns an error, try executing
bootsect /nt60 sysand running fixboot again.
-
bcdedit /export C:\bcdbackup -
attrib C:\boot\bcd -h -r -s -
ren C:\boot\bcd bcd.old -
bootrec /rebuildbcd
- Note. If you get a message other than “Operation completed successfully”when you run the commands above, exit here and move on to other troubleshooting methods to fix the automatic repair that your PC can’t fix.
- The command
bcdeditwill create a backup copy of the existing BCD directory. - The last
bootreccommand will scan for existing Windows installation entries. If found, add them to the download list by typing Y and pressing Enter to finish. - Type
exitand press Enter twice to continue using the Windows desktop.
Run chkdsk to scan the disk partition for file system errors.
In addition to fixing the boot sector, you can also scan for bad sectors and bad fragments on your primary partition’s file system using the chkdsk command: follow the instructions given here to repair bad sectors and fix automatic repair can’t repair your computer error:
- If you are stuck in an automatic repair loop, force restart your computer three times in a row when the Windows logo appears. The recovery menu will appear on the third reboot.
- Click the “Advanced Options”button and open a command prompt.
- Choose your username and enter your password to continue.
- Enter the following commands as given below depending on the number of partitions on your hard drive.
-
chkdsk /f /r c: -
chkdsk /f /r d:
-
- If you don’t know the disk volumes on your PC, run
diskpartat the command prompt and typelist volumeto display the full list of partitions. - Type
exitand press Enter on your keyboard 2 times to restart your computer. - If automatic repair failed to fix your PC error is showing up again, try the method below.
Run the SFC Scannow and DISM utility in safe mode.
The System File Checker (SFC) and Deployment Image Servicing and Management (DISM) utilities help to scan and repair any corrupted system files or device drivers on the Windows partition:
- Open Advanced options on blue screen error.
- Go to Troubleshoot > Advanced Options.
- Click Launch Options to see a list of launch options.
- Click the Restart button to continue.
- On the next blue screen, press the number 6 or F6 to enable safe mode using the command line.
- Windows will boot into safe mode. Sign in using your password.
- Open a command prompt window using the “Run as administrator”mode in the “Search”menu.
- Run the following commands at the same time to check for errors in the Windows image (DISM) and determine if any system file (SFC) is missing or corrupted:
-
DISM /Online /Cleanup-Image /RestoreHealth -
sfc /scannow
-
- The utilities will take a significant amount of time to complete the entire process.
- Restart your computer to see if Automatic Repair failed to restore your computer.
Roll back to a working Windows image using System Restore
Whenever the installation of any device driver or Windows Update is triggered, your computer automatically creates a system restore point before any breaking changes are made. You can use a system restore point to restore a working version of Windows and fix the “Automatic Repair couldn’t repair your computer”error:
- Click the “More Options”button on the error message screen.
- Go to the Troubleshoot > Advanced Options menu and click the System Restore button in the top left corner.
- The System Restore window will open after a while. Click Next to continue.
- System restore points will be listed with the latest point at the top.
- Select a restore point and click Next.
- Finally, click “Done”to apply the changes. Select Yes to confirm.
- Wait patiently while the utility restores the files on the specified Windows drive.
- Click the “Restart”button after the process is complete.
- If Windows does not restart now, try using older versions of System Restore or use the other methods below.
Disable auto repair on boot from BCD settings
If Automatic Repair was unable to repair your PC, the most logical solution would be to disable Automatic Repair from starting at startup. This can be achieved with the following procedure:
- Click the “More Options”button in the error message.
- Go to Troubleshoot > Advanced Options and click Command Prompt.
- Select your Microsoft account and enter your password to open a cmd window.
- Type
bcdeditand press Enter to view the existing BCD configuration.
- Pay attention to the values of the Identifier and recoveryenabled parameters in the Windows bootloader.
- If recoveryenabled is set to Yes, follow the steps given here; otherwise, follow the other solutions.
- Type the following command and press Enter to disable automatic startup repair:
-
bcdedit /set {default} recoveryenabled no
-
- After the operation completes successfully, type exit and press Enter twice to restart your computer.
Disable early launch antimalware protection in startup options.
Windows provides its own protection against malware before the computer boots. Therefore, if Windows detects any suspicious file, it may try to completely block startup and create an automatic repair loop. Follow the instructions given here to disable this feature and fix “Automatic Repair could not repair your computer”:
- First, click the “More Options”button on the blue screen.
- Go to Troubleshoot > Advanced and click the Start Options menu.
- Click “Restart”to allow changes to the list of options displayed on the screen.
- After restarting your computer, you will see various modification options the next time you start Windows.
- Press 8 or F8 to select the “Turn off early startup antimalware protection”option and Windows will automatically restart without enabling this feature.
- Check if the launch was successful. Follow other methods if this solution doesn’t work.
Disable Driver Signature Enforcement
If a recent third-party application installed a driver in Windows that is not digitally signed by Microsoft, you may receive the message “Automatic Repair was unable to repair your computer.”Windows OS checks installed drivers before starting; any unknown driver file can prevent a successful boot. Here’s how to avoid it:
- Open the Windows Recovery window and go to Troubleshoot > Advanced options.
- Click Launch Options and you’ll see a list of changes you can make on your next boot.
- Click “Restart”to continue.
- When Windows restarts again, press 7 or F7 on your keyboard to turn off driver signature enforcement.
- Windows will attempt to boot again without checking for unknown drivers and will check if the problem with Automatic Startup Repair is fixed.
- If Windows boots, open Device Manager from the start menu and uninstall, update, or roll back any driver with a yellow error sign next to it.
Delete the file causing the auto-recovery loop.
The SrtTrail (Startup Repair Tool Trail) file found in the “Automatic Repair could not repair your computer”error screen is a log file that stores detailed messages when the computer fails to boot. Looking more closely at the log will help us find and remove the problematic file that caused the error.
Note. If you get an error when deleting a problematic file from the command line, turn on safe mode and try deleting the file again.
- Click the “More Options”button as shown in the error message.
- Go to Troubleshoot > Advanced Options > Command Prompt.
- Choose your username and enter your password when required.
- Run the following commands to find the log file:
-
C: -
cd Windows\System32\LogFiles\Srt -
SrtTrail.txt
-
- You will now see the error log generated by the startup repair tool.
- Find a line of code similar to:
-
Boot critical file C:\windows\system32\drivers\tmel.sys is corrupt
-
- The next step is to determine the nature of the file that is causing the problem and how to fix it. For example, our auto-repair loop was caused by a tmel.sys file corrupted by a driver called TrendMicro ELAM Driver.
- Given that this is not a critical Windows 10 system file, we can safely remove it.
- To delete a file, you must use the command prompt to navigate to the specified location and run
delthe command. In our case, the command will be:-
cd c:\windows\system32\drivers -
del tmel.sys
-
- Again, this is just an example; you may need to delete another file from another folder. Before deleting a file, make sure it’s not a core Windows 10 file; otherwise, you risk harming your OS.
- Restart your computer and uninstall the application that installed the driver if Windows loads successfully.
Check the device and osdevice partition settings in the boot configuration data.
If AutoRepair was unable to repair your computer, it’s possible that the device partition and OS device partition values do not match the main Windows partition in BCD. Here’s how to fix it:
- Select Advanced Options > Troubleshoot > Advanced Options > Command Prompt.
- Enter the following command to display the boot configuration data:
-
bcdedit
-
- Check if the values for the device partition and the osdevice partition in the Windows bootloader are set for the drive where Windows was installed.
- If they are incorrect, enter these commands to install them on the correct partition:
-
bcdedit /set {default} device partition=c: -
bcdedit /set {default} osdevice partition=c:
-
- Note. Replace C: with the partition where Windows is installed.
- Restart Windows to see if the Startup Repair Error is fixed.
If your hard drive is not set as the first boot device in the BIOS boot priority settings, you may encounter the “Automatic Startup Repair cannot repair your computer”error. Here’s how to fix it:
- Boot the computer and continuously press any of the following buttons until you enter the BIOS setup menu: F1, F2, F3, Esc, Del.
- Go to the boot options menu.
- Make the hard drive the primary boot device. If your computer has more than one hard drive, the one that has Windows 10 installed should be set as the primary boot drive.
- Press F5 to save the changes and exit the BIOS and accept the confirmation window that appears after that.
- Check if the next boot auto-repair issue is resolved.
Change Disk Controller Mode in BIOS
Changing the Disk Controller Mode in the BIOS will change the way your computer accesses the hard drive or SSD and fixes the Auto Repair error at boot that cannot fix your PC error:
- Open the BIOS menu using the key shown in the previous method.
- Find the disk controller mode in the BIOS and change it to the standard one (IDE, SATA or Legacy).
- Keep changing the controller mode until your computer boots correctly. If not, return the disk controller mode to the previous one and use the other methods below.
Enable the NX, XD, or XN security options in the BIOS.
NX (No eXecute), XD (eXecutive Disable), and XN are CPU security features at the hardware level that are only available in a select few BIOS interfaces. So don’t panic if your computer doesn’t show them:
- Access the BIOS settings using the F2, Esc or Del keys and navigate to the Security tab.
- Find CPU XD Support or Execute Disable and enable it.
- If you can’t find this feature, look for NX or XN in the same menu and turn them on.
- Press F5 to save your BIOS settings and restart your computer.
Disconnect and re-insert the hard drive
Several Windows users have previously mentioned that reconnecting their hard drive fixed the “Automatic Repair couldn’t repair your PC”issue, so you might want to try this:
Note. We are not responsible for opening the internal parts of the equipment, which may void the warranty. So please proceed with caution and only if you know what you are doing.
- Turn off your PC and unplug it from the power outlet.
- Open the CPU case and disconnect the SATA and power cables from the back of the hard drive. Wait a few minutes and re-insert them into their regular slots.
- Turn on the power to check if the computer boots without errors.
- If there are multiple hard drives, repeat the above step for each one.
- You must also reconnect those drives where you don’t have Windows installed.
- Leave only one disk connected to the computer and try loading it. Reconnect the disconnected ones if the issue is resolved.
Remove laptop battery
- If you have a removable laptop battery, you can try starting the laptop without a battery and see if that fixes the automatic repair error that couldn’t fix your computer.
- Simply disconnect the battery, plug in the AC charging cable, and turn on your laptop.
- If your computer boots up, run it for a while before shutting it down properly and reinserting the laptop battery.
Remove external USB devices
- Disconnect any USB devices connected to your computer, which may prevent them from interfering with the startup recovery process.
- Just unplug their cable from the USB port, restart your computer and check if the error is gone.
Change RAM slot
Few customers stated that removing the RAM and replacing their slots was enough to eliminate the Windows 10 auto-recovery loop:
- To do this, you must turn off the computer, remove the processor case or laptop panel, and carefully remove the RAM cards. Swap them with the RAM slots and try turning on the computer.
- If your computer has more than one RAM slot, try booting with only one RAM module removed.
Restart your computer
If you have no problem losing your installed app and Windows settings without erasing other valuable files (images, videos, documents, downloads), you can try restarting your Windows PC via Windows Recovery:
- In the error message, open the “Advanced Options”section.
- Select the Troubleshoot menu to see ways to fix your computer.
- Click Reset this PC.
- Click the Keep My Files button (if you want to keep important personal files) or Delete All (all files will be permanently deleted).
- On the next screen, select Cloud Boot (to download a Windows ISO from WiFi and reinstall Windows) or Local Reinstall (to use a Windows image from your device).
- After waiting, Windows will remind you which files will be deleted. Click “Reset”to continue.
- After Windows finishes resetting your PC, Windows OS will boot up automatically.
Update Windows with a Microsoft ISO File
Reinstalling Windows on your PC is the ultimate troubleshooting method for fixing “Automatic Repair can’t fix your PC”error and other startup problems, as long as your important data and files are saved.
Note. This method will delete everything on your computer.
Create Windows installation media on another PC
- If you don’t have the official Windows ISO file, download the Windows Media Creation Tool from the Windows 10 download page.
- Accept the license agreements and click “Create installation media for another PC”.
- Select your preferred language, architecture (depending on PC) and version.
- Select the ISO file if you have a DVD and want to use it as your installation media.
- Select USB Drive if you want to use a USB drive to update Windows.
- Make sure the removable media is already inserted.
- The installation will boot and continue via USB or burn the downloaded ISO to DVD.
Reinstall Windows on your computer
- Insert the DVD or USB drive into the computer with startup error and restart the device.
- To open the boot menu, keep pressing F11 when the boot logo appears (F12, F9, or F10 may also work, depending on your motherboard).
- Select a USB flash drive or DVD-ROM as the boot device. Save changes and restart your computer.
- Your Windows installation files should now start loading. Follow the instructions to get your new system up and running quickly.
Conclusion
Last but not least, if none of the previous measures helped and you are sure that a fresh installation of the operating system did not resolve the “Automatic Repair could not repair your computer” error, then this should be due to a hardware problem and consult a specialist PC is your only option. We hope that you were able to take advantage of one of our suggestions for its repair. Let me know in the comments how your renovation went!
FAQ
What to do if automatic recovery doesn’t work?
If automatic repair doesn’t work, you can try restoring Windows to the latest restore point, restoring a backup of the registry, restoring the boot sector, or resetting the PC to default values.
How do I fix automatic repair that didn’t fix my computer?
If automatic repair didn’t fix your computer, you can fix it manually by rebuilding the MBR and boot sector, repairing registry entries, using a restore point to restore Windows, and using the Windows installation media to reinstall the OS.
What does it mean to prepare for automatic repair?
When the message “Preparing for automatic repair”is displayed on the Windows boot screen, it means that Windows is trying to solve the startup problem on its own by applying various automated methods.
How to bypass automatic recovery in Windows 8?
The automatic recovery feature in Windows 8 or 8.1 can be disabled by running the following command at an administrative command prompt: bcdedit /set recoveryenabled NO