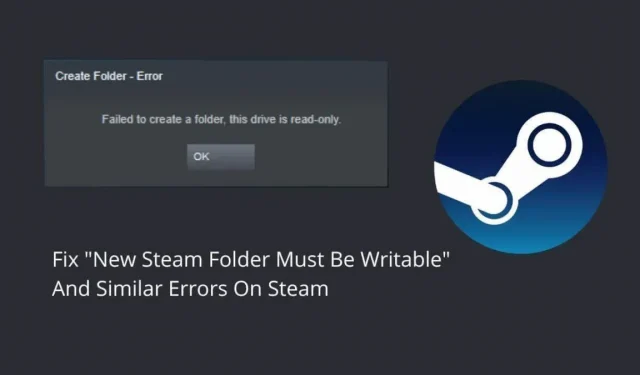

The Steam app has a default location for saving games to your storage. But if you change the storage location, you will probably see the “New Steam folder must be writable”error. It also has some other similar forms, such as the Steam folder is not writable and cannot create a disc; this folder is read-only.
This will prevent you from adding a new game save folder. Keep reading to find out how to fix this error.
Causes of “The new Steam folder must be writable”error in the Steam client
- Library folder is read-only
- Steam cache is corrupted
- Errors in the Steam app
- Steam does not have admin rights
- The new library is on the Windows drive
- Your user account does not own the folder
- Steam library folder is corrupted
- Some files on the hard drive are corrupted or missing
- The installed antivirus is blocking the folder or blocking Steam access to the folder
- The game you are updating or installing is crashing
12 Solutions to “New Steam Folder Must Be Writable”Error
To fix this Steam library folder error, make sure you are logged in with an administrator account on your PC to apply these solutions:
- Restart your computer
- Make sure the folder is not read-only
- Allow Steam Administrator Access
- Give your existing user account ownership of the folder
- Reinstall the problematic game
- Restore the library folder from the Steam client
- Clear Steam Download Cache
- Use folder for game library outside of local C drive
- Check hard drive for errors (CHKDWe)
- Add Steam to your antivirus exclusion list
- Delete the application cache folder from the Steam directory.
- Reinstall Steam outside of the Windows installation disc
1. Restart your computer
A simple system restart fixes many problems. Running your computer without restarting for many days or weeks results in temporary errors. So, restart your computer if your Steam desktop client cannot access the library folder and shows errors like the new Steam folder should be writable.
2. Make sure the folder is not read-only
Problems with the Steam Library folder occur when the game folder you have selected as the Steam Library is read-only. Because of this, Steam may prevent you from creating a Steam Library folder or incorrectly install or update the game.
So, check the folder where Steam games are stored if it is read-only.
- Close the Steam client from the notification area.
- Navigate to your Steam folder (C > Program Files > Steam).
- Right-click on the “Steamapps”folder and select “Properties”.
- Make sure you are on the General tab.
- Make sure the “Read Only”field is empty or filled in the “Attributes”section. It should not be checked.
- Click “Apply”and “OK”.
- Restart your computer and try again.
3. Allow Steam Administrator Access
When you encounter the “The new Steam folder must be writable”error, the Steam client may not have the proper permission to access the folder. That’s why it can’t write (download or install games) on it and shows an error instead.
To fix this, try running the Steam client as an administrator and create a new folder again, or download/update the game installed in the problematic folder (Steam Library).
- Close the Steam client.
- Right-click the Steam icon on your desktop and select Properties.
- Click the “Compatibility”tab.
- Check the box next to “Run this program as an administrator”.
- Click “Apply”and “OK”.
- Launch the Steam client.
- Add the folder to the Steam Library again.
If the Steam library or a folder within the library is not writable, you should use this method with the following fix.
4. Give your existing user account ownership of the folder
Usually, when selecting a folder for a library, Steam throws an error if Steam cannot access it. In this case, you can choose a different folder or drive.
But if you want to select the same folder or when you select the folder for the Steam library it doesn’t throw any error but now Steam can’t download or update the games in the specified folder, you have to take ownership of the folder that stores the Steam games from folder security settings.
- Right-click on the Steam icon in the taskbar and select Exit.
- Navigate to a folder that cannot be added to the Steam Library or that was added but is now unwritable. We will navigate to the default library folder. (C > Program Files > Steam)
- Right-click “Steamapps”and select “Properties”.
- In the Properties window, go to the Security tab and click the Advanced button to view advanced security options.
- You will see an “Owner”tag with the account name. Click the “Edit”link next to it.
- Type the name of the user account you are logged in with and press Enter.
- After that, check the box “Replace owner of nested containers and objects”or “Replace all permission entries of child objects with permission entries inherited from this object”.
- Click Apply and OK on the Advanced Security window.
- And then “Apply”and “OK”in the “steamapps properties”window.
- Right-click “Steamapps”and select “Properties”again.
- Go to the “Security”tab.
- Click the Change button.
- Select your user account to take ownership of the Steamapps folder.
- Click “Full Control”to give your account full control over the folder.
- Click “Apply”and “OK”.
Launch Steam and add the folder to the Steam Library or install or update a hard game. If the problem persists, follow these steps:
- Take ownership of the game folder that is not being updated or installed.
- Close Steam by right-clicking on the system tray icon and selecting Exit.
- Open a web browser and visit the Steam database.
- Find the AppID number of the game that is not installed or updated.
- After that, go to the Steam directory. Usually this is C> Program Files> Steam> Steamapps> download.
- Right click on your game folder number and select “Properties”.
- Follow the same process of taking ownership of the folder as above.
5. Reinstall the problematic game.
Sometimes the new Steam folder needs to be writable due to corrupted files in the game folder or a bug. Try uninstalling the game and reinstalling it to resolve the issue.
- Make sure your game files are backed up to the Steam Cloud so you don’t lose your progress.
- Open the Start menu and select Settings.
- Go to Applications.
- Find the problematic game in the list of installed programs.
- Click on the game and select Uninstall.
- The uninstall wizard will open. Follow the instructions to remove it.
- Restart your computer.
- Visit the Steam Library page (mentioned in section 4) and look for the game’s AppID number.
- Go to C > Program Files > Steam > Steamapps.
- Delete the folder with the game you installed. If it is not visible, the remote master has removed it. If you delete it, delete it from the trash too.
- Open Steam and install the game again.
You can also uninstall Steam by going to Control Panel > View as Category > Uninstall a Program.
6. Restore the library folder from the Steam client.
If you reinstalled the game and the new Steam folder should be writable, the issue persists, the Steam library may be buggy or corrupted. Since this issue is common, Steam has included a repair feature to fix common errors in the library folder.
We will use this automatic repair feature to try and fix the problem. Use these steps:
- Launch Steam and sign in to your account.
- In the menu bar at the top of the app, click “Steam”and select “Settings”.
- In the Settings window, go to the Downloads tab in the sidebar.
- Click the Steam Library Folders button at the top of the window.
- You will find the Steam Library folders (drives). If you have multiple library folders, you should select the one that shows the new Steam Library folder should be a writable error.
- After that, click on the three dots at the end of the colored bar and select Restore Folder.
- Wait for Steam to restore the folder and close when it’s done.
- Restart Steam.
7. Clear Steam Download Cache
The new Steam folder should be writable. The error may be due to a missing or corrupted cache. The download cache contains temporary files for the games you download. They are not needed to download or update games. But if they are damaged, they can cause problems.
Follow these steps to clear the download cache in the Steam client:
- Open Steam.
- Click “Steam”in the menu at the top right and select “Settings”.
- Select the Downloads tab in the left pane.
- Click the “Clear Download Cache”button.
- The client will ask you to confirm. Click OK.
- Restart Steam and add the folder to the library or update the game that was causing the issue.
8. Use a folder for the game library outside of the local C drive
Many folders on the local drive C (installation drive) have restricted access for users and programs. This is necessary to keep important Windows files safe.
The default Steam client directory is C > Program Files. This location is not restricted like other disk directories. But for some reason, some folders in Program Files may also be restricted.
When this happens, you cannot access your Steam Library. If you can access it, downloading a new game or updating an existing one will be a hassle. Because Steam won’t have “write permission”for the disc.
Moreover, if you create a new Steam Library, you may see an error message that the new Steam folder must be writable.
To resolve this issue, create a new Steam Library folder outside of the Windows installation disk. If you are running Windows on local drive C, create the Steam library on local drive D.
- Open Steam and go to “Settings”by clicking “Steam”in the menu bar and selecting “Settings”.
- In the settings window, go to the “Downloads”section.
- Select “Steam Library Folders”at the top of the window.
- When the Steam Library opens, click the “+”button to select a new drive for the Steam Library and add the library folder.
- Select a drive that does not have Windows files (where Windows is not installed).
- Create a new folder and select it.
- Steam will create a new library.
- Switch to the new library tab.
- Click on the three dots at the far end of the colored bar and select “Make Default”to make it the default Steam Library folder.
- Exit Steam from the system tray.
- Launch Steam and try downloading a new game.
If you encounter an error while updating the game, please uninstall the game and then reinstall it on a new Steam library disk.
9. Check your hard drive for errors (CHKDWe)
The reason for the new Steam folder is to be writable. The error may be due to problems with the hard drive. When some Windows system files are corrupted or missing, some Windows features show problems. It also causes other programs to access their files or the hard drive.
We perform folder recovery from the Steam application. This was only for the Steam folder. If you need to check your entire hard drive for errors and fix common errors, Windows has a Check Disk (CHKDWe) utility that runs on the command line.
- Open the start menu, type cmd and select “Run as administrator”. OR. Open the start menu, type cmd, right-click Command Prompt, and select Run as administrator.
- At the command prompt, type or copy and paste
chkdskC:/f and press enter. (C is the drive you want to check. Scan the Steam library drive. But it is recommended to scan all drives on your computer.)
For those of you who don’t like typing on the command line and need a GUI to check their hard drive, external SSD or hard drive, follow these steps:
- Open File Explorer.
- Right-click the drive you want to check and select Properties.
- Go to the “Tools”tab.
- In the Error Checking section, click the Check button.
- This will open a new wizard. Select “Scan Disk”to start scanning.
- Windows will check the drive for errors and show options when the scan is complete.
- Select a repair option.
- When finished, restart your computer.
10. Add Steam to your antivirus exception list
Antiviruses protect your computer from viruses and malware. But sometimes they block harmless files and programs. If you’re seeing the “The new Steam folder must be writable”error, your antivirus might be blocking the folder or blocking Steam from accessing the folder.
To resolve this issue, add Steam to your antivirus program’s exclusion list by following these steps: (These steps are for Microsoft Defender Antivirus.)
- Close the Steam tray icon.
- From the icons in the notification area on the taskbar, click the shield icon.
- Windows Security will open. Select Virus & Threat Protection.
- Under Virus & threat protection settings, select Manage settings.
- Click Add or Remove Exceptions.
- Click the “Add Exception”button.
- Now you can select any application to exclude from antivirus scanning. Locate and select the Steam executable in the Steam installation folder.
- Restart your computer.
In AVG, go to Home > Settings > Features > Web Security > Exceptions.
If you have any other antivirus program such as Kaspersky, Avast, or Norton, open its main window and look for similar options.
11. Delete the application cache folder from the Steam directory.
I mentioned the method above to clear the cache. But if you’re still experiencing the issue and can’t add the folder to the library, or can’t download or update the game, delete the folder that stores the Steam temporary files directly from the Steam directory.
This will ensure that you have removed everything. Follow these steps:
- Access the Steam icon on the taskbar, right-click on it and choose Exit.
- Navigate to the folder where Steam is installed.
- You will find the “Appcache”folder in the “Steam”folder.
- Right-click it and select Delete.
- Go to the trash, right-click the “Appcache”folder again and select “Delete”.
- Restart your computer.
- Run Steam as an administrator by right-clicking on the Steam application and selecting “Run as administrator”.
- Go to the library and try adding a folder or updating the game.
12. Reinstall Steam outside of the Windows installation disc.
If none of the solutions above fixed the problem with the new Steam folder that should be writable, you should uninstall Steam and then install it on another drive that doesn’t have read/write permission issues (e.g. local drive D, E or F).
- Before uninstalling Steam, go to C > Program Files > Steam.
- Copy the “Steamapps”and “Userdata”folders and paste them somewhere else.
- Now click the Start menu and go to Settings.
- Select Applications.
- In the list of installed programs, select “Steam”and click the uninstall button (or go to the control panel to uninstall Steam).
- In the uninstall wizard, be sure to completely uninstall Steam.
- Restart your computer.
- Launch a web browser and get the Steam client.
- During installation, select a directory on any other local drive, such as local drive D.
- After installing the program, navigate to where you pasted the copied folders. Copy them and paste them into the new Steam installation folder.
- Launch the Steam app and try adding the new library folder again or updating the game.
Conclusion
The “New Steam folder must be writable”error usually occurs when Steam cannot access the folder you want to designate as the Steam Library. This error often occurs when downloading or installing a game into an already created Steam library. Follow the solutions above to resolve the issue.
FAQ
How to make a new Steam Library folder writable?
To make the new Steam Library folder writable, try the following methods: – Run Steam as an administrator. – Navigate to the Steam Library folder and make sure it’s not read-only. – Take ownership of the Steam library folder by opening the folder’s advanced security settings – Reinstall the game that is causing the problem – Change the location of the Steam library outside of the local C drive.
Why can’t I create a new Steam folder?
If you are unable to create a new Steam folder, this may be due to the following reasons: – You are creating a Steam folder on a local drive that already has a Steam Library folder. – Steam does not have administrator rights – The folder you re-select is not empty – The Steam download cache is corrupted – The local drive is inaccessible to your user account.
How to create a new Steam Library folder?
To create a new Steam Library folder, follow these steps: – Open Steam. – Click “Steam”in the menu and select “Settings”. – Select “Downloads”. – Click the “Steam Library Folders”button. – Click “+”and select a new drive and folder. – Navigate to the library you just created, click on the three dots and select Make Default.
How to fix Steam library not loading?
To fix the Steam library loading issue, try the following solutions: – Run Steam as an administrator. – Update the Steam application and your operating system. – Clear the download cache from the Steam app and restart Steam. – Navigate to the Steam directory, right-click on the Steam executable and select Troubleshoot Compatibility. Try the Steam beta.