


When you start playing Overwatch 2, the first thing you should do is change your crosshair settings. Getting the grid right is one of the most important things in any first person shooter. And this game is no exception to this rule. But to worry without changing it is quite easy. So, in this guide, let’s see how to change the crosshair in Overwatch 2 to get the perfect reticle.
How to change crosshair settings in Overwatch 2
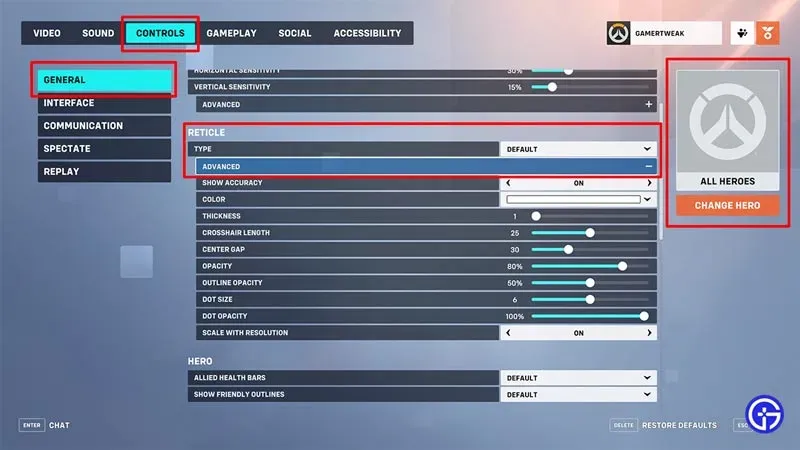
You can change crosshair settings in Overwatch 2 under Controls in Options. Here is how you can change your grid:
- Go to the menu screen.
- Here, select options.
- Next, go to the “Management”tab.
- Here, in the General section, you can find the Grid subsection in the middle.
- The first option is “Type”, it gives you the following options:
- Default
- Circle
- crosshair
- Circle and crosshair
- dot
- You can further customize these settings by expanding Advanced Settings. Here you get the following settings options:
- Show Accuracy
- Color
- Thickness
- Cross hair length
- central gap
- Opacity
- Outline Opacity
- Dot size
- Dot Opacity
- Scale with resolution
- After you finish changing the crosshair, you can directly save it for each hero, or use it only for a specific hero. To do this, simply click the “Change Hero”button on the right side of the screen.
If you are new to the game, then it is best to use the new scope for all heroes. Once you start to understand the game, you can try experimenting with different scopes for different heroes.
While there is no perfect crosshair, if you play games like Valorant or CS:GO, you should use a crosshair or dot as your crosshair. But this is just my recommendation: you should still try different meshes to see which one is right for you.
That covers this guide on how to change the crosshair settings in Overwatch 2 for your reticle.