

Everyone is familiar with (or maybe even abused) the iPhone screenshot feature. With a simple press of a few buttons or two taps on the back, you can instantly share tidbits of information, a series of posts, or PDF pages with others.
However, sometimes what you want to capture goes off screen, or you want to take a screenshot of an entire web page or PDF document. While taking a few screenshots would be enough, a scrolling screenshot would be much more convenient. Don’t know how to take a scrolling screenshot on iPhone? That’s how!
- What are scrollable screenshots?
- How to Take a Scrolling Screenshot on iPhone
- Use Assistive Touch to take long screenshots on iPhone
- Ask Siri to take a screenshot on iPhone
- Stitching Screenshots on iPhone Using a Third-Party App
What are scrollable screenshots?
Scrolling screenshots are similar to regular screenshots, except they capture more than one page on your iPhone. Compared to regular screenshots, which require you to take a photo, scroll a bit, and take a screenshot again, a scrolling screenshot is a continuous series of stacked screenshots to cover the entire web page.
This is especially useful when you want to take a screenshot of something that is outside the scope of what is visible on your display. It’s also perfect for saving a conversation thread (on Twitter or Reddit) or taking a snapshot of an entire PDF document.
Note. This feature is best used in applications such as Safari, Mail, and Notes. It may not work in other native and third party applications.
How to Take a Scrolling Screenshot on iPhone
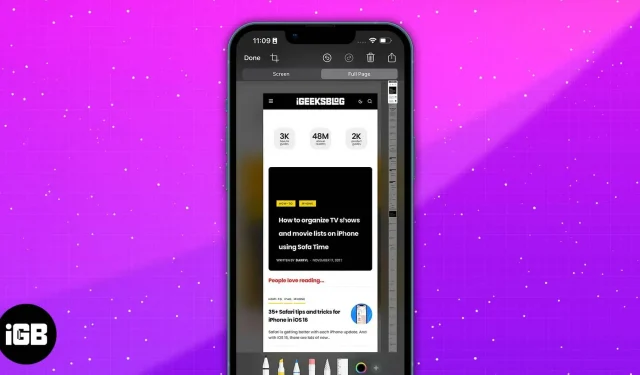
- Open the Safari app on your iPhone and sign in to a website.
- Take a normal screenshot by pressing the side button and the volume up button at the same time. You can also use the “Press Back”feature if it’s enabled.
- Tap the screenshot preview that will appear on the bottom left side of the screen.
- At the top of the preview window, tap Full Page.
- Click Done → Save PDF to Files or Save All to Files if you’ve taken multiple screenshots. Note that your iPhone will save the screenshot in the Files app by default.
- If you want to send the file directly, click the Share button in the top right corner and select a sharing method. Please note that the file will be exported as a PDF.
Use Assistive Touch to take long screenshots on iPhone
If you have problems with the buttons and can’t use the Press Back feature yet (which only works on iPhone 8 and later running on iOS 14 or later), you can also use the iPhone’s Assistive Touch feature to take a screenshot.
Simply activate this feature by going to Settings → Accessibility → Touchscreen → enable AssistiveTouch.
To take a screenshot using Assistive Touch:
- Go to the page or file you want to take a screenshot of.
- Tap the Assistive Touch button → Screenshot.
- Click “Entire Page”→ “Save PDF to Files”.
Ask Siri to take a screenshot on iPhone
You can also take advantage of the always-reliable iPhone Assistant to get the job done. Just say, “Hey Siri, take a screenshot.”Then you just need to interact with the screenshot as above.
Siri has a lot of tricks up its sleeve. Read our definitive guide to getting the most out of Siri and keeping your hands free while you let it do all your tasks.
Stitching Screenshots on iPhone Using a Third-Party App
If you don’t have these features yet and still want to send scrolling screenshots, you can opt for third-party apps that can combine multiple screenshots into a single cohesive image. Some apps allow you to take them off. Others also let you choose whether you want to stitch them vertically or horizontally.
This option works great for many other apps not supported by this built-in iOS feature, such as Messages and other third-party messaging apps like Facebook Messenger and Snapchat.
Tailor and Picsew are examples of such applications.
Completion…
Scrolling screenshots are great for sharing large pieces of information without having to break them up into multiple smaller images. Now you know how to use this native iOS feature and get the most out of it!
If your device is not compatible with this feature, you can still rely on third party apps to do the trick. Happy scrolling!