

When you first connect your iPhone, iPad, or iPod touch with a USB cable to your Mac or PC, you’ll be prompted to trust your computer. The same prompt appears when another device tries to access your iOS device’s files for the first time or just periodically as a security measure.
In this lesson, we will cover everything related to the question “Trust this computer?”pop-up and show you how to distrust the computers and devices you previously trusted on your iPhone or iPad.
What is a trusted device?
The trusted device can access your iOS device’s files and settings, create backups, import photos, access movies and videos, contacts, and more. Data stored on your iOS device is not revealed until you enter a password, if any, and choose to trust the connected computer or device.
If you choose not to trust the connected computer, you will still be able to charge your device via the USB cable, but the computer will not be allowed to access any content on your iPhone or iPad.
So, when you connect your iPhone to a computer or a device to your iPhone’s Lightning port, the alert is essentially telling you that you have connected your device to an unknown computer that it has never connected to before.
Apple introduced this feature in iOS as a kind of chain of trust to prevent external machines (both computers and peripherals) from accessing your data. The device owner must trust the machine by clicking the “Trust”button before iOS contacts it. If you click the “Do not trust”button, the device will not communicate with the computer to which it is connected.
When you trust a machine, a special key is stored on both the machine and the iOS device on which you set up the chain of trust. If the keys match, iOS allows the secure transfer of information between machine and device; but when they don’t match, iOS is designed to protect your information.
Before a computer can be trusted, you must first unlock the device with its passcode. This is the first step in security, ensuring that only the owner of the device can give permission to use the device with the machine. After signing in, the user of the device can connect it to a Mac or PC for the first time and a warning will appear.
The warning will not reappear for machines that have already been trusted, but if you recently chose not to trust the machine and then disconnect and reconnect the device again, the warning will reappear, giving you the option to either trust or distrust. Trust the computer again. If you don’t use it for more than six months, you may experience a chain of trust expiration and the trust will have to be restored again.
When not to trust a computer
Here are some of the situations in which you can not trust a Mac or Windows computer from your iPhone or iPad:
- You accidentally trusted a computer. If you accidentally confide in a computer, discard it using the tricks above.
- You trusted a friend’s computer: if I transfer a friend’s media files to my iPhone and the file is too large, I resort to syncing with his iTunes. After that, I don’t trust a friend’s computer from my iPhone.
These are just two common examples where computers may need to be distrusted.
Each user has different needs and special ways of doing business, so you may want to distrust all computers from your iOS devices for reasons not listed above.
What you need to know before not trusting devices
The distrust device method below will reset all location and privacy settings on your iPhone, iPad, or iPod touch, so you’ll need to re-create them afterwards. While this workaround is a little clunky, it is more user-friendly than resetting the entire device to factory settings, as in versions of iOS prior to iOS 8.
Another little catch: distrusting a computer from your iOS device will also reset the “Trust this computer”warning on that device for all computers it’s connected to.
How to not trust your computer with iPhone and iPad
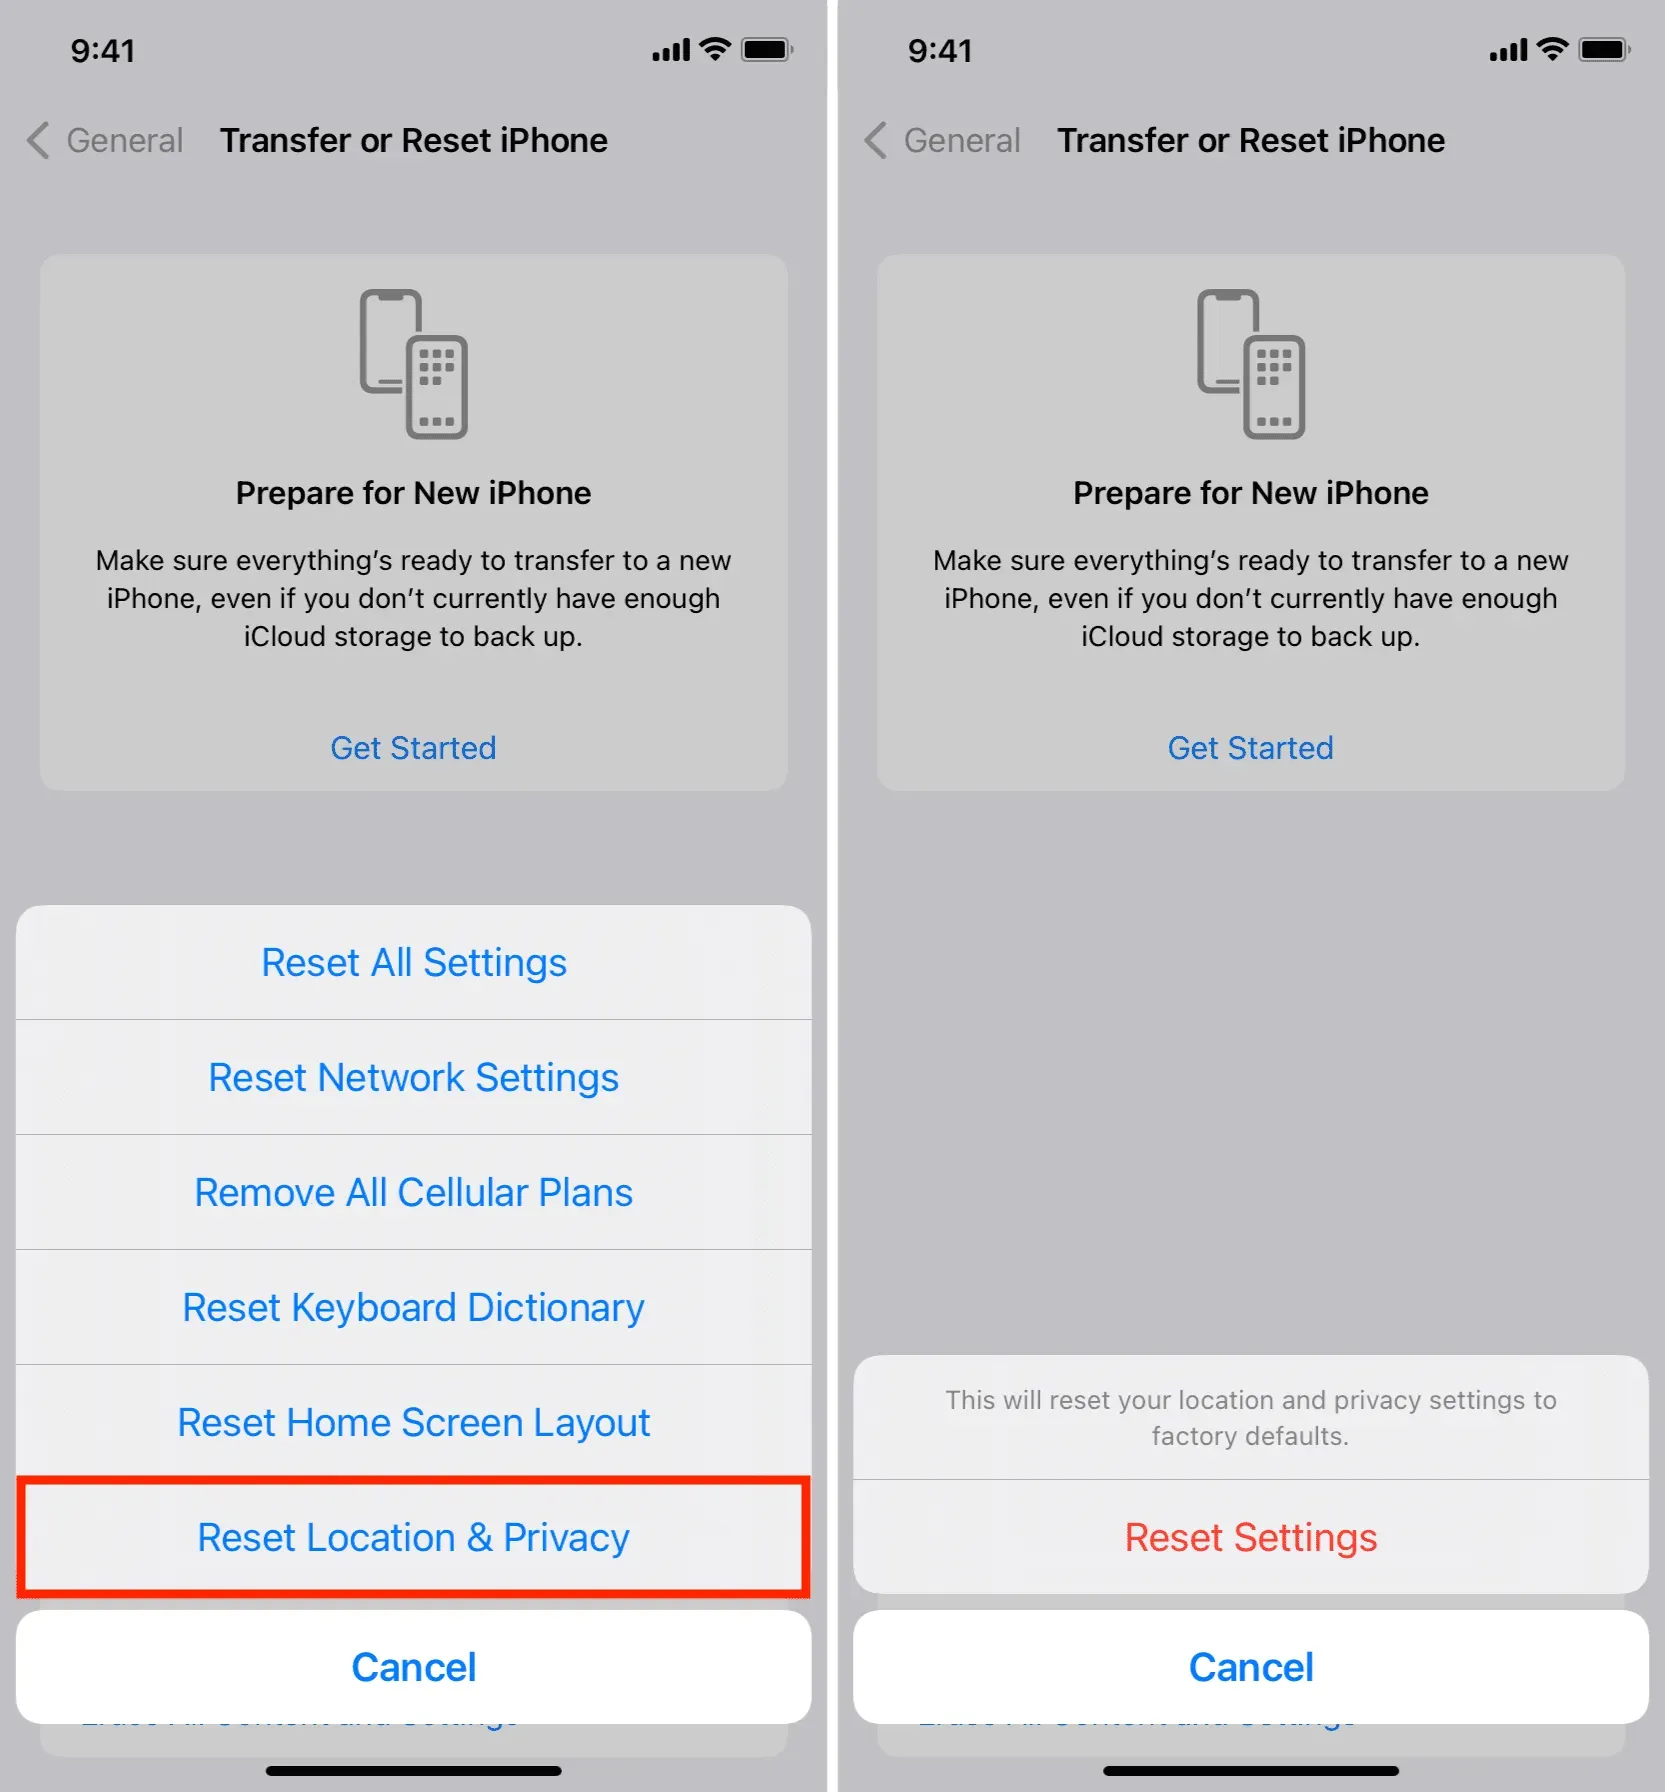
- Open the Settings app and go to General > Transfer or reset iPhone.
- Tap Reset.
- Select the “Reset location and privacy”option. You will be prompted to enter your device passcode if you have set it up.
- Confirm that you want to reset all location and privacy settings on your device.
- Close the Settings app when finished.
Advice. Now is the time to recreate your location and privacy settings. Just go to the “Privacy”section in the Settings app to adjust your location and privacy settings to match what you had before the reset.
Another way to distrust computers from iOS devices
If you don’t like the idea of resetting privacy and location settings only to break all trusted connections, you can just as easily distrust all computers by resetting your network settings.
Just go to Settings > General > Transfer or Reset iPhone > Reset and tap Reset Network Settings. This will also reset your network settings and saved Wi-Fi passwords, so you will need to recreate these items at a later stage.
Advice. Wiping the device also untrusts all connected computers.
Can you trust this computer again?
Yes you can. When you connect your iPhone or iPad to iTunes, Finder, Image Capture, Photos, and more via a USB connection, the familiar Trust and Distrust dialog box will appear on your iOS device screen.
Click “Trust”to give iTunes/Finder access to your iOS device. If you click “Do Not Trust”, you will see this warning every time you connect your device to this computer. If your iOS device is password-locked, you need to unlock it before you see the warning.
Click “Accept”if you are going to sync your device with iTunes or Finder.
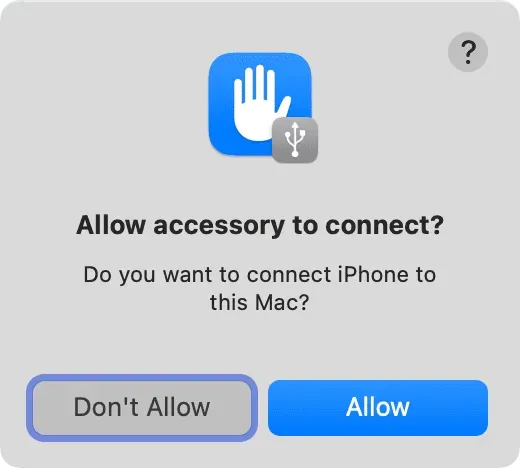
Note. In recent versions of macOS, such as macOS Ventura, you first need to click Allow in the Allow accessory to enable an alert or Finder. Once you do that, you’ll see a “Trust this PC”warning on your iOS or iPadOS device.
What to do if the trust warning does not appear?
In some rare cases, the “Trust this computer”warning may not even appear when it should. So what are you doing? Here are some of the things you can try: