


Go beyond the Music app with this Apple Music tips and tricks video demonstrating the secret and little-known features of the Music app that you should be using.
Video Tips: 20+ Apple Music Tricks on iPhone and iPad
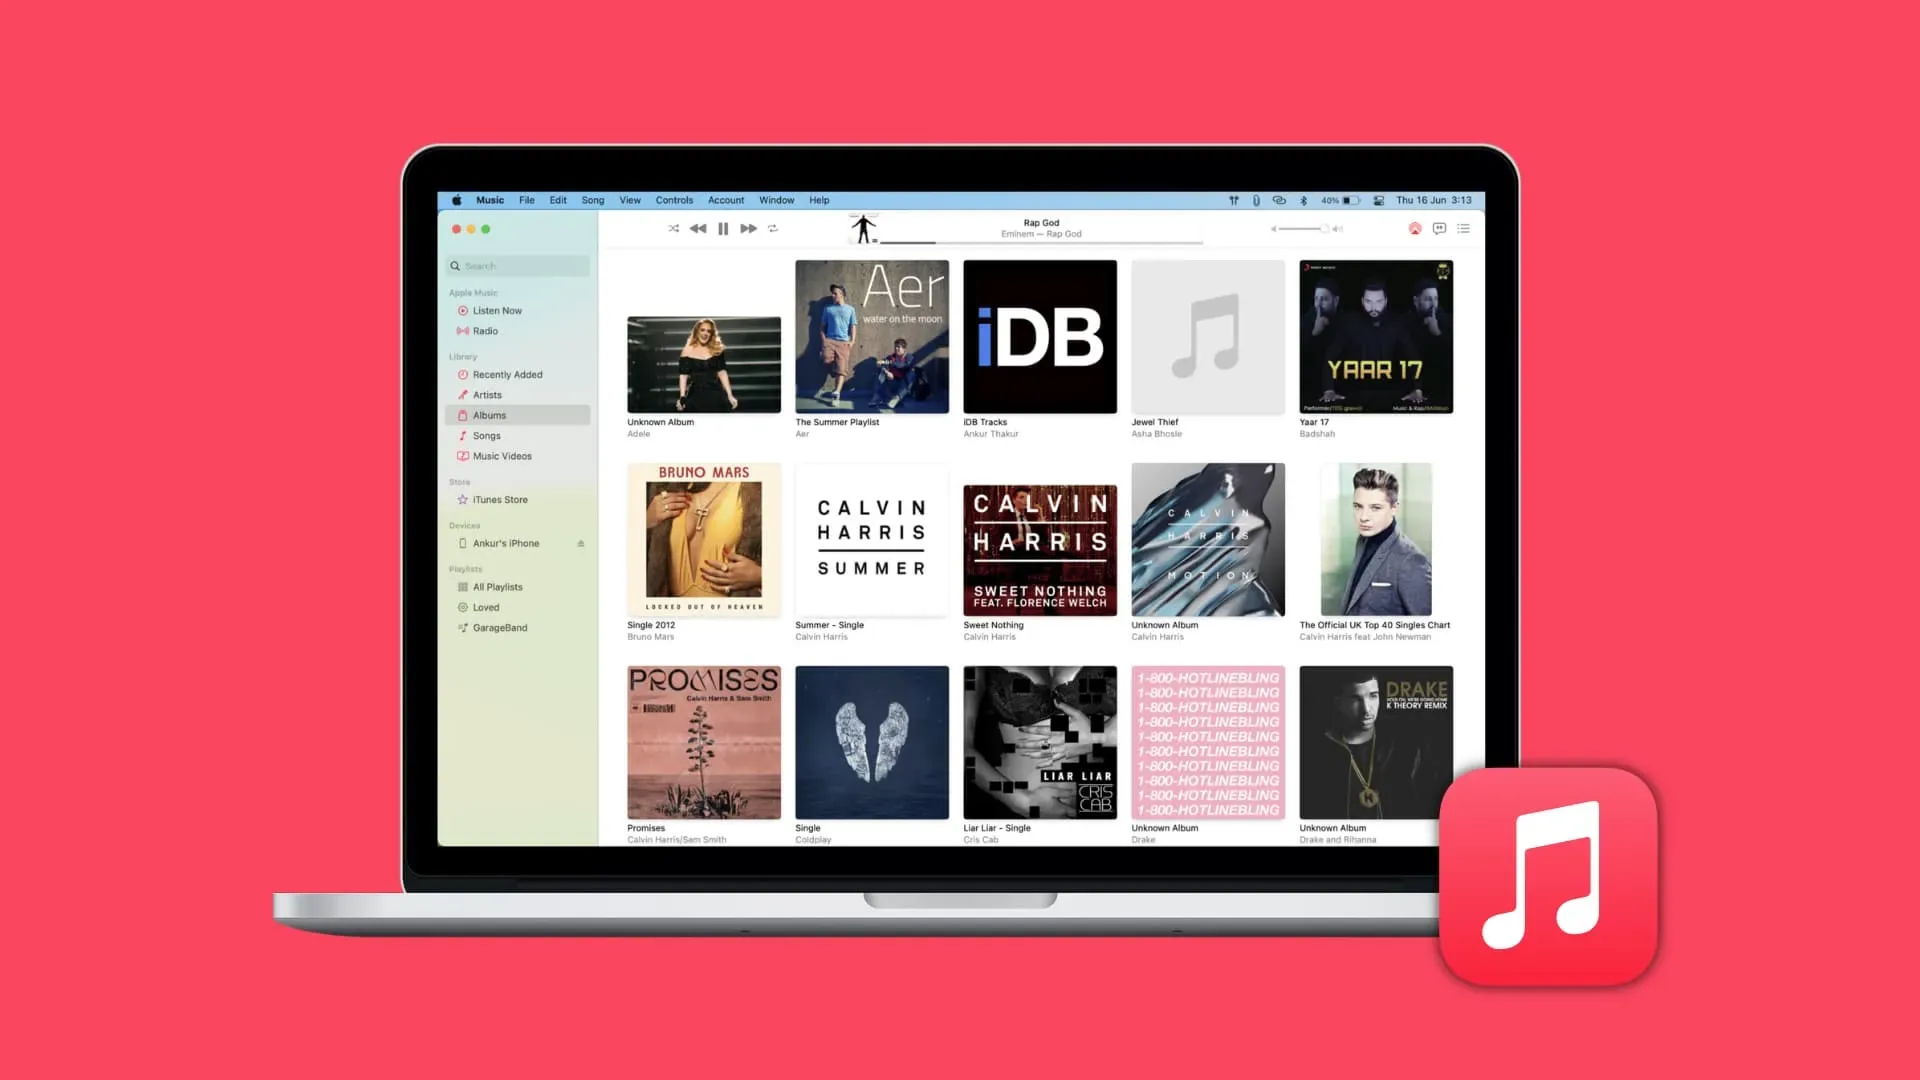
If you’re using the Apple Music app to listen to or stream your favorite tunes on your iPhone, iPad, Mac, Apple Watch, and Apple TV, be sure to watch our how-to video for various tips on how to use the Music app. We’ve done our best to find little-known or hidden features that your average Apple Music user is probably not familiar with.
1. Turn on auto download for offline listening
In Settings → Music, turn on Automatic Downloads so that every song/album added to your library is automatically downloaded for offline listening. If you don’t have enough storage on your iPhone, please disable this feature to stream songs.
2. Manage storage settings for lossless audio

Turn on lossless audio in Settings → Music → Sound Quality. Like RAW images, the lossless audio format preserves every detail of the original (24-bit/192kHz) sound without cutting out hard-to-hear frequencies.
Almost the entire Apple Music catalog is available in this format. On the other hand, lossless streaming over cellular networks or Wi-Fi connections consumes significantly more bandwidth. Read: How to change streaming and download quality on the TV app
In other words, storing higher resolution songs for offline listening will definitely take up significantly more space on your device.
Luckily, you can control audio quality separately for offline downloads, cellular streaming, and 5G/Wi-Fi after you enable lossless audio in settings. For example, you can set your iPhone to never download lossless music and only stream lossless audio over cellular.
Lossless only works with wired headphones. Leave it off if you have AirPods or other wireless headphones because it’s not worth the extra space and bandwidth.
3. Adjust the equalizer settings

Not many people even know that they can change the sound of music on their iPhone and iPad by adjusting the Equalizer (EQ) setting. In Settings → Music → Equalizer, you can choose between different sound presets.
These include pop, hip hop and rock, just to name a few. Apple also provides equalizer presets such as Bass Up, Bass Down, Small Speakers, Treble Enhancer, Voice Enhancer, and Spoken World that are tailor-made for specific scenarios.
The equalizer is disabled by default. We recommend switching between different EQ settings while listening to a song to instantly hear the difference.
4. Turn on spatial sound

The vast majority of the Apple Music catalog is available in Dolby Atmos. Artists have remixed much of their older work for Dolby multi-channel audio, and new albums are also being recorded in this format.
This allows you to enjoy Apple Music with spatial audio that applies sound filters and effects to better separate vocals and instruments.
In Settings → Music → Dolby Atmos, select Automatic to enable spatial audio.
This will cause the Music app to play the Dolby Atmos version of the song when using compatible headphones such as AirPods, AirPods Pro, AirPods Max, and some Beats products (spatial audio does not support iPhone speaker). To control spatial audio, press and hold the volume slider in Control Center to access the hidden switch. Read: How to Get Details of Any Apple Music Song on Your Mac
5. Manage sections at the top of your library
On the Library tab, under Music, several options are listed at the top: Playlists, Artists, Albums, and Songs. But did you know that you can choose which sections to display?
To do this, tap “Edit”in the upper right corner and turn on the sections you want: “Playlists”, “Artists”, “Albums”, “Made for You”, “Songs”, “TV & Movies”, “Music Videos”, “Genres ”, “Collections”, “Composers”, “Downloaded”, or “Home Sharing”. Check the boxes next to the subsections you want to show in your library, then click Done.
6. Sort the list of songs
The Music app sorts your music by artist by default, but wouldn’t it be great if you could browse your library by artist, or better yet, alphabetically?
Well, you can, but you need to switch to the Library tab and then go to the song list by clicking Songs at the top of the screen. Now click “Sort”in the upper right corner and choose how you want to sort the list: “Title”(alphabetically), “Recently Added”(most recent additions to oldest) or “Artist”(alphabetical order).
7. Sing along to your favorite music
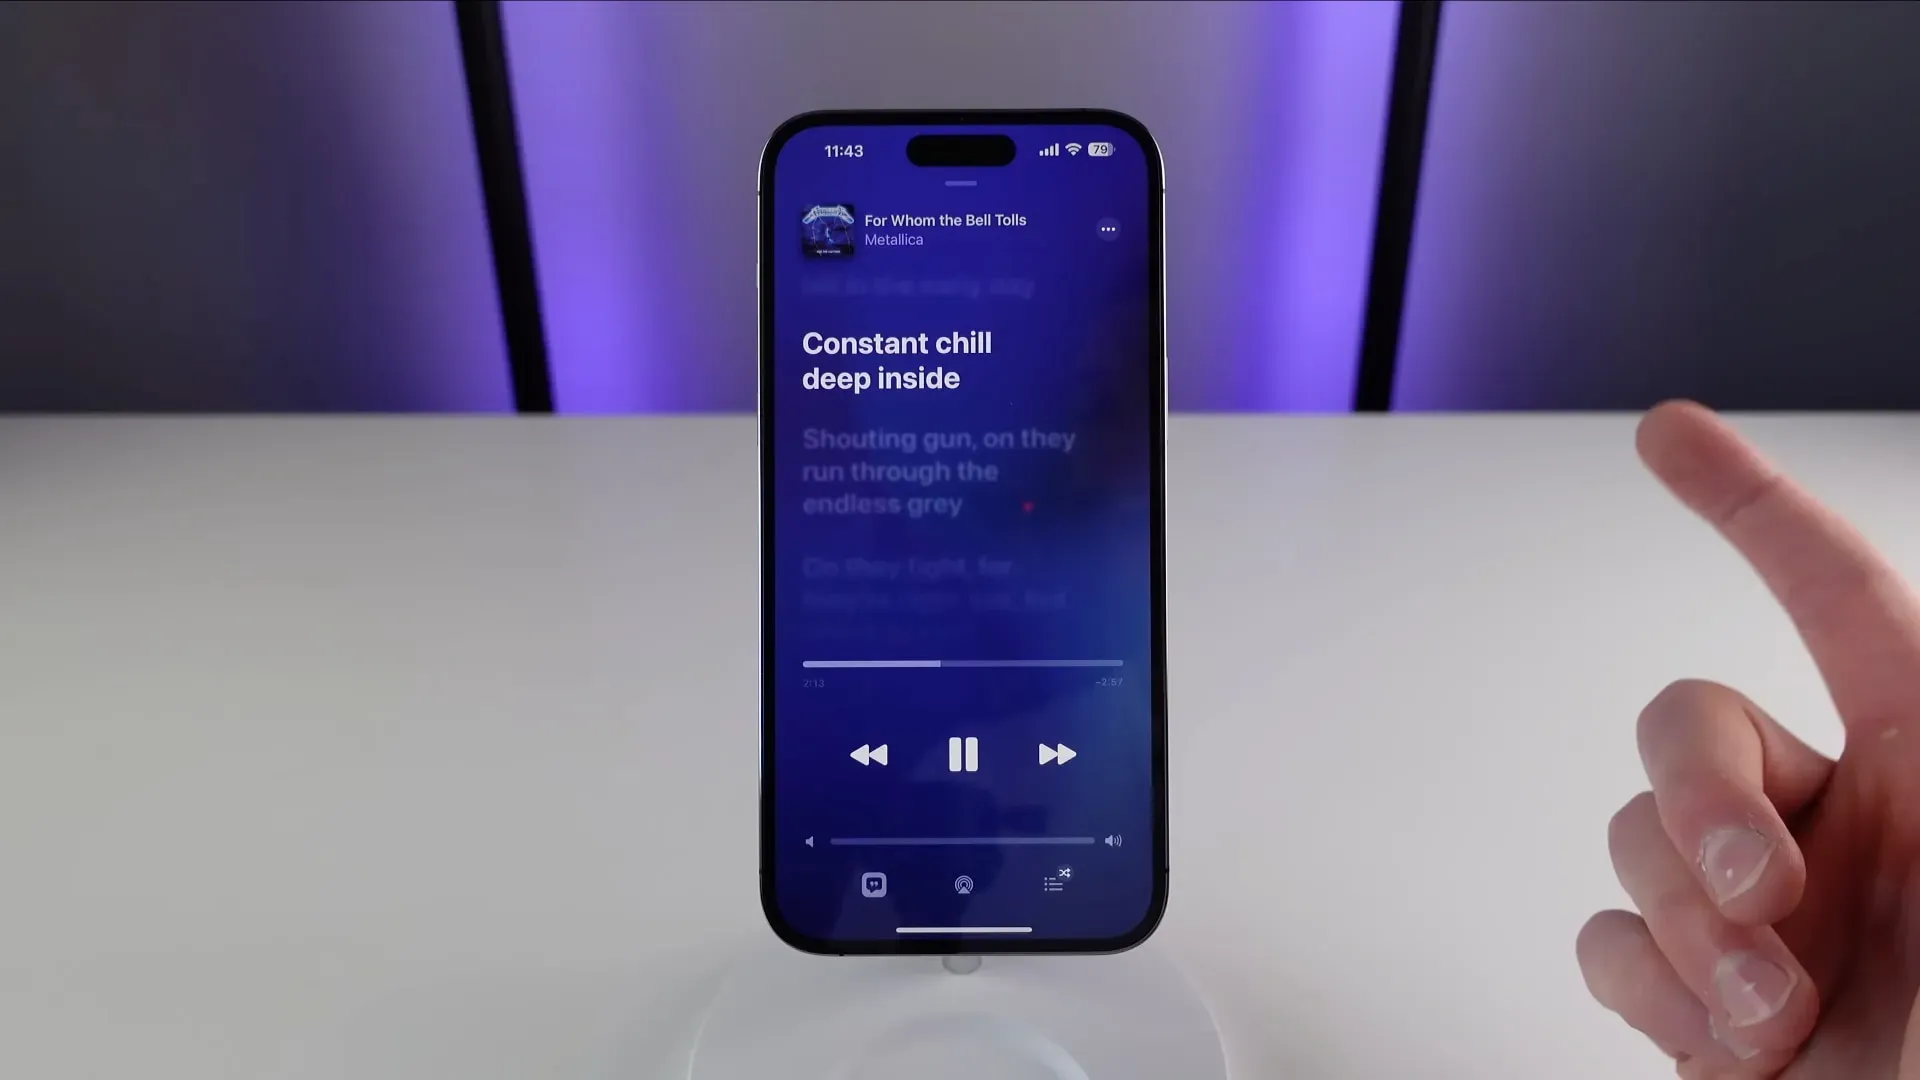
The lyrics of most Apple Music songs are time-synced. Just start listening to the song in the Music app and then switch to the Now Playing screen.
To open the panel with animated texts, click the icon in the lower left corner. You can click on a line to jump to that part of the song. To share lyrics up to four lines, tap the three-dot menu (…) in the lyrics screen (or long-press a song in other views), then select Share Lyrics.
8. Quickly jump to the song’s album
Whenever you want to see the album a song comes from, just long press on the song in any view and select Show Album or the hit album art displayed at the top of the context menu. This will show you the list of songs from this album that are in your library. To see the entire track list of an album, click “Show Full Album”at the bottom of the list.
9. Create your own stations
Back in the days of iTunes, there was a feature called Genius that provided personalized recommendations based on the contents of your music library and other factors. iTunes is gone, but the idea of Genius lives on.
To hear music similar to the artist, song, or genre you’re currently listening to, tap the three-dot menu (…) on the Now Playing screen and select Create Station.
Also, call up Siri at any time and say something like “Hey Siri, start the station at”followed by the name of a song, artist, or genre.
10. Inline Up Next Shortcuts
The Music app contains a list of songs to play in a special queue called Up Next. To view your Up Next list, tap the icon in the lower right corner of the Now Playing screen, which looks like three bulleted lines. You can now drag any track to a new location to reorder the “Next”queue to your liking.
You can also swipe right on a song in the list, then select the purple icon to play that song next, or the orange icon to add it to the very bottom of the “Next”queue. To remove a song from Up Next, swipe left on it and tap the Delete icon.
11. Custom Images in Playlists
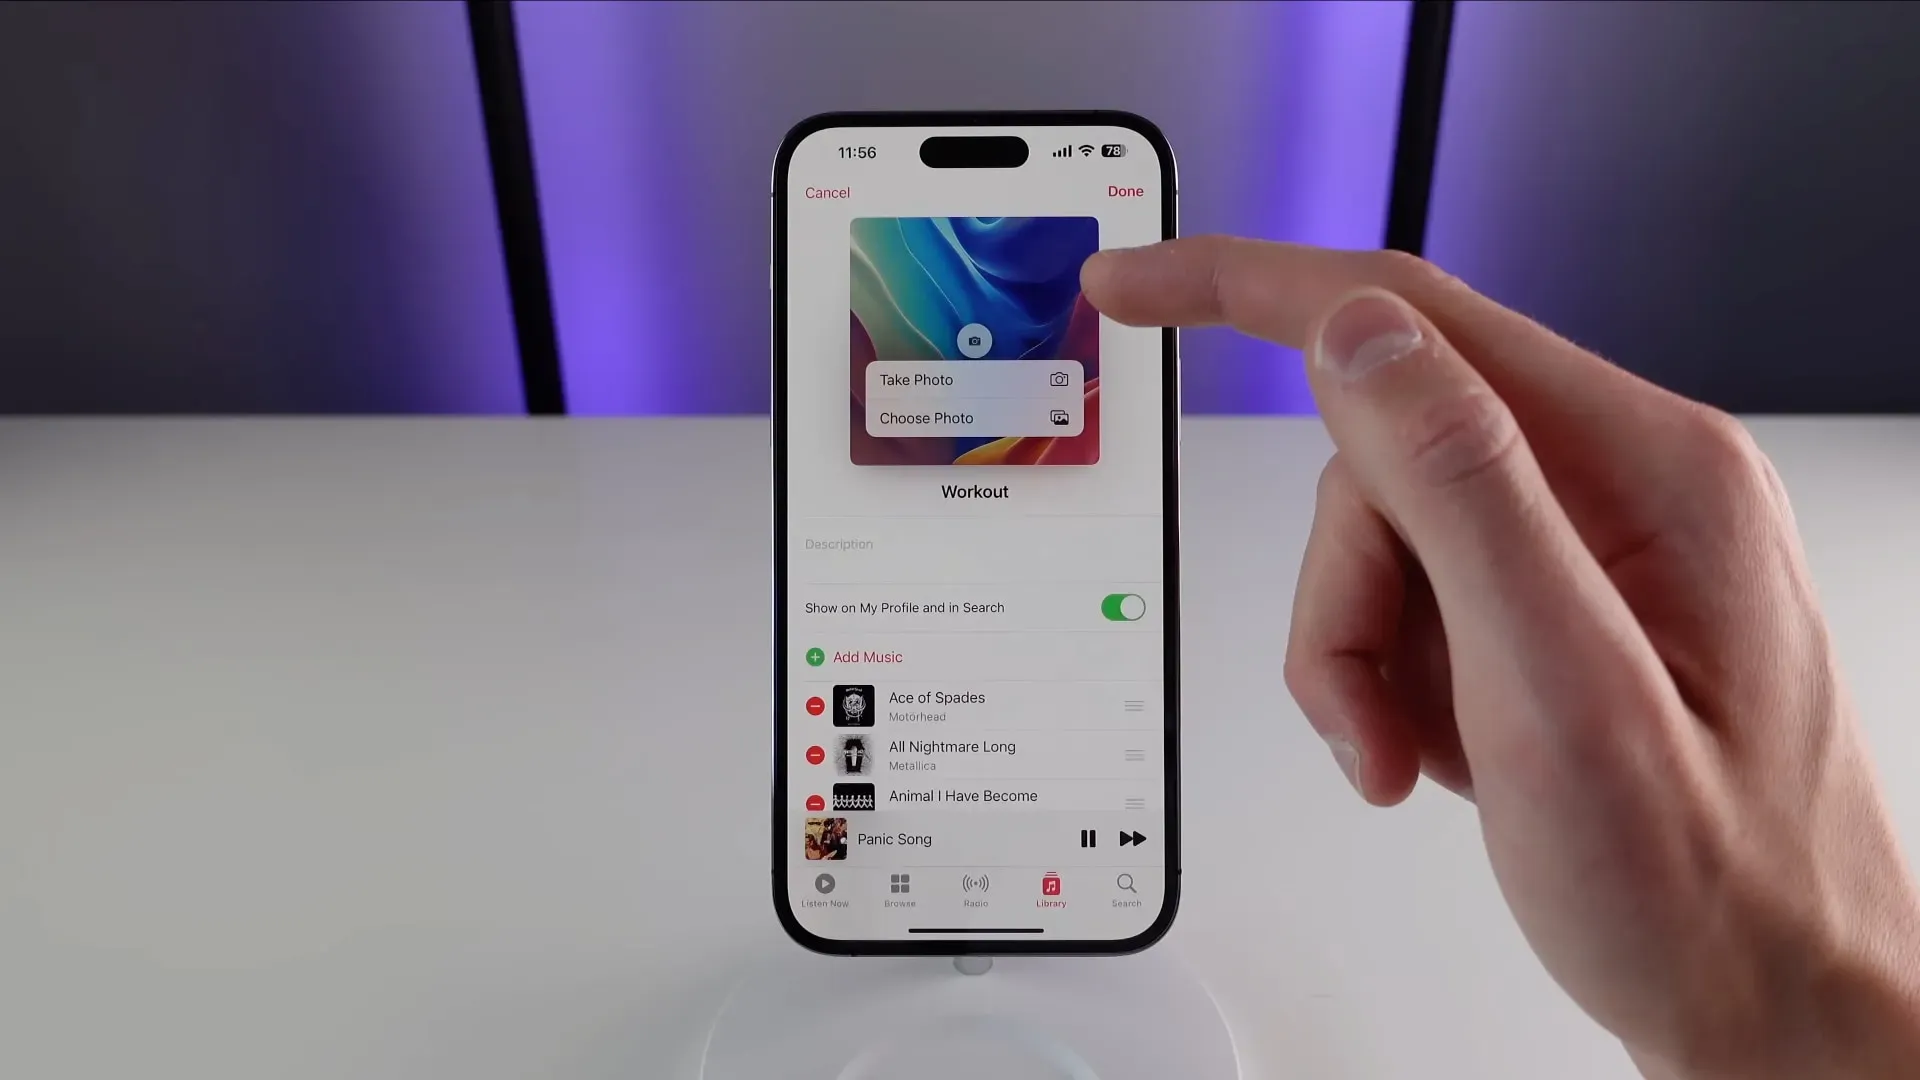
To make your playlist easier to visually distinguish, upload a custom cover image. Select “Playlists”in the “Library”tab and select the playlist you want, then tap the three-dot menu (…) and select “Edit”.
Now, click the “Camera”button on the cover image to open the options to take a photo or select an image from your library to use as your playlist’s cover art.
12. Sort your playlists
People who have many playlists may want to sort them alphabetically for easier browsing. Tap the three-dot menu (…) on the playlist screen and select Sort By, then choose how you want to sort your playlists: Playlist Order, Title, Artists, Album, or Release Date.
Sorting playlists requires iOS 16.0 or later. Before iOS 16, you could only view your playlist in the order you added them, but now you can choose your own sort order.
13. Search music by mood
Instead of using keywords to find the right song, sometimes you just want to listen to something that suits your mood. Apple’s editors have created hundreds of mood-based playlists, with the most popular ones listed in the Browse tab (Music by Mood section, or tap a mood, such as Feel Good).
For even more detailed results, go to the “Search”tab and enter a keyword based on your mood, such as “Romance”, “Calm”or “Party”to get a list of eligible songs that match the theme.
14. New Music Mix playlist keeps you in the loop
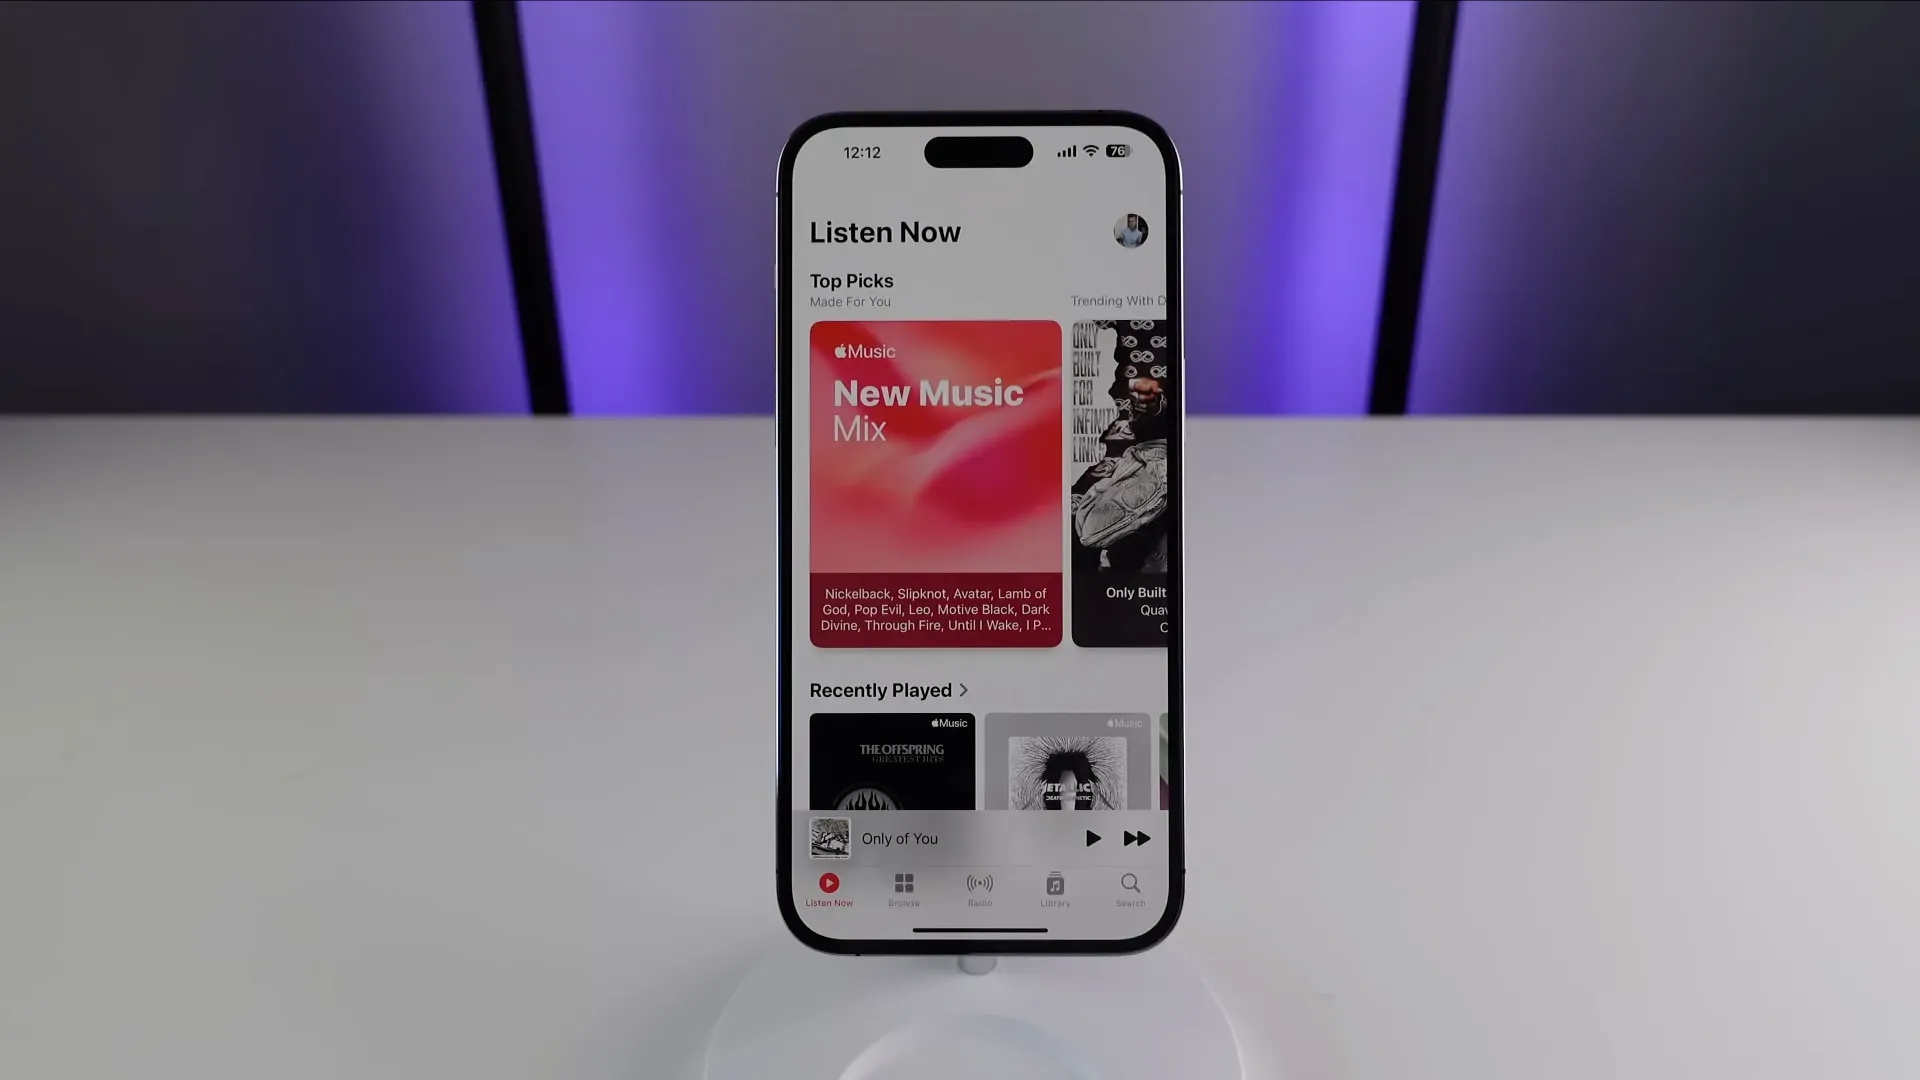
In addition to playlists created by human experts, Apple Music offers algorithmically generated, dynamically updated, and personalized playlists just for you. For example, one of them is filled with the best of what your friends are listening to.
To discover something new, go to the Listen Now tab in the Music app and tap the Made for You heading, then select the New Music Mix playlist.
In this playlist, you’ll find new music from artists Apple’s algorithm thinks you’ll love, updated every Friday. While there, feel free to explore other personalized playlists such as Favorites Mix, Get Up! Mix, Chill Mix, Friends Mix and more.
15. Don’t Forget the Top Charts
One of the best ways to discover new music is to explore the charts in the Music app, which list the most popular songs and more. In fact, this playlist is a great way to discover the most popular songs of the day.
Go to the ‘Overview’ tab and scroll to the bottom, then select ‘Charts’. Now tap on the Daily Top 100 heading to see what’s hot around the world or country by country. If you want to know what’s popular in over 100 cities around the world, choose the City Charts heading instead.
Also, browse the top songs, albums, music videos, or playlists by selecting the appropriate titles (Top Songs, Top Albums, Top Videos, and Top Playlists). The charts include songs from various genres. To view charts by genre instead, click All Genres in the top right corner and select a genre from the list, such as Rock or K-Pop.
16. Live radio broadcast
Apple Music supports live streaming of any iHeartRadio-branded radio station. This is a great way to keep track of your local radio stations in the Music app. To get started, go to the “Search”tab and enter the name of the radio station, call sign, frequency or nickname. You can also ask Siri to broadcast a radio station live.
17. Full Screen Album Art on Lock Screen
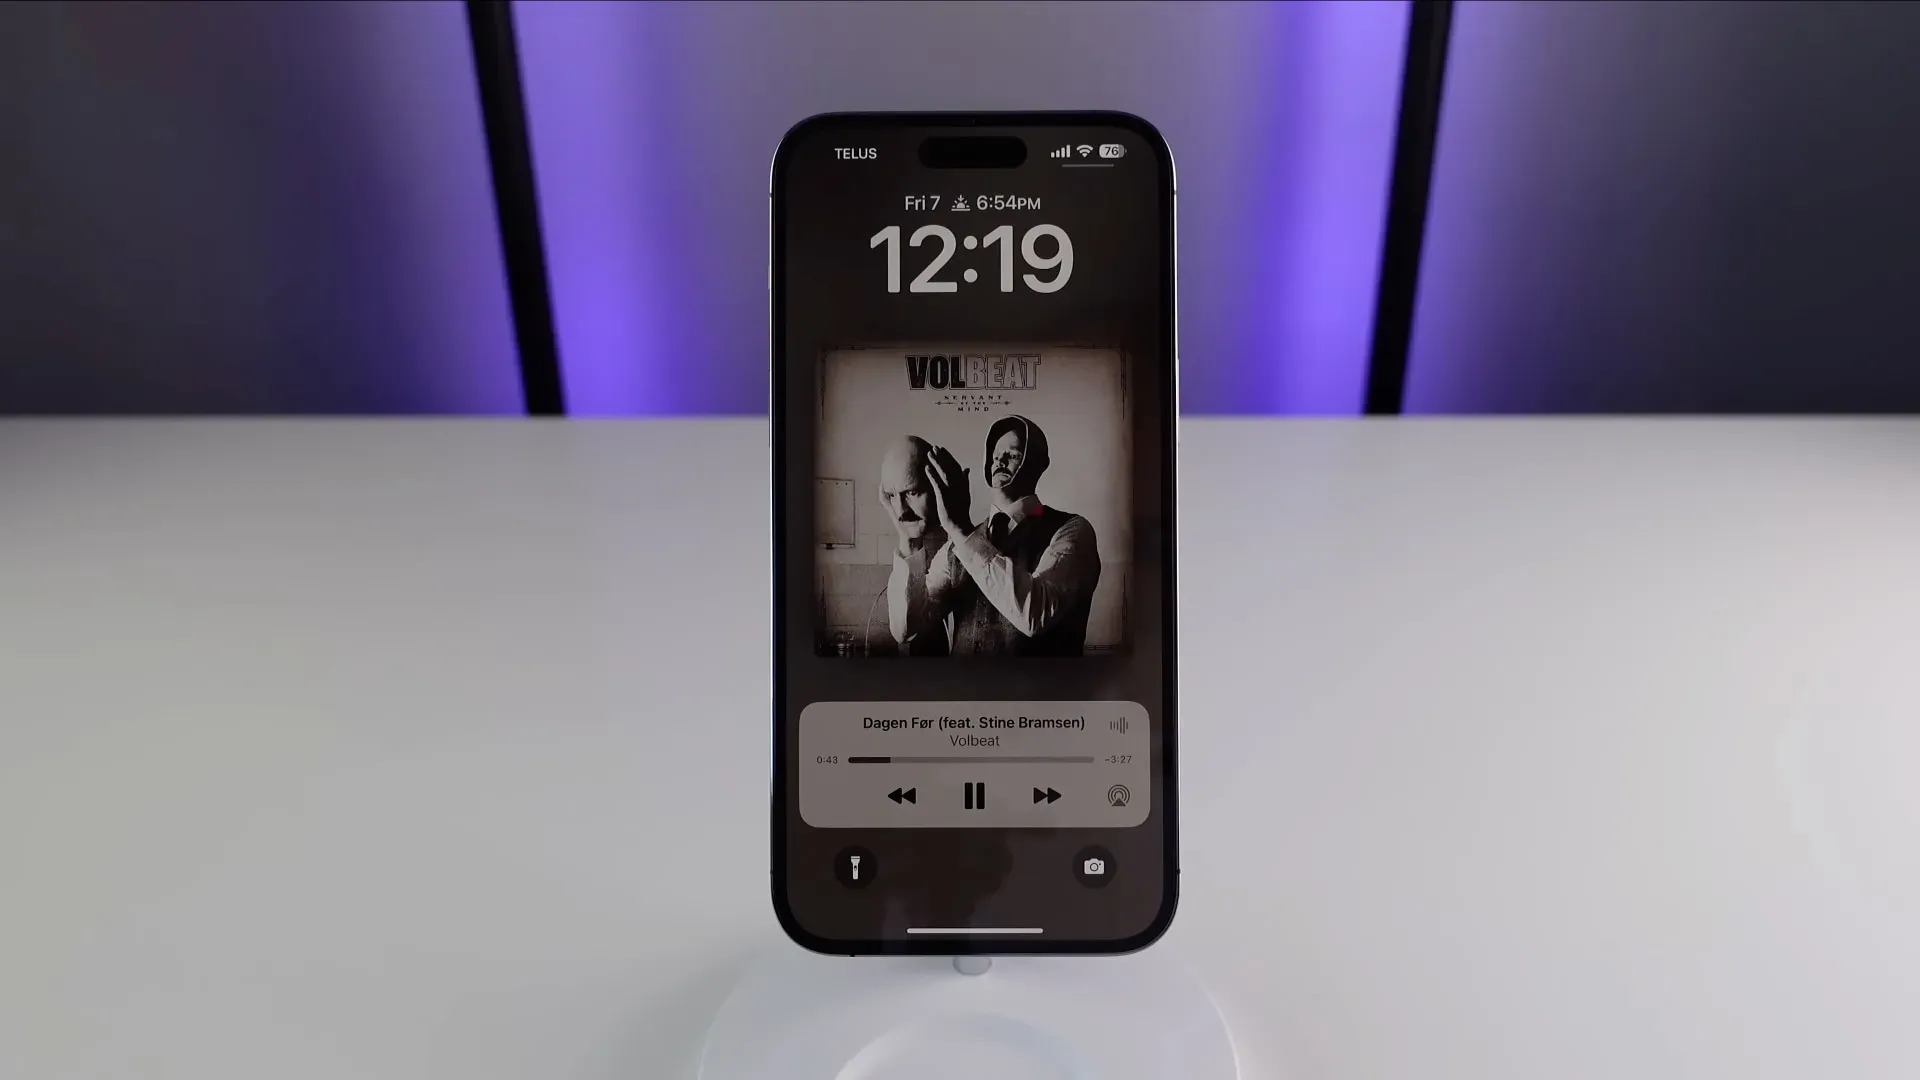
The Music app in iOS 16 lets you switch between the standard Now Playing bar on the lock screen and an enhanced version that fills the screen with album art.
Simply tap the small album art image in the Now Playing controls on the lock screen to switch to the full-screen player. In this mode, the album art is much larger, and the background color and player controls match the album art.
To return to the default view, click on the cover image.
After all, the Music app isn’t all that bad.
I hope you learned something new by watching our video tips and tricks for Apple Music. The Music app could be better designed, especially since some of its features are hidden deep in the menu or too hard to find on your own, so you’ll need all the help you can.
Armed with the knowledge in this guide, you’ll learn how to better manage your favorite songs, discover new things to listen to in myriad ways, and personalize your Music experience.