
Making espresso at home involves a puzzle familiar to many pursuits: it can be delicious, cheap, or easy to learn, but you can choose no more than two of them. You can spend an endless amount of time and money tweaking and upgrading your gear, chasing shots that taste like the best cafe deals, always wondering what else you could change.
Or you could do what Norm Zol did and build a highly customizable machine from open source hardware plans and Espresso Gaggia thermal guts. Here’s what Sol did, plus a few additional responses from a retired programmer and tech writer, now that his project is circulating in both open hardware and espresso circles.
Like many homemade espresso drinkers, Zol saw that his favorite machine, the Gaggia Classic Pro, could be modified in a number of ways, including the addition of a proportional-integral-derivative (PID) controller and other modifications for better temperature, pressure, and portion control. volumes. Most intriguing to Saul was Gaggiuino, a project that adds these things with an Arduino Nano or STM32 Blackpill, lots of electrical work, and open source software.
It looked neat to Saul, but as he told Ars in an email, he was very pleased with the espresso he dialed on his Classic Pro. “[S]o I decided to build a new car to experiment with. I didn’t want to risk not drinking coffee while experimenting with a new car.”Luckily, he had an older machine, the Espresso Gaggia, and the design of the Gaggia home espresso machine hasn’t changed in decades. After descaling the boiler, he had a pump, a boiler and, as he writes, “an experiment site to try out some of the crazy stuff I’ve seen on YouTube and the Internet.”
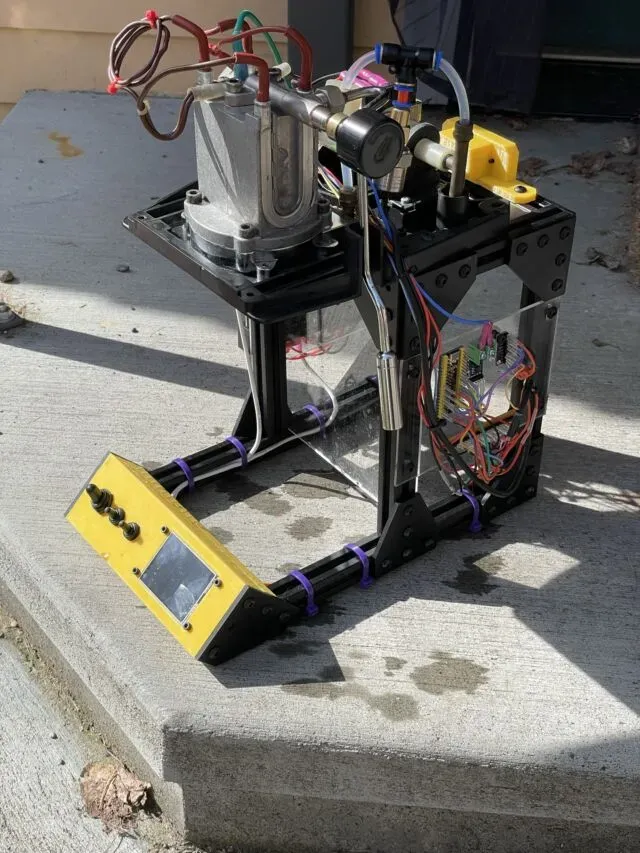
As a result, Zol created a detailed guide for building your own highly customizable machine from common espresso machine parts and Gaggiuino software. From his own car, he pulled out a pump with a pressure sensor, a boiler with a temperature sensor, an overpressure valve and a brew head. Sol made the chassis for his new machine out of extruded rails and stiffeners.
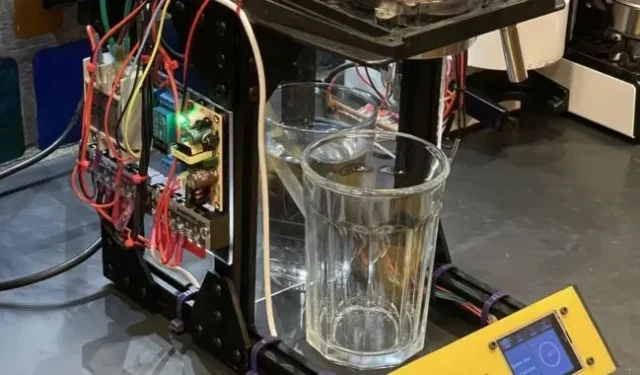
The boards and high voltage components were assembled in breadboard form on acrylic panels held together with poster adhesive. The 120 volt power connector was removed from the PC power supply and then installed using a 3D printed bracket. Low voltage wires and parts were also nailed to acrylic, individually crimped and shrink wrapped. And the control panel was printed on a 3D printer, which allowed the use of toggle switches and a touch screen.
Sol’s division still has a lot of work to do; an open boiler and 120-volt wiring should be hidden, and a drip tray would be nice. But it works. The first shot was quick and under-extracted, suggesting finer sanding and tweaking settings. Again, this describes almost every first homemade espresso. Saul hopes that future versions of his project will use Gaggiuino’s own PCB design and that he will make his 3D design files available for sharing.
In an email interview, Saul wrote that he received friendly and encouraging feedback about his project.
Mostly people carve their own path and wonder how deep they want to get into the weeds with extra control. My advice (if they ask!) is to buy a proper coffee grinder and grinder (I’ll use a Gaggia Classic grinder and maybe a Baratza Encore ESP grinder) and then spend some time learning how to use them. For example, my grinder is outdated and it took me ages to figure out how well I really need to work to get the espresso I wanted.
Asked if he was intimidated by the level of control he now has over every shot, Saul replied, “Yeah, but is that good?”
The level of control is amazing and I’m just starting to take shots that rival what I get every morning from my stock car. The machine itself still needs to be fine-tuned before it enters everyday use – I want to add a decent drip tray before it’s really practical, and a digital scale is another thing I… want to try. To be honest, I think it might be overkill for my espresso needs, but I really enjoy the painstaking work that goes into building and learning how to use something like this. I think the satisfaction I get from creating and experimenting is probably just as important as the final product.
I asked Saul what was the most difficult aspect: hardware, software/firmware, or setting up the espresso. “It’s all quite complicated, it’s hard to choose one thing,” he wrote. The software flashing went without any programming on his part. The hardware required new skills, like crimping connectors, but he was slow and learned from small mistakes. The hardest part will be getting the espresso to come in, Saul wrote. “I think I’ll buy a pack of fresh dark roasts and spend a couple of evenings making shots and changing parameters.”
Overall, “this is one of the most enjoyable builds I’ve ever made – the combination of mechanical work, electronics, water and steam is a challenge,”Saul wrote. You can see many more shots of the homemade machine and its parts on Sohl’s Substack, which we first saw on the Hackaday blog.