

The native Apple Pages app lets you create documents and personalize them to your liking. Data security is critical when writing sensitive documents such as contracts, agreements, and other files. This article shows you how to add a password to a Pages document on iPhone, iPad, and Mac.
- How to Password Protect Pages Documents on Mac
- How to Password Protect Pages Documents on iPhone and iPad
How to Password Protect Pages Documents on Mac
Before we get started, I should point out that you won’t be able to recover your Pages password if you forget it. Therefore, choose a password that you won’t forget, or write it down securely. Let’s learn how to do it now.
- Open Launchpad or use Spotlight search.
- Launch Pages.
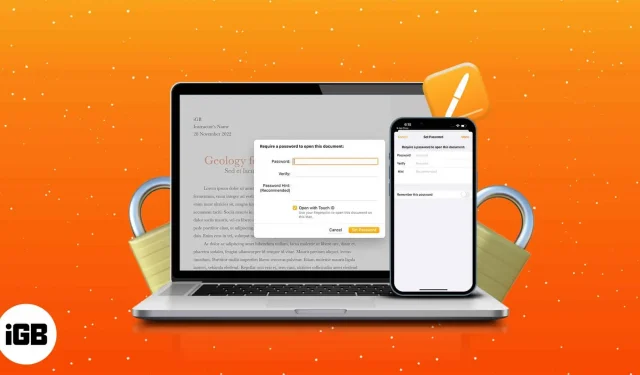
- Open the document you want to password protect.
- In the upper left corner of the screen menu bar, click the File tab.
- Select Set password.
- Enter your password and confirm.
- Select Set password.
Enable access to Touch ID by checking the “Open with Touch ID”checkbox. Also, to remember your password, add a password hint.
To open locked documents on Mac
Follow the steps below to open items in Pages on Mac.
- Launch Pages.
- Select a document → click Open.
- Use Touch ID.
Alternatively, you can click “Use password”→ enter password → “OK”. You may see a padlock icon on your secure pages in the Pages app.
Change or remove password from a Pages document on Mac
- Launch Pages → File.
- Go to change password.
- Click Remove Password.
If you want to change the password of the document on the pages, you need to follow steps 1-3 above, enter the old password → new password → confirm → select “Change password”.
Set up Touch ID for password-protected documents on Mac
- Click on the Apple logo in the top left corner of the screen.
- Select System Preferences.
- Go to Touch ID and Passcode.
- Click Add Fingerprint.
- Enter password → Unlock.
- Follow the instructions displayed on the screen.
- Click Done.
Follow our Touch ID and passwords article if you’re having trouble setting up or using macOS Monterey.
If you’re using the same Apple ID, Pages documents will automatically sync from your Mac to your iPhone.
How to Password Protect Pages Documents on iPhone and iPad
- Open the Pages app on your iPhone.
- Tap the document you want to password protect.
- Select the three dots → Document Options.
- Select Set password.
- Enter the password and confirm.
- Click Done.
If you have Face ID turned on, you’ll see an “Open with Face ID”option in a password-protected Pages document on your iPhone. Also, you can help yourself by providing a password hint in the Hints field.
If you don’t have an active Face ID for your device, you’ll get the option to enable Remember this password.
Note. When you set a password for a document, you will see a lock icon.
Open locked Pages documents on iPhone and iPad
- Launch Pages.
- Touch a secured document.
- Select OK at the prompt. Do you want to allow Pages to use Face ID?
- Scan your face.
After two failed Face ID attempts, you’ll be prompted to enter your passcode.
Remove a password from a Pages document on iPhone and iPad
- Open Pages → protected document.
- Go to the three dots → Document Options.
- Tap Change Password.
- Disable the required password.
- Enter your password.
- Click Done.
FAQ
We often receive password-protected PDFs, especially for important job information. This can be quite annoying and hard to remember. So, if you want to learn how to remove passwords from PDFs, check out the article on how to remove passwords from PDFs.
Did you encrypt the Pages document?
Now that you’ve learned how to add a password to a Pages document on your iPhone, iPad, or Mac, you can also check out how to protect extra files like images or PDFs. If you have any further concerns please leave a comment and I will respond as soon as possible.