You are already familiar with the Personal Hotspot feature on your iPhone and cellular iPad, which allows you to share mobile data with other devices. Similarly, your Mac also has this hidden feature that allows you to share your internet connection with other devices such as an iPhone, iPad, Android phone, another MacBook, or any other device that can connect to Wi-Fi.
In this guide, we’ll show you how to turn your Mac into a wireless Wi-Fi router and share its internet connection. In addition, we will also show you how to share your Mac’s Wi-Fi with other devices such as iPhone or iPad via Lightning or Bluetooth cable.
- If your Mac is connected to Ethernet, it can transmit that Internet wirelessly to other Wi-Fi enabled devices.
- If your Mac is connected to Wi-Fi, it can use that internet connection with your iPhone or iPad via cable or Bluetooth (only for older versions of macOS).
- You cannot directly share your Mac’s Wi-Fi as a Wi-Fi hotspot and let other Wi-Fi devices connect to it. However, sharing a Mac’s Wi-Fi as Wi-Fi is possible when using optional accessories such as Wi-Fi network adapters.
Why do you need to do this
1) I vacationed at a resort in Mexico that didn’t offer free Wi-Fi to its customers. If I wanted to go online, I had to pay a huge price. Even worse, paying for this Wi-Fi plan would only let me connect one device. Signing out of your laptop to sign in with your iPhone just won’t work. Because I really wanted to get things done, I decided to pay for Wi-Fi on my MacBook Air and shared it with my iPad.
2) A few months ago my Wi-Fi router stopped working. Unfortunately, I didn’t have a spare, and the ISP said they would replace the router the next day. During this time, I inserted an Ethernet cable into my Mac and turned it into a wireless Wi-Fi router. I then connected my iPhone and iPad to this Wi-Fi network.
3) A few years ago, when I lived in a hostel, the management was very reluctant to let us connect to Wi-Fi. After a little prodding, they allowed me to connect my MacBook to their Wi-Fi for “work”purposes. I could dig inside and find out the Wi-Fi password from my Mac, but at the time I didn’t know it was possible. So instead, I found that sharing the internet from my Mac to iPhone via cable could be a useful option.
Having gone through the incidents described above, you now have a good idea of how useful this can be. Of course, you won’t be using your Mac’s Internet every day. But when the need arises, it will come in handy.
The basics are the same for macOS Ventura and previous versions of macOS. But there are slight differences in steps. So, we have listed them under separate headings.
macOS Ventura or later
1) First, make sure the Ethernet cable is connected to your Mac. Then click the Apple () icon and select System Preferences.
2) Select “General”on the left sidebar and click “Sharing”.
3) Click the information icon ⓘ next to Internet Sharing. Do not turn this switch on yet!
4) Click the menu next to Share Connection From and select your Ethernet adapter.
5) In the “To a computer using”field, check Wi-Fi.
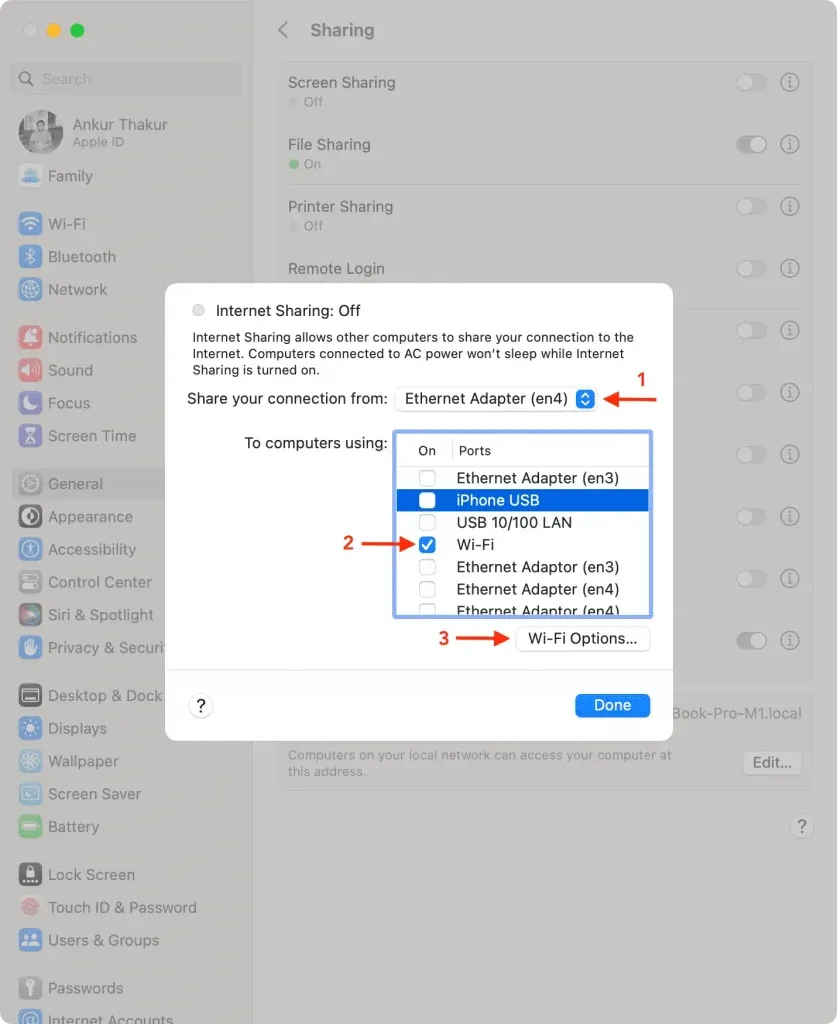
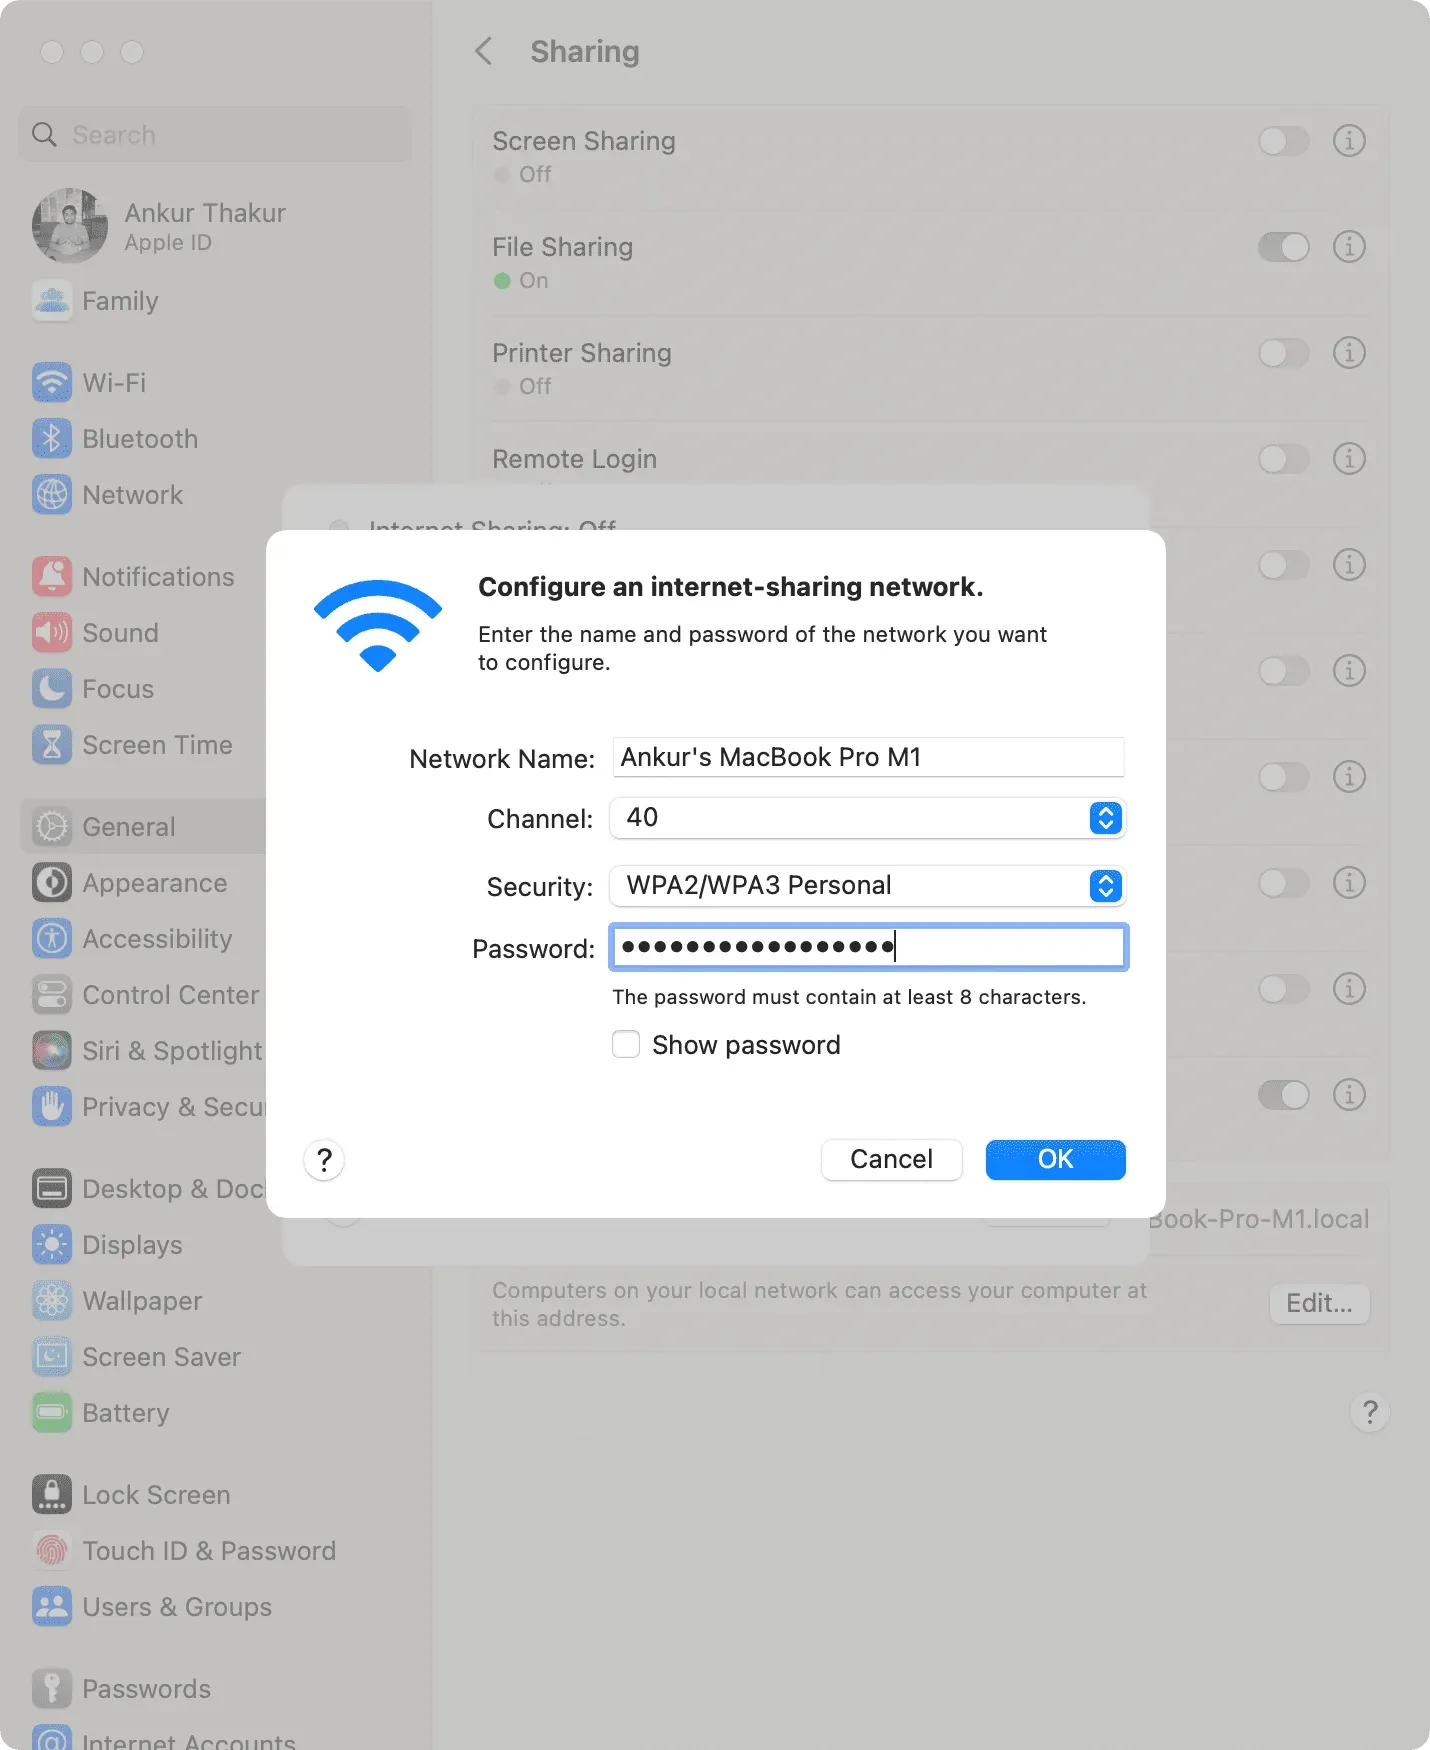
6) Now click the Wi-Fi Settings button and set the following:
- Network Name: This is the name of your Mac and you can leave it as is.
- Channel: 11 will be selected by default. But you can change this. 1, 6, and 11 offer 2.4GHz connectivity, which is great for older, cheaper, and smaller devices like the 1st generation Apple Watch SE. 36, 40, 44 and 48 offer 5 GHz connectivity for better speeds. Thus, if you only need to connect iPhone 5 or later, iPad (4th generation) or later, and similar devices, you can select a higher channel number. Find out more on Wikipedia.
- Security: WPA2/WPA3 Personal is the default for security purposes.
- Password: This is the most important field here. Use this to set a password so that your Mac’s Wi-Fi hotspot is secure and no strangers can connect to it.
When everything is in order, click “OK”and then “Finish”.
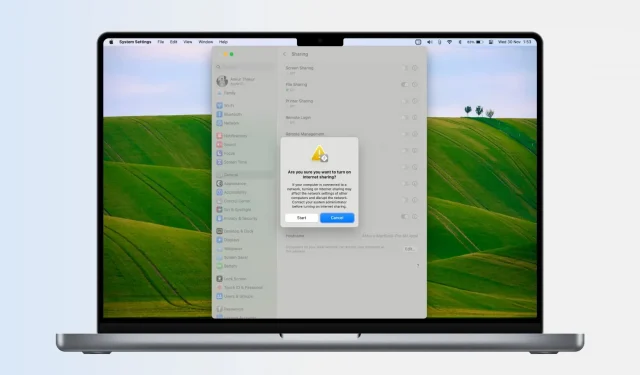
7) Finally, turn on the switch for Internet Sharing and click Start.
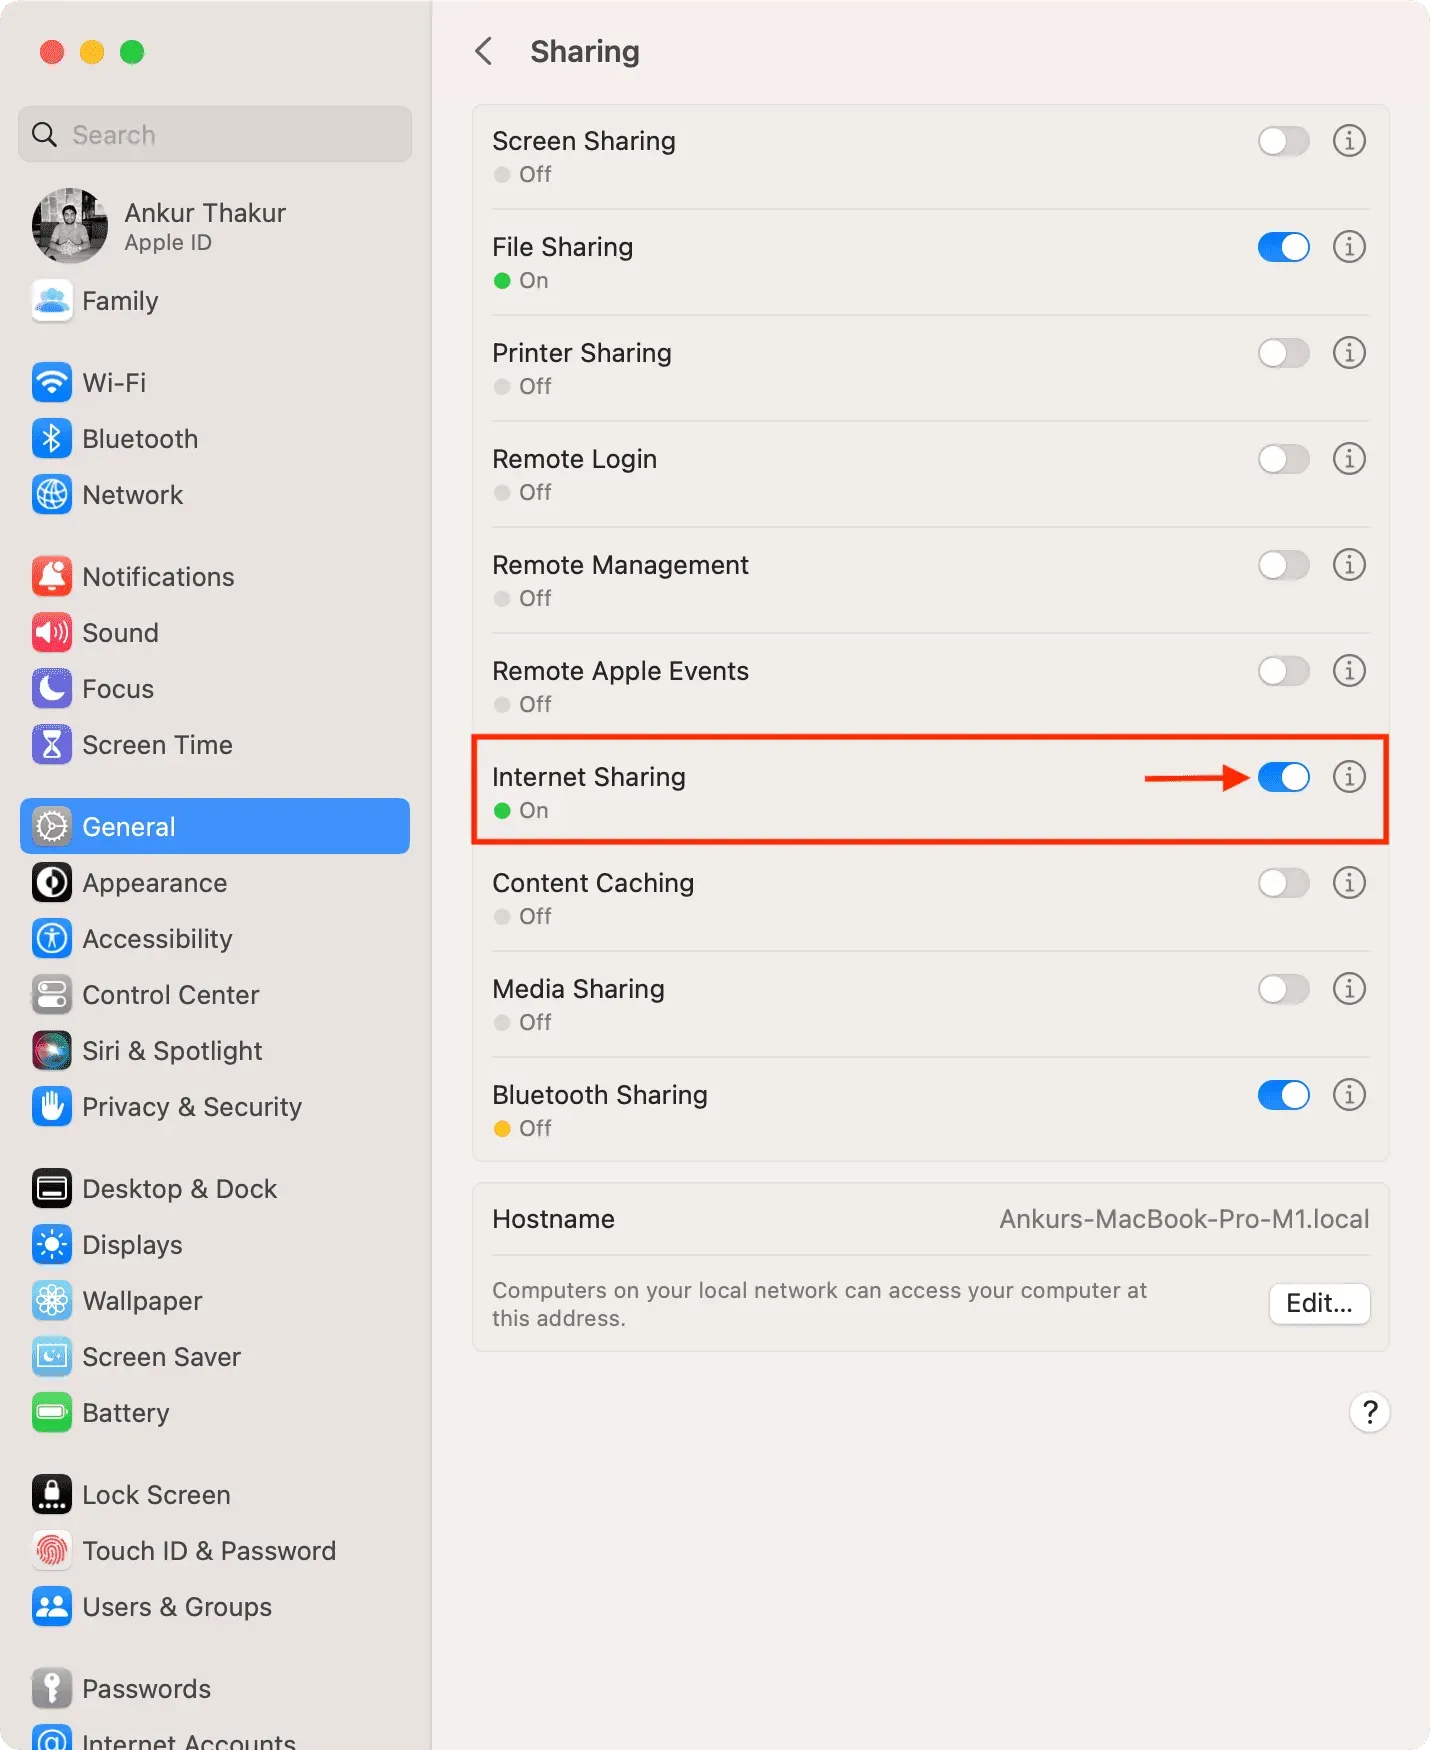
Your Mac’s Wi-Fi icon will no longer show stripes; instead, it will become solid and show an arrow indicating that your connection is being shared.
Now connect your iPhone, iPad, Android phone, tablet, other Mac, Windows PC, or any similar device to your Mac’s hosted wireless network. (steps below)
macOS Monterey and earlier
1) Connect an Ethernet cable to your Mac. Then click the Apple () icon and select System Preferences.
2) Select “Share”.
3) Click “Internet Sharing”in the menu on the left. Don’t tick yet!
4) Click the drop-down menu next to “Share connection from”and select “Ethernet”.
5) Check the Wi-Fi box next to “To computers using”.
6) After that, click “Wi-Fi Settings”, set a password and click “OK”. Read more about this in the section above.
7) Finally, check the box for Internet Sharing and confirm by clicking Start.
How to connect to a Wi-Fi hotspot on your Mac
The steps to do this will differ from device to device. But the basics are the same, namely:
- Go to the Wi-Fi settings screen of your iPhone, iPad, Android phone, PC, etc.
- Select your Mac’s hotspot name.
- Enter the password you set in step 6 above.
- Join your Mac Wi-Fi network and surf the Internet!
As stated earlier, without a dedicated wireless adapter, your Mac won’t be able to share its Wi-Fi with other devices by creating a Wi-Fi hotspot. But you can share your Wi-Fi via Bluetooth or cable with supported devices like iPad and iPhone.
The steps for this are the same as above, but here is the summary.
1) Open System Preferences and select General > Sharing.
2) Click the information icon ⓘ next to Internet Sharing.
3) Select Wi-Fi next to the Share Connection option.
4) Check iPhone USB for “To Computers Using”.
5) Click Finish.
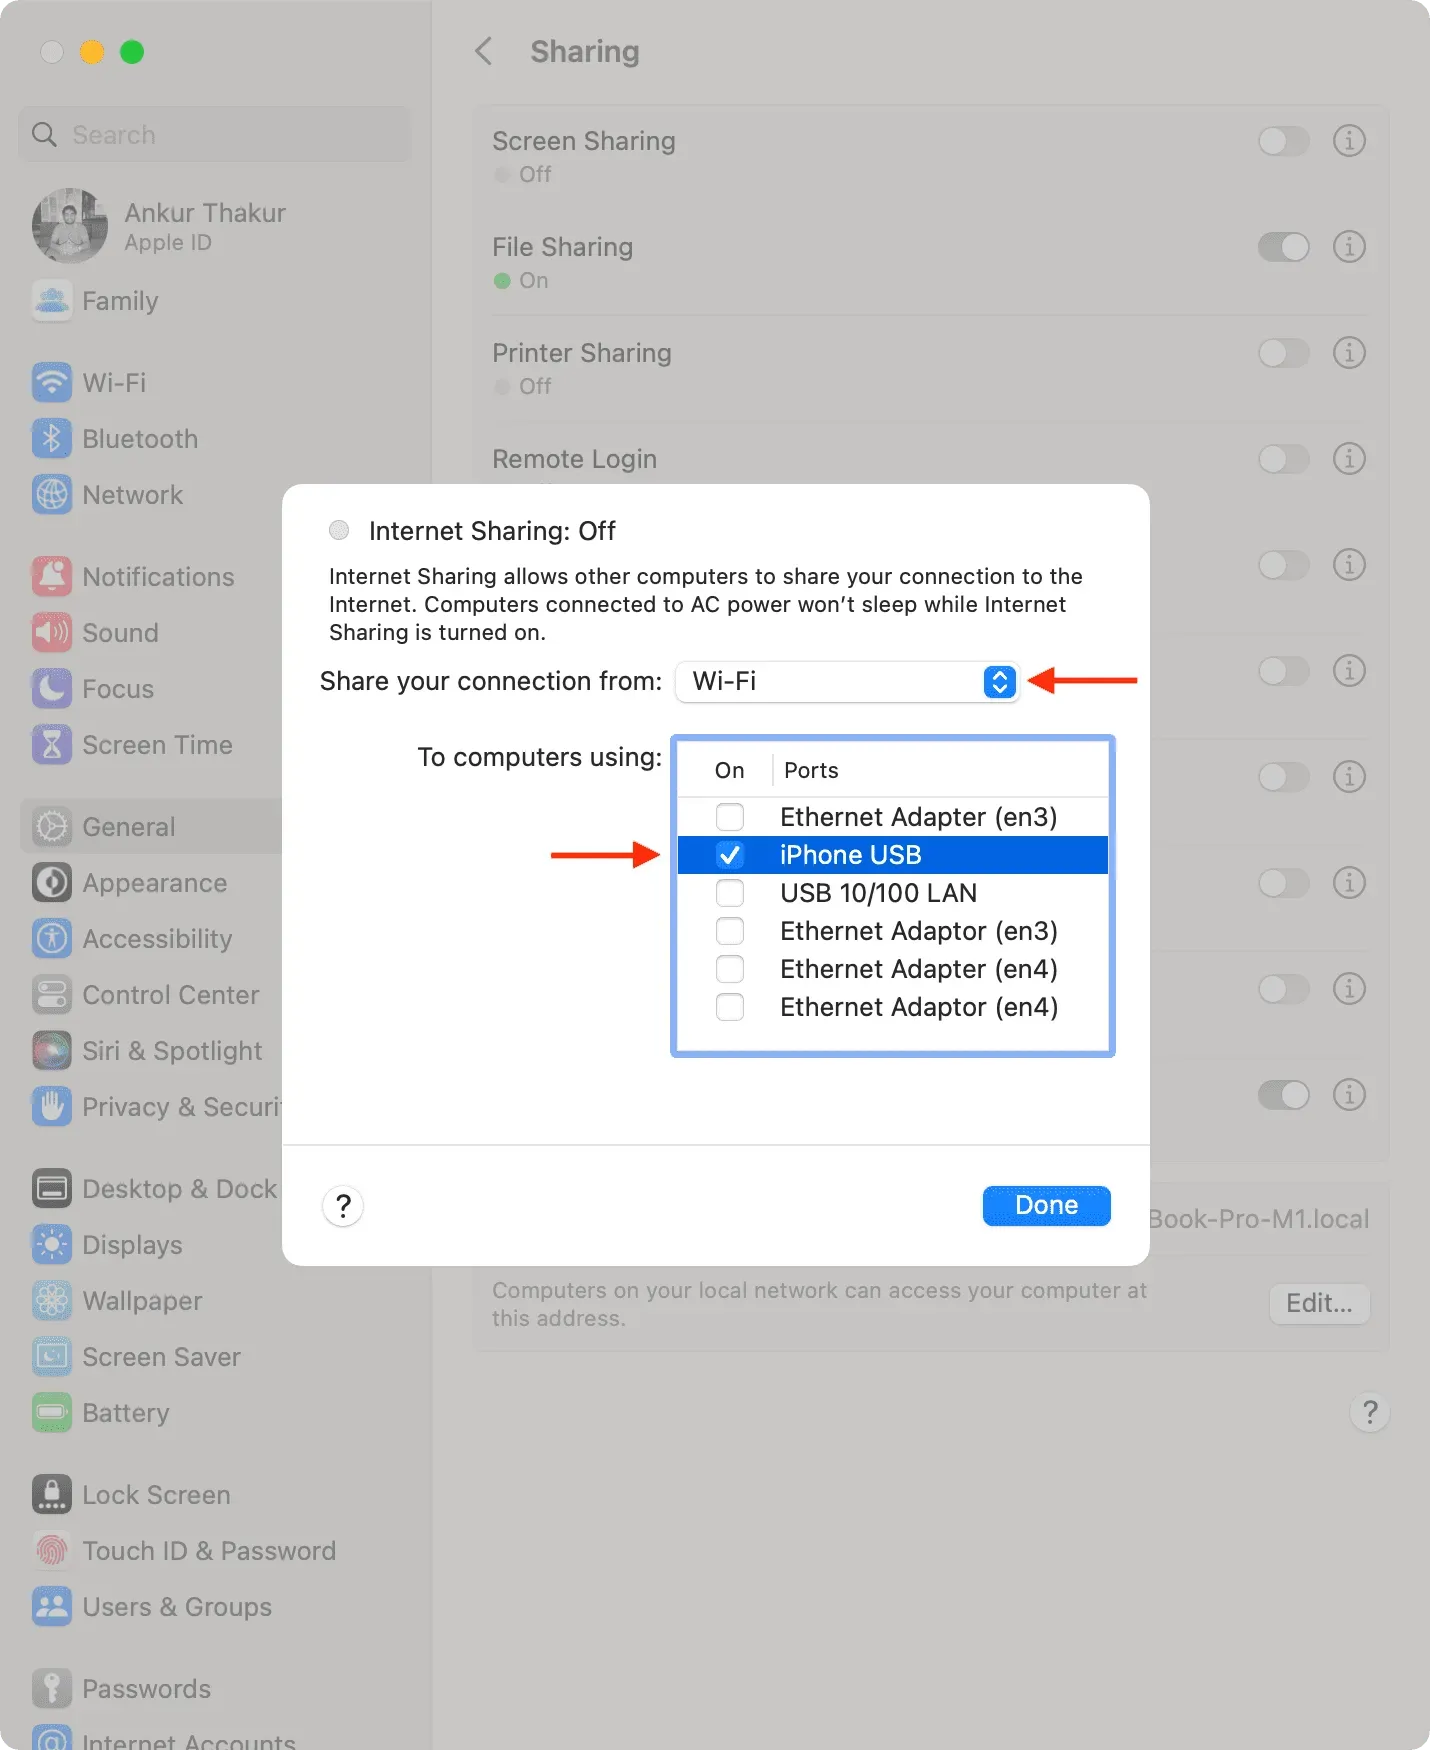
6) Turn on the “Internet Sharing”> “Start”switch.
7) Now connect your iPhone or iPad to your Mac using a Lightning or USB-C cable. You can disable Wi-Fi and Cellular Data on your iOS device. Start using the Internet on your connected iPhone or iPad and it will work using your Mac’s Wi-Fi to which it’s connected via cable.
This screen recording shows that I turned off Wi-Fi and Cellular on my iPhone; however, I can use the internet:
Important: You can’t share your Mac’s Wi-Fi via Bluetooth on recent versions of macOS such as macOS Monterey and macOS Ventura, but it does work on older versions. With that said, here’s how to share your Mac’s Internet with iPad via Bluetooth:
1) On a MacBook, go to System Preferences and turn on Bluetooth. Stay on this screen.
2) On your iPad, go to Settings > Bluetooth and turn on Bluetooth. Now click “Allow new connections”. Be sure to keep this screen open.
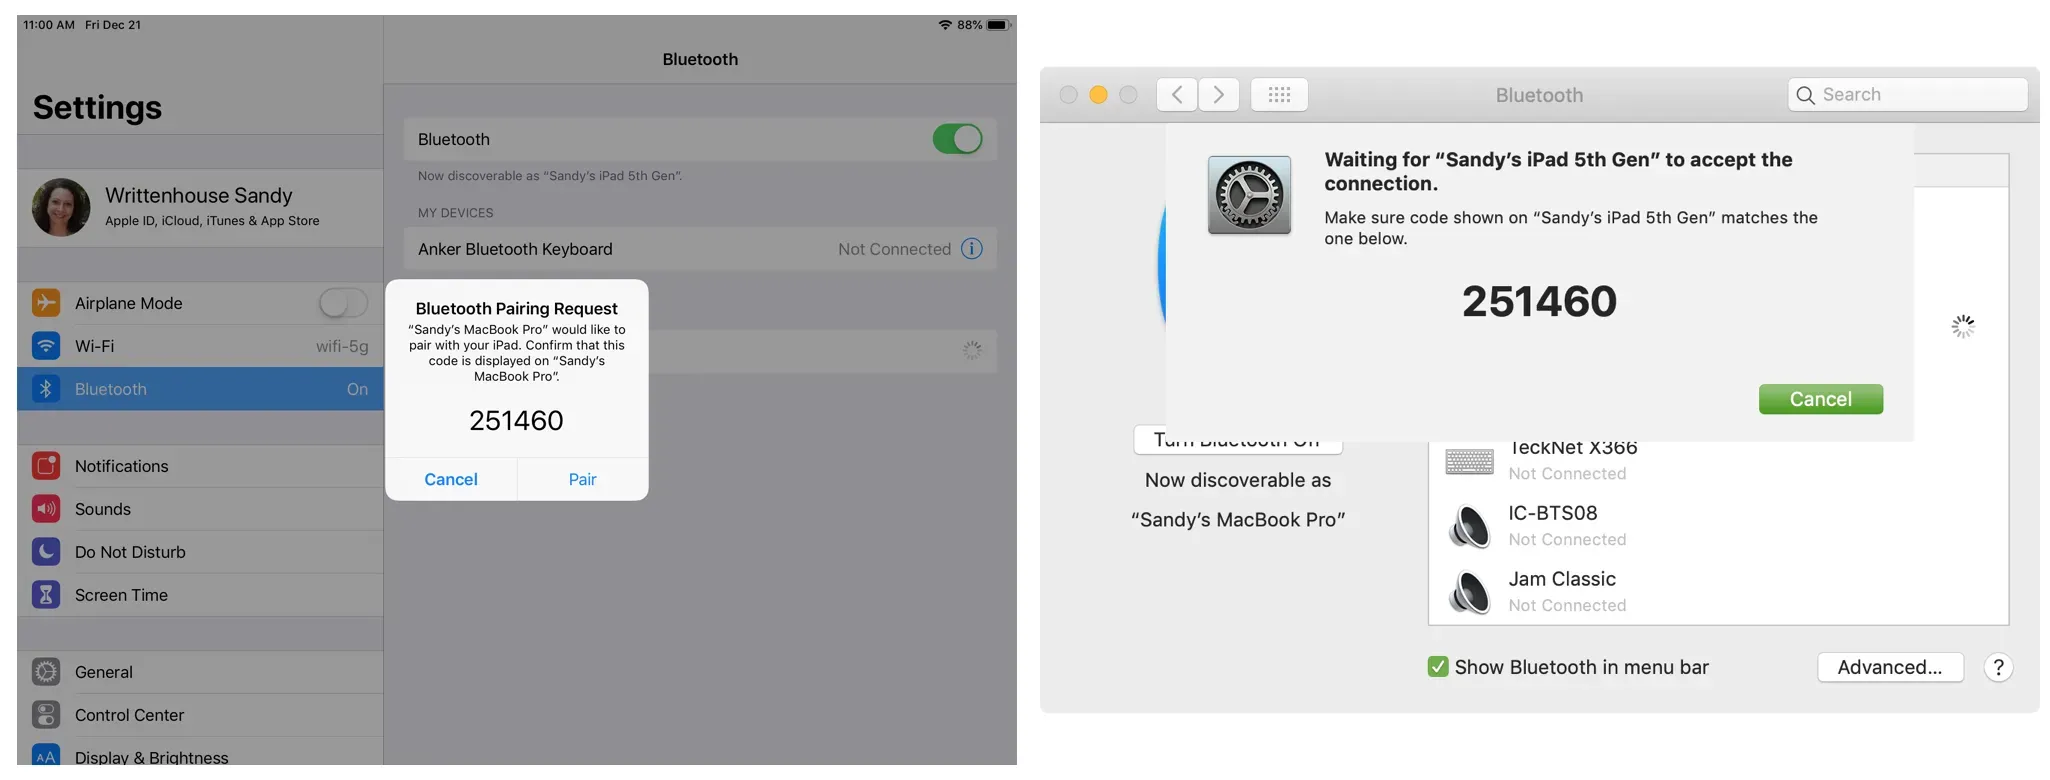
3) Your iPad should show up as a new device in your MacBook’s Bluetooth settings. Click Pair. A six-digit number will appear on your MacBook. The same number should be displayed on your iPad. Confirm the connection by tapping “Pair”on the iPad.
4) Now on your Mac follow the steps mentioned above to share your internet. That is, go to System Preferences > Sharing > Internet Sharing. Do not check this box yet!
5) In the Share Connection section, select Wi-Fi.
6) In the “For computers using”field, select Bluetooth PAN.
7) Now check the “Internet Sharing”box and click “Start”.
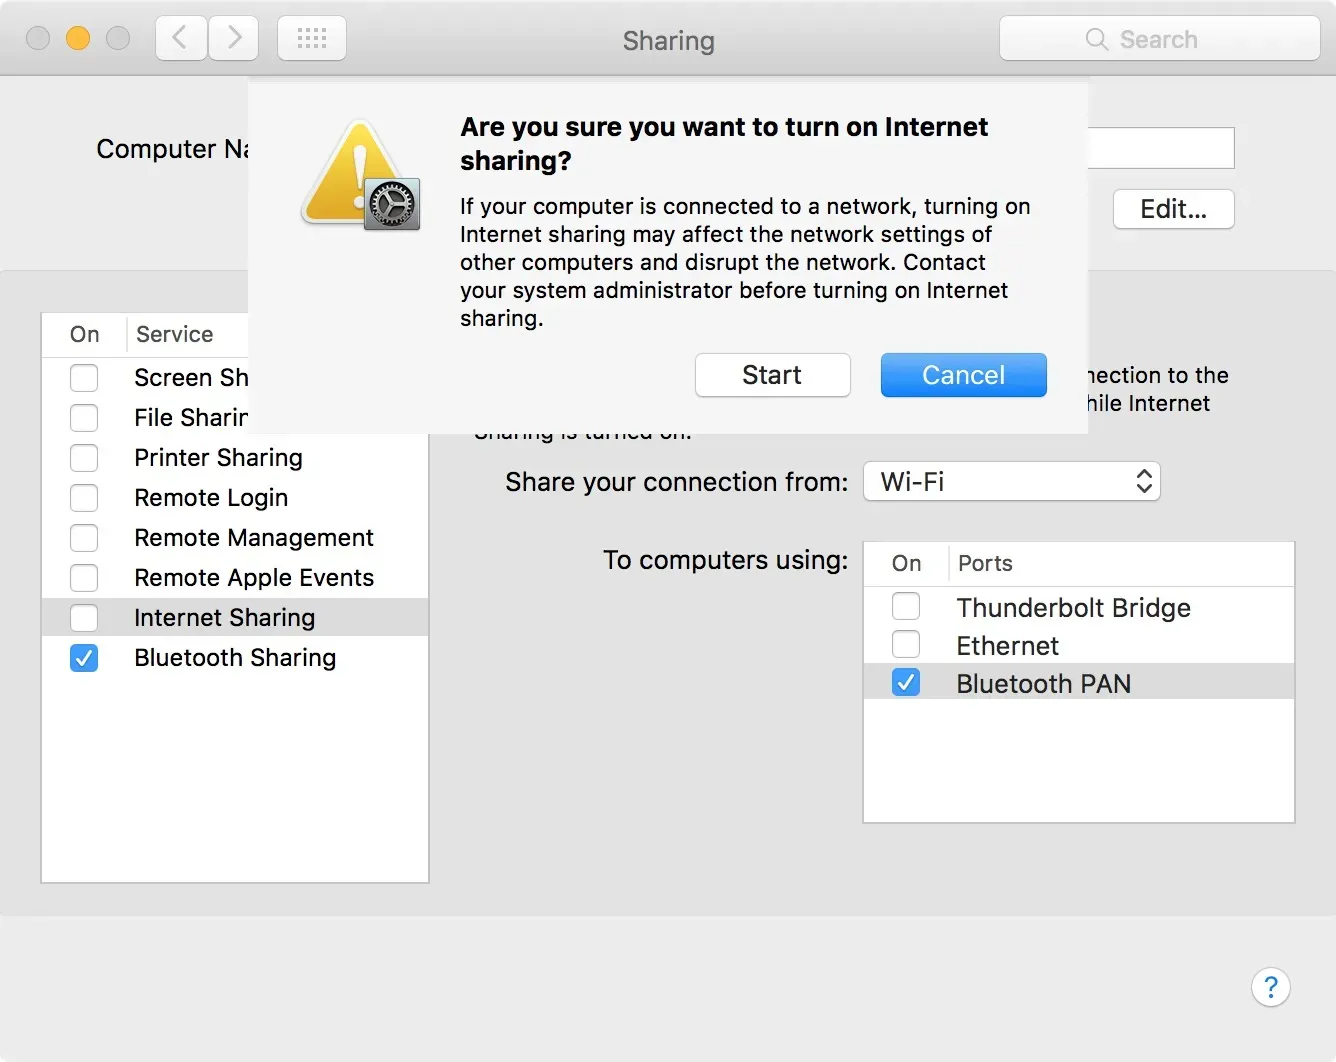
At this point, you should be able to get online on your iPad.
