
If you want nothing less than crystal clear audio, HyperX Cloud headsets are your best bet. HyperX Cloud headsets have built-in stereo sound and 7.1 surround sound, making them suitable for both watching Netflix and long hours of video games. However, you will need to communicate with your teammates during video games. In the event that the HyperX cloud Mic is not working, it can cause a headache.
Many users have reported that the HyperX cloud microphone sometimes stops picking up sound. However, this does not mean that the headset is defective. There can be several factors preventing a headset microphone from working, so a faulty headset shouldn’t be the first suspect. You can’t tell an earpiece is broken unless the underlying problems are identified and fixed. With that said, here is our guide to fixing the HyperX Cloud microphone not working issue.
Content:
How to fix HyperX Cloud or Stinger microphone not working
Here we have listed six possible fixes that will likely resolve the microphone not working issue on HyperX Cloud and Cloud II headsets. Make sure you do these fixes in the order they are mentioned and don’t skip them.
Fix 1: Basic troubleshooting
Since the microphone in the HyperX cloud is removable, you can remove the microphone and reinsert it to check if it works or not. After that, you can check if the USB switch is in the correct position. Also, make sure you don’t turn on the mute button on the switch by mistake.
If none of this helps, try removing the switch and reinstalling it. You can also try cleaning the fasteners. You can also try using the 3.5mm audio jack and unplug the USB switch for a while and check.
If the other person hears you harshly, the problem may be with the microphone itself. Take it out and clean it. If the other person can’t hear you at all, try the following fix.
Fix 2: Check Microphone Access
It’s possible that access to use HyperX Mic is disabled, which is why the HyperX Cloud microphone isn’t working. Now you have to check it and give it access. Follow these steps to do the same:
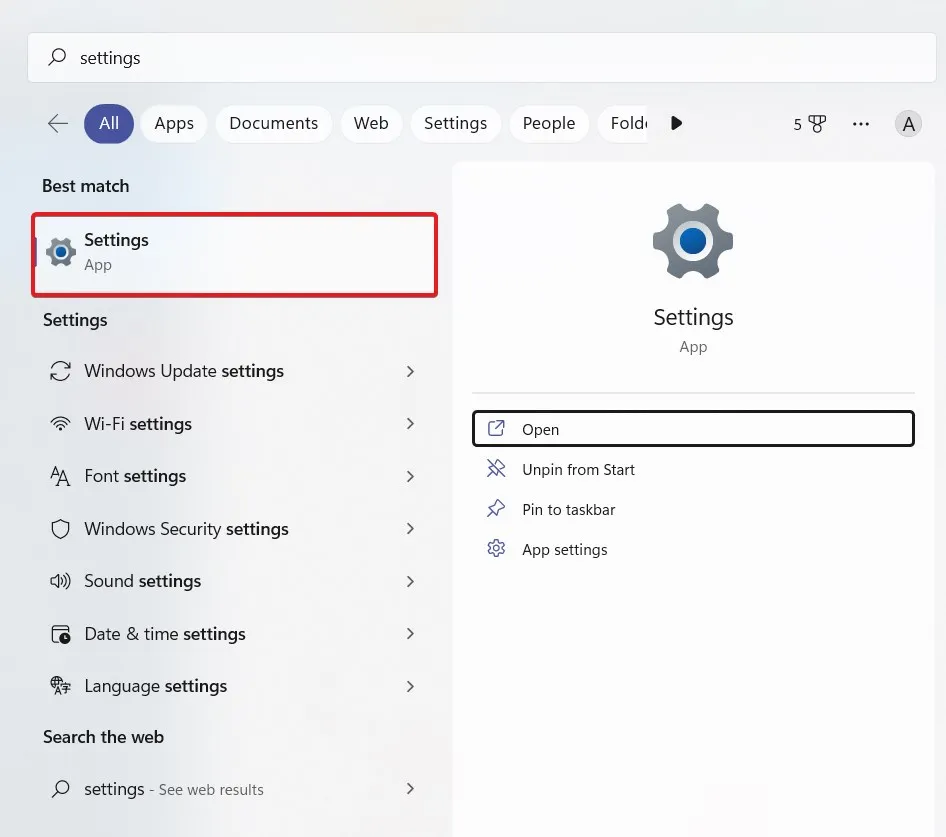
- Click on the “Start”button and go to “Settings”.
- Now, on the left pane, click on “Privacy and Security”.
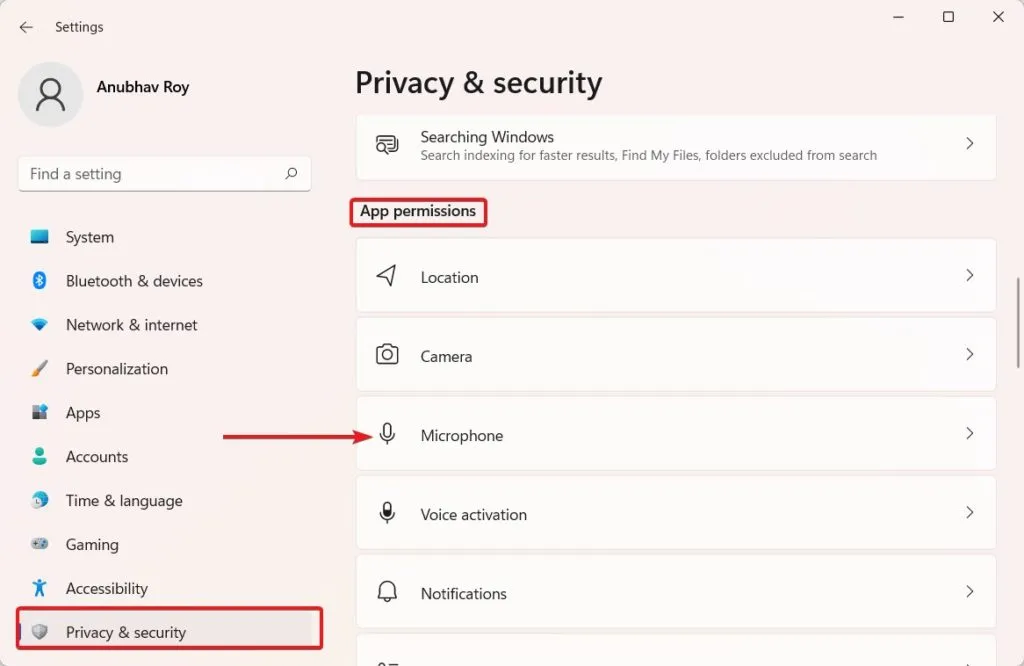
- Now scroll down a bit until you get to app permissions and toggle microphone access.
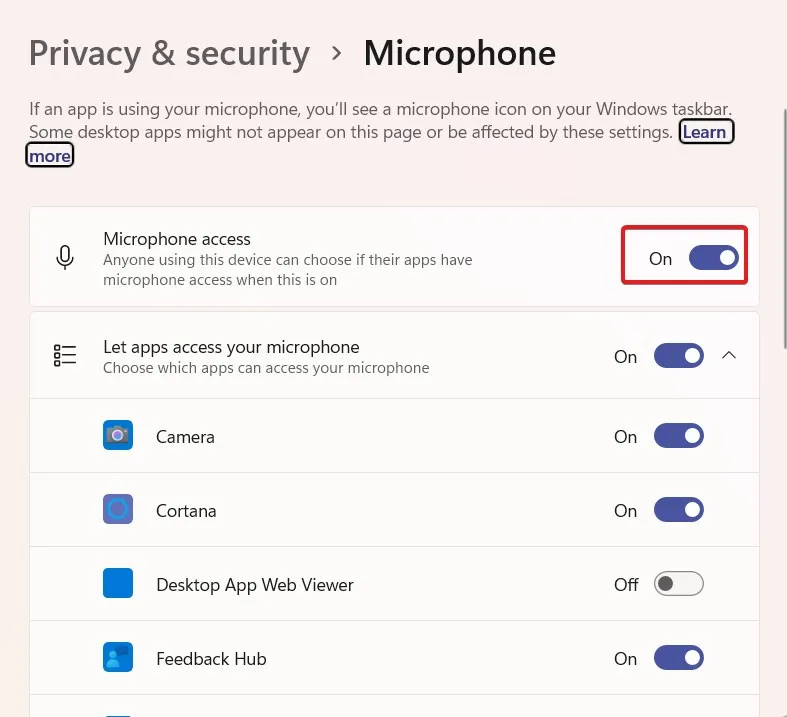
- After that, scroll down again to check if the app you’re trying to use, HyperX Cloud Mic, also has microphone access enabled.
Now try using the app and check if the HyperX Cloud Microphone is working. You can also start a meeting and check if the other person can hear you. If not, follow the next fix.
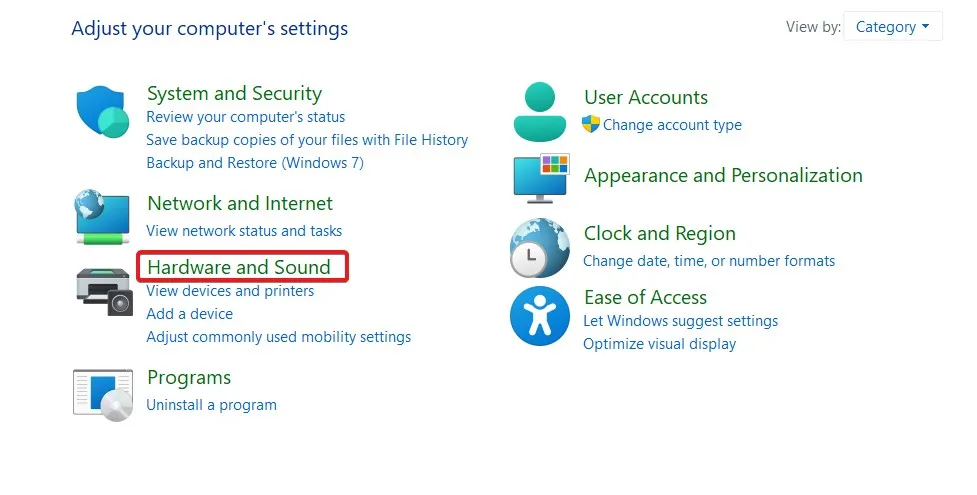
Fix 3: Check Sound Settings
Sometimes, even out of ignorance, the sound settings get lost. So it’s possible that your HyperX Cloud Microphone is not working due to a simple issue in your audio settings. Follow these steps to fix it:
- Press Windows + R to open the Run dialog box.
- In the Run dialog box, type control and press Enter.
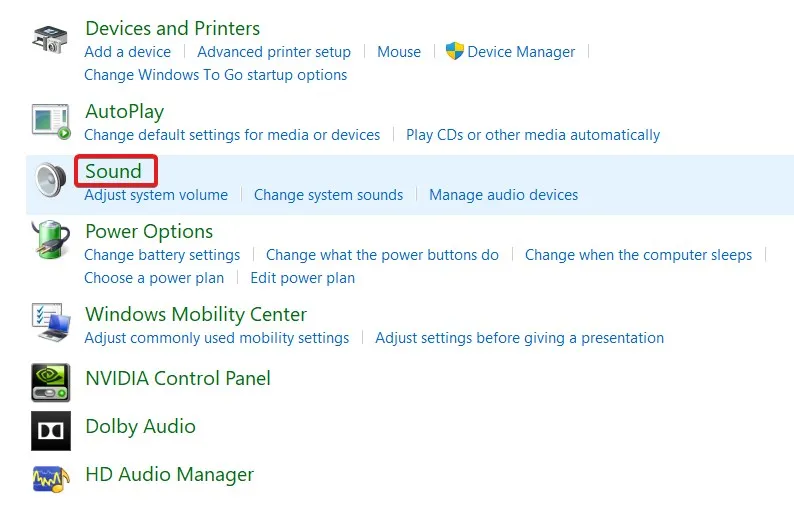
- In the Control Panel window, click Hardware and Sound.
- In the next window that opens, click “Sound”.
- Select the “Record”tab, then right-click on an empty space.
- In the drop-down menu that appears, click “Show Disabled Devices”.
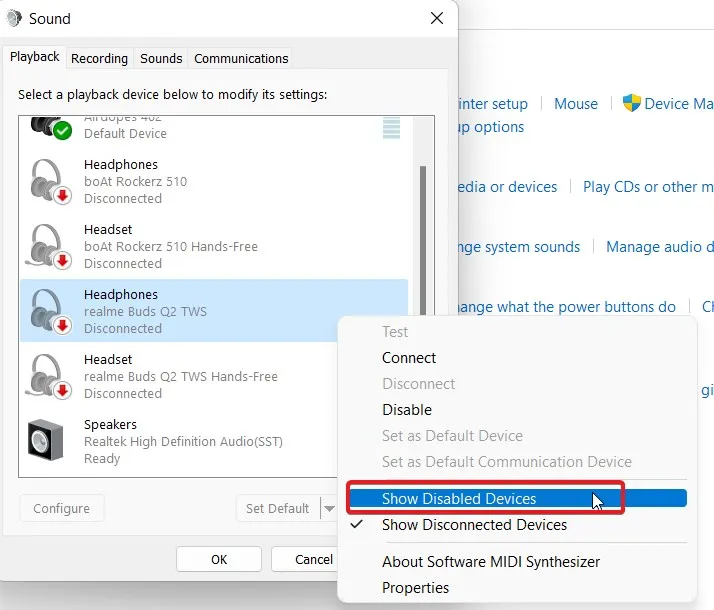
- Now right-click on the headset microphone and click on Enable.

Your HyperX Cloud microphone is now enabled. Check if it works or not. If yes, great. If not, follow the next fix.
Fix 4: Update your audio driver
Just like any other application, device drivers also require updates to function properly. As a result, you need to update your device drivers regularly to avoid errors like HyperX cloud microphone not working.
Since almost every PC and laptop manufacturer uses Realtek audio drivers, we will choose Realtek. To update your audio driver, follow these steps.
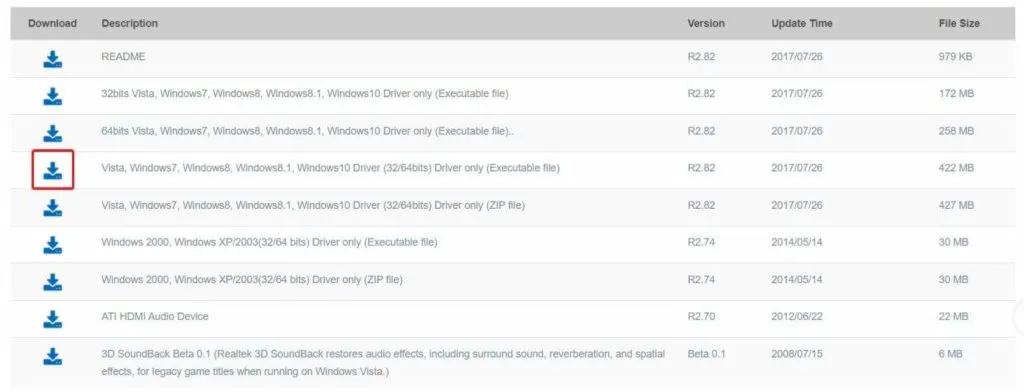
- Go to the Realtek official website. Or go straight to this link.
- Now look at the version of your operating system and click on the “Download”button on the left.
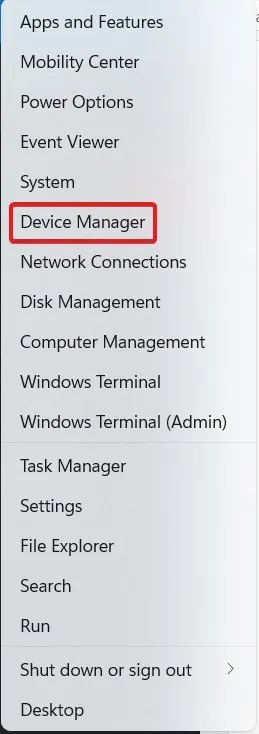
- Once the download is complete, right-click on the Start button and select Device Manager.
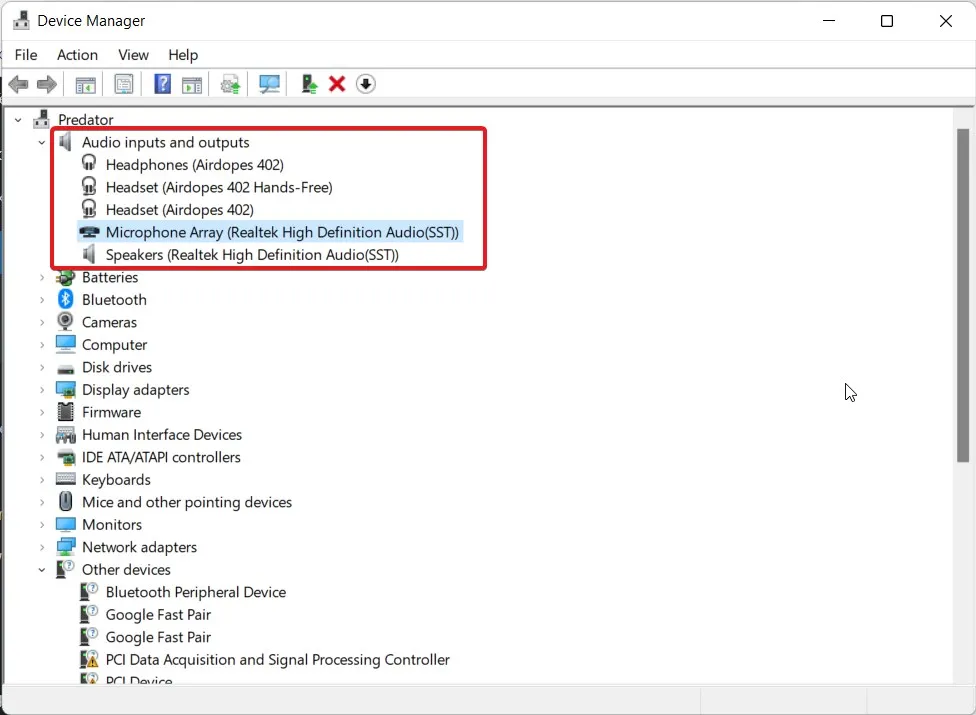
- Expand Audio Inputs and Outputs and double-click Microphone Array.
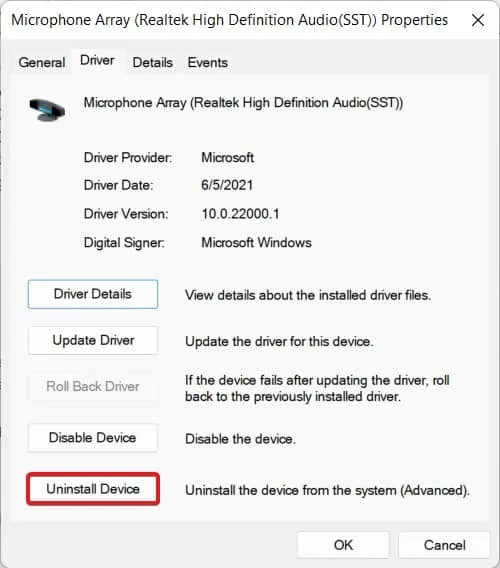
- Click the Driver tab and click Uninstall.
- Restart your computer or laptop.
- Now go to your Downloads folder and install the newly downloaded Realtek audio driver.
- Follow the instructions on the screen to complete the installation.
Once you do this, your problem will be solved. In the unlikely event that your problem still exists, move on to the next fix.
Fix 5: Update HyperX Cloud Firmware
Like any other piece of software, firmware is also very important. Similarly, HyperX releases firmware updates for its device from time to time to improve functionality, add new features, and fix existing issues.
If this is the first time you’ve heard of a firmware update on your HyperX Cloud, we bet your firmware is quite old and updating it will fix the HyperX cloud microphone not working issue.
Follow this link and download the firmware. The link is given at the bottom of the page. You have to download the firmware to your Windows PC and once you extract it, it will automatically update the firmware on your HyperX cloud. After that, you can use it on any other device. This will solve the problem with the microphone not working.
Fix 6: Contact Support
If none of the above fixes worked for you, it’s time to contact HyperX Support and ask them about the issue.
They will most likely file a return request and repair it or, under certain conditions, replace it. However, if you live in an unserved area, you may need to take your headset to a service center and have it repaired.
bottom line
Well, that is all we have on how to fix the HyperX cloud microphone not working issue. We hope this guide has helped you. If you contact support, let us know in the comments section what they suggested.