
Windows 11 has been around for almost a year and its first major update will be released in the next few weeks. Even if our initial review didn’t convince you of the need for an update, you may be thinking about it now that it’s more established and some of the biggest early bugs have been fixed.
We’ve gathered all sorts of resources to create a comprehensive installation guide for upgrading to Windows 11. It includes tips and step-by-step instructions for enabling officially required features such as TPM and Secure Boot, as well as official and unofficial ways to bypass system requirements checks on “Unsupported”PCs because Microsoft is not your parent and therefore cannot tell you what to do.
I’ve had Windows 11 running on PCs as old as a 2008 Dell Inspiron 530, and while I’m not saying this is what you should do, this is what you can do.
How to get Windows 11?
The easiest way to get Windows 11 is to check Windows Update on a supported, fully updated Windows 10 PC. But if you don’t see it there, or if you have many PCs to update and only want to download the new OS once, there are other options..
Microsoft Offers Multiple Ways to Manually Boot Windows 11. One is to use the Setup Assistant app that you install on your computer to run a normal update installation via Windows Update. The second is to use the Windows 11 Media Creation Tool, which automates the process of creating a bootable USB installation drive or downloading an installation ISO file. If you have a USB drive, you can either boot from it to do a clean install, or run the setup app from Windows 10 to do a normal update install. You can also burn the ISO to DVD, but installing from any USB stick, even an old 2.0 USB stick, will be much faster, so you shouldn’t do that. Finally, you can simply download the ISO file directly from the Microsoft website.
Do I need to pay for this?
Windows 11 is a free upgrade to Windows 10. So if you’re running Windows 10 Home or Pro on your PC, whether your PC is officially supported or not, you’ll be able to install and activate the equivalent version of Windows. eleven.
If you’re installing Windows 11 on a new PC that you’ve built yourself, you should officially buy a Windows 10 or Windows 11 license. These can be purchased from retail sites like Amazon, Newegg, Best Buy, or direct from Microsoft for prices ranging from $120 to 140 dollars. Unofficially, you can buy a working Windows product key from product key resale websites for between $15 and $40. Many of these sites are sketchy and we won’t be linking to any of them directly, but this is one way to get a working key.
Also, unofficially, I’ve had some success using old Windows 7 and Windows 8 product keys to activate equivalent editions of Windows 11. It’s no secret that the Windows 10 installer will continue to accept these old product keys long after the “official”expiration date. The Windows 10 free upgrade offer expired in 2016, and at least in our testing, these keys continued to work for Windows 11.
What do I need to “support”my PC?
Let’s repeat the system requirements of Windows 11:
- “Compatible”1 GHz or higher dual-core 64-bit processor from Intel, AMD, or Qualcomm.
- 4 GB RAM
- 64 GB memory
- UEFI Secure Boot supported and enabled
- Trusted Platform Module (TPM), version 2.0
- DirectX 12 compatible GPU with WDDM 2.0 driver.
- 720p display larger than 9 inches
Windows 11 Home requires a Microsoft account and internet connection; Windows 11 Pro can still be used with a local account on Windows 11 version 21H1, but the 22H2 update for Pro will also require you to sign in to a Microsoft account. There are workarounds for this, which we’ll look at later.
The processor requirements are the most stringent; Supported processors include 8th Gen Intel Core processors and newer and AMD Ryzen 2000 series processors and newer. All these chips were released in late 2017 – early 2018. Older computers can’t officially run Windows 11. This is a big departure from Windows 10, which sought to support just about anything that could run Windows 7 or Windows 8.
We will learn more about these requirements (and their validity) in our review. But the top three are CPU requirements, TPM requirements, and Secure Boot requirements.
How do I know if my PC is supported?
When you open Windows Update in Windows 10, it can tell you if your PC is supported or not. But the easiest way to check manually is with the Microsoft PC Health Check app. Early versions of this app weren’t great, but the current version will tell you if your computer is compatible and also why it’s compatible or not.
If you’re not using a supported processor, either schedule an upgrade to a supported processor, or skip to the section we talk about installing Windows 11 on unsupported PCs.
If your processor is supported but you don’t meet the TPM or Secure Boot requirements, the good news is that if something is wrong with your PC, both of these features should be enabled in your PC’s BIOS.
How do I enter the BIOS of my PC?
You can usually enter your BIOS by pressing a key after the computer is turned on but before Windows starts loading. The keys vary, but the most common is the Delete key, F2 (for Dell systems), F1 (for Lenovo systems), or F10 (for HP systems).
A consistent but more roundabout way to open the BIOS is to go to the Windows Settings app, then Windows Update, then Recovery, then Restart Now under Advanced Startup. On the normal blue screen you see next, click Troubleshoot, then Advanced Options, then UEFI Firmware Settings.
How to enable my TPM?
Enabling your processor’s firmware TPM is easy, but finding the setting to do so can sometimes be tricky. If you’re not sure what you’re doing, try searching for “[your computer or motherboard manufacturer] enable TPM”because many manufacturers have created help pages specifically for Windows 11.
For Intel systems: If you can’t find a setting marked “TPM”anywhere in the chipset or security settings, look for “Platform Trust Technology”or “PTT”and enable it. AMD systems usually refer to it simply as “fTPM”, although you may also see it called “Platform Security Processor”or “PSP”.
Once you’ve enabled your TPM, reboot into Windows and look in Device Manager or use the Health Check app to make sure it’s working properly.
How to enable secure boot?
Any computer released after the release of Windows 8 in 2012 must support Secure Boot, which helps prevent unsigned and potentially malicious software from loading during your PC’s boot process. You should be able to enable it in your PC’s BIOS if it’s not already enabled, usually either under Security or Boot. As with enabling your TPM, if you can’t find the setting, check your PC or motherboard manual.
If your PC won’t boot after enabling Secure Boot, don’t worry – you just need to follow a couple of extra steps. The inability to boot is most likely because your HDD or SSD is configured with an MBR (or Master Boot Record) partition table and not the newer GPT (GUID Partition Table) format, which is required for both secure boot and and for UEFI.
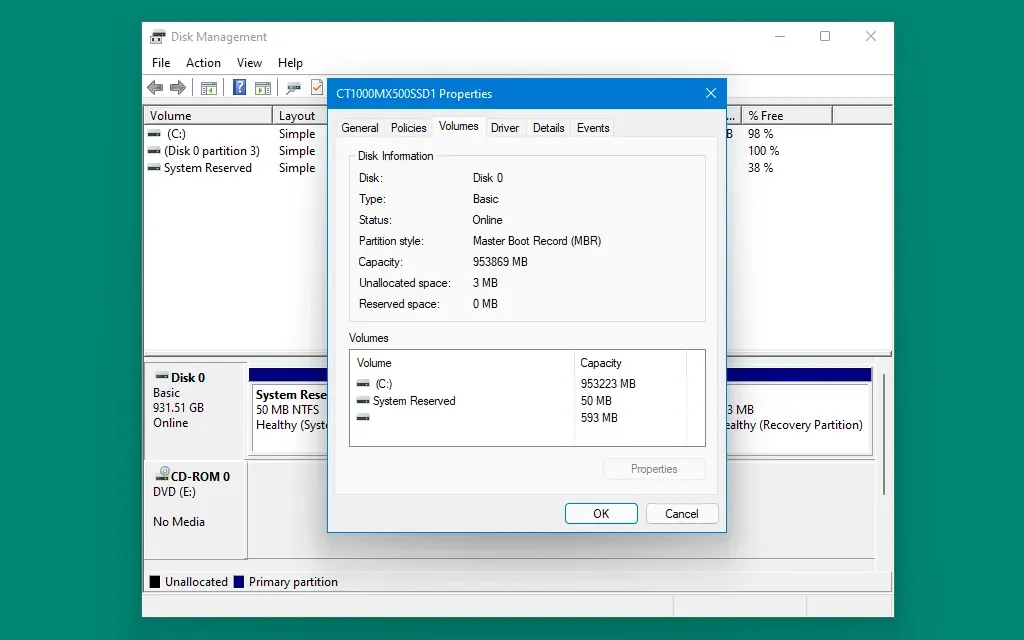
To check, right-click the Start button or use the keyboard shortcut Windows + X and then click Disk Management from the menu that appears. Right-click on any drive where Windows is installed (on most computers it will be Disk 0, but not always if you have multiple hard drives), then click Properties and check the Volumes tab. If your partition style is listed as MBR then you need to convert the drive.
To convert MBR to GPT on Windows 10:
- Open Settings, then Windows Update, then Recovery, and click Restart Now under Advanced Startup.
- When your computer restarts, click the Troubleshoot button, then Advanced Options, then Command Prompt.
- In the command prompt window, type
mbr2gpt /validateto verify that the drive can be converted. Then typembr2gpt /convertconvert disk. - When you’re done, re-enable secure boot in BIOS and your computer should boot normally.
If this conversion fails for some reason, the easiest option might be a clean reinstall of Windows 10 or 11 with Secure Boot enabled. When you format a drive and install Windows from a bootable USB drive, it will use GPT instead of MBR.