
Is your Mac running out of storage space? If so, then you are not alone. MacBooks tend to fill up hard drives quickly. Apple’s recent offering of its new Macs with double or quadruple storage might do that. But don’t rush to read the card just yet.
Let me share some quick and easy ways to free up space on your MacBook Air or MacBook Pro without spending a dime. Let’s start with the basics!
How to check the space on your Mac
Before I tell you how to free up space on your MacBook Air or MacBook Pro, you should know how much memory is left on your computer and how much you are currently using.
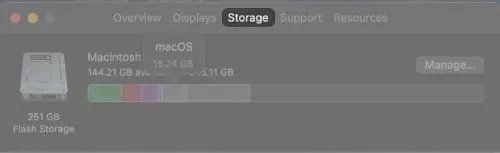
Here you will see a storage panel with segments representing categories of files such as apps, music, documents, iOS files, and more. You can hover over each segment to see how much space they take up.
Knowing what is taking up disk space will help you figure out how to free up space on your MacBook Pro or Air. However, simply choosing and deleting won’t get you far. Read along to find out how to free up storage space!
How to free up space on a MacBook Air or Pro
Below are tips for freeing up some disk space to make your Mac run faster again.
1. Optimize your storage space
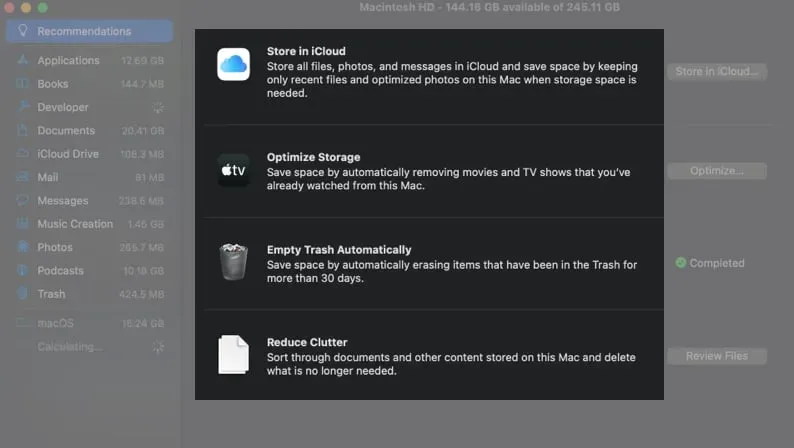
I. Store in iCloud
iCloud is a convenient external storage solution that helps free up space on your MacBook while making it easy to access files from your devices. This feature allows you to store all the files saved on your desktop and documents, your photos and messages.
When your Mac runs out of storage, your Mac only saves recently opened files and compact versions of your photos to free up as much local space as needed.
II. Storage optimization
We know how great videos and TV shows are, especially in HD. This feature helps you save space by automatically deleting purchased shows and movies after you’ve finished watching them. You can always download them again.
It also saves your recent email attachments so that bulky attachments don’t clutter up your drive, especially when you need extra storage space.
III. Reduce Clutter
This feature helps you find the largest files, books, movies, apps, and other items that are taking up a lot of space on your drive, and also allows you to determine where they are stored and delete them manually.
IV. Empty trash automatically
While many of us routinely clear out the clutter on our desktop, only a few permanently remove items from the Recycle Bin causing it to pile up. This feature automatically deletes items in the Trash that are older than 30 days.
You can also select an element and press Control + Delete if you want to permanently delete the element in place.
Note. The recommendations you see vary depending on how you set up your app and iCloud settings.
You can refer to the available space at the top of the window to see how much disk space you are freeing up.
2. Removed unnecessary or unused media
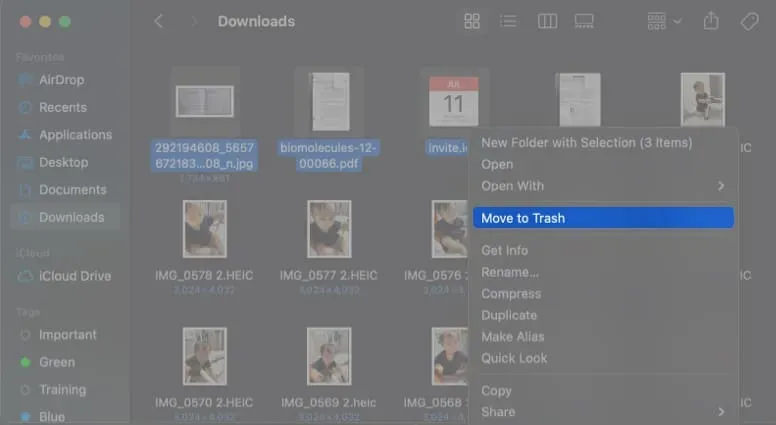
Be sure to delete files you no longer need. For example, you can find and delete files. dmg in your Downloads folder after you have installed the applications they contain.
To delete files, folders, or applications, Control-click an item → Move to Trash.
You can also delete podcasts that you no longer listen to. Do it:
- Open Podcasts → select Downloaded from the sidebar.

- Select a podcast and click the More (…) button next to it.
- Select Remove download.

The process is similar to deleting downloaded songs from Apple Music.
3. Empty your Downloads folder.
The Downloads folder is another place where you can find a lot of junk files.
In addition to everything else that you download, it contains all the files that you have automatically and unknowingly downloaded, as well as an application installer from applications that you have installed on your device.
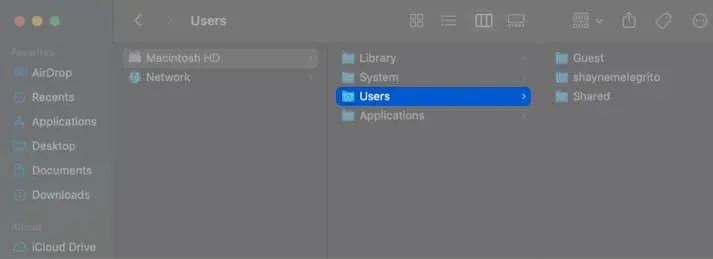
4. Remove users
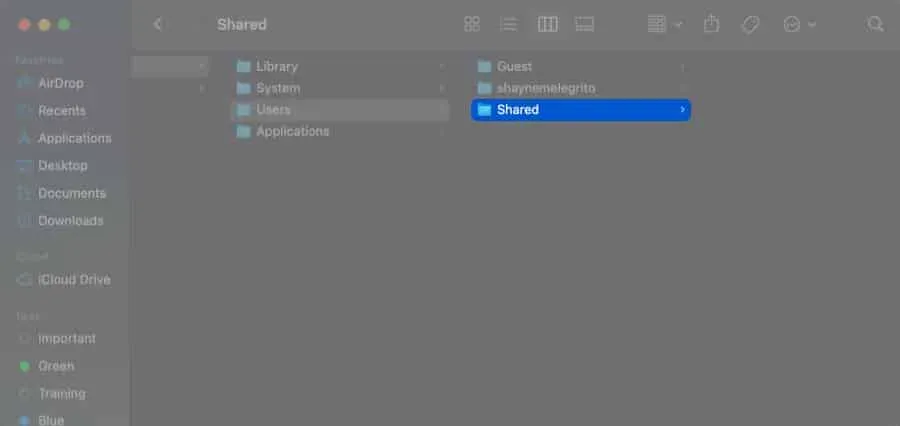
5. Stop sharing files between users
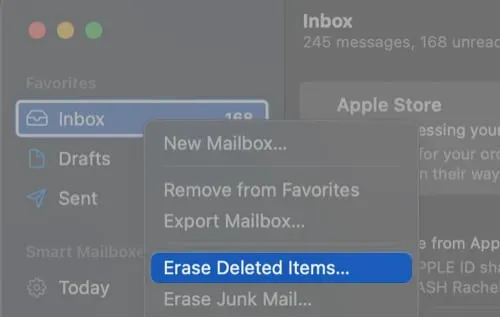
6. Delete unwanted emails
If you store your email for a long time, there is a good chance that your mail is taking up a lot of storage space. While emails themselves don’t often clog up your storage, attachments do. Once you open them, these attachments will remain on your Mac until you delete them.
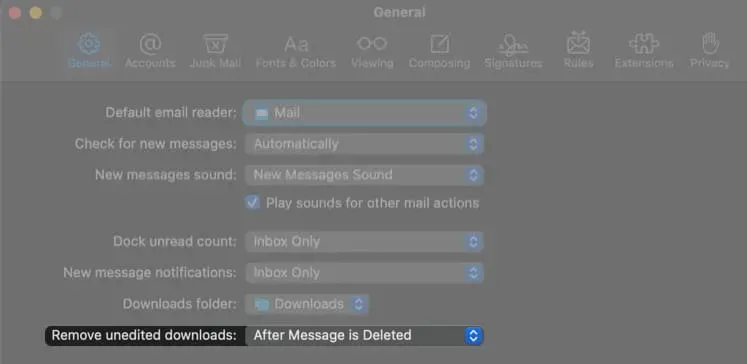
- Open Mail → Settings.
- Select the “General”tab → select “After deleting a message”next to “Delete unedited uploads”.
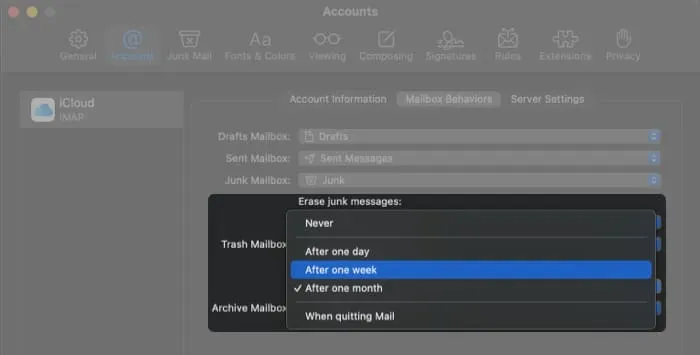
To delete junk mail:
- Go to Mail → Settings.
- Click the Accounts tab → select Mailbox Behavior.
- In the “Delete Junk Messages”section, set the time for automatic deletion of spam.
7. Use external storage
You can also use external devices like hard drives or USB sticks to offload your MacBook’s heavy data that you can’t delete. Here are the best USB-C external hard drives for Mac and USB-C external SSDs for your MacBook.
Alternatively, you can use other cloud storage services such as Google Drive or Dropbox.
💡Tip: You can use cloud storage apps for your iPhone or iPad instead of dumping your device data on your Mac.
8. Remove apps
If you’re like me, you’ll probably download a free app to try it once and never use it again. Unfortunately, these apps take up space. There are various ways to uninstall apps on Mac.
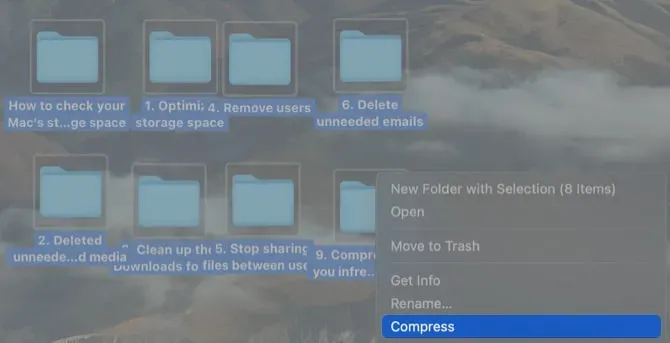
9. Compress rarely used files
10. Find and remove duplicate files
Duplicates are inevitable. We download attachments and photos all the time, make too many copies of the same documents and files, and put them everywhere on our Macs. However, duplicate files cause confusion, take up disk space, and clutter up the backup.
There are several third party apps and built-in tools that you can use to get rid of duplicate files on your Mac.
11. Clear temporary files
If you are an avid Internet user, chances are you have a lot of temporary files stored on your hard drive. Caches contain files from web pages so that they load faster the next time you visit. They’re not exactly bad. However, excessive cache files can significantly reduce memory space and slow down your Mac.
Safari also has a built-in feature to clear your Mac’s cache, history, and website data. To clear the Chrome cache:
- Open Chrome → click the “More”(…) button in the top right corner.
- Click More Tools → Clear Browsing Data.
- Select the time range you want to clear → select Clear Data.
To clear the Firefox cache:
- Open Firefox → Preferences.
- Click the “Privacy and Security”panel.
- Go to “Cookies and site data”→ click “Clear data”.
12. Remove unused language files.
Apple has done a great job of expanding language support for features like Translation and Visual Search. Each of these languages comes with language files.
Since you probably only use one language on your Mac, you may want to delete additional language files on your Mac. You can use third party cleaning software to do the job, or you can remove them manually.
Note. Deleting language files will affect your user experience. You will have to reinstall the app if you want to change the language. You may also need to reinstall your device’s macOS if you change the default language for Apple apps.
To remove unused language files:
- Go to Finder → Applications.
- Control-click the app → select Show Package Contents from the context menu.
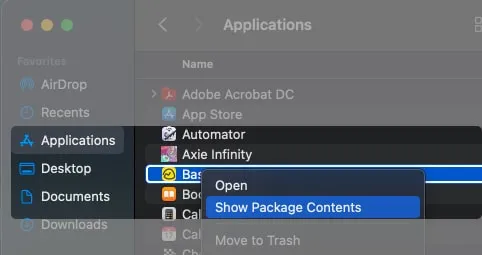
- Open the Contents folder → select the Resources folder.
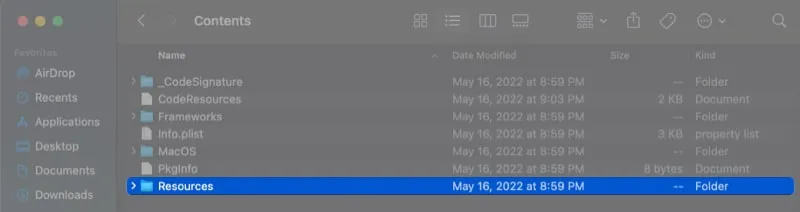
- Delete all subfolders with extension. lproj except those needed.
- Empty trash.
13. Clean up your desktop
If your desktop is cluttered with screenshots, last week’s reports, email attachments, and other miscellaneous files, it’s time to start cleaning up to free up a few gigabytes of disk space.
If you can’t delete files but still want to reduce desktop clutter, Control-click anywhere on the desktop and choose Use Stacks. This categorizes items, automatically organizing your desktop for you.
14. Delete old backups
Backing up your iPhone or iPad is essential to keep your data safe in the event of failure, breakdown, or theft. However, these are meant to be temporary files and should not remain on your Mac permanently. You can delete old iCloud backups to free up space. The same is true for old Time Machine backups on your Mac.
15. Remove system junk
System junk contains outdated cache files, application localizations, and old Time Machine backups. Removing system junk manually takes effort.
I have already mentioned some items that need to be cleared regularly, such as the cache, temporary and language files. Also, be sure to delete the system and user log files. Do it:
- Open Finder → Go → Go to Folder.
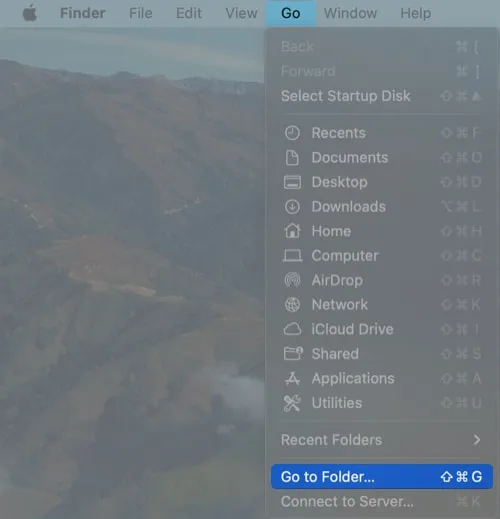
- Type ~/Library/Logs → hit “Return”to open the folder.

- Select the log files you want to delete → move them to the trash.
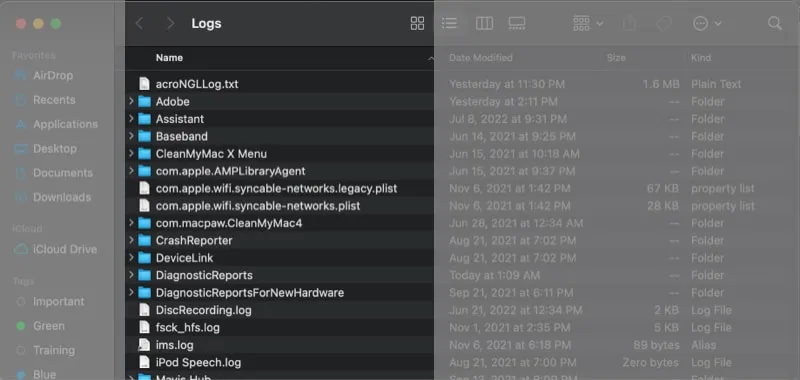
- Go back to “Go to Folder”→ type /Library/Logs to access unnecessary system application logs.
- Enter /Library/Logs/DiagnosticReports to find system reports. You can also remove them.
- Delete the trash and restart your Mac.
If you don’t want the hassle, you can use cleaning software like CleanMyMac or Gemini 2.
These tools are packed with features to ensure security and privacy, remove duplicate files, and scan junk apps and junk files on your Mac.
FAQ
You can use any external hard drive on your MacBook Air, as long as you have the right connector for your device.
It probably contains a lot of cache files, which improves download speed and performance.
Connect an external hard drive to your Mac → open Finder → select the files or folders you want to transfer and drag them to your storage device.
Completion…
Files and miscellaneous items can quickly pile up on your MacBook. This not only leads to clutter, but also greatly affects its speed and performance. Try one or more of the methods above to free up space on your Mac.
The process can take a long time, but your machine will thank you. Do this regularly so you always have enough space to store more important files and media on your Mac!
What process do you do regularly? Which of them are new to you? Comment them!