


If you took a photo or received it with the wrong orientation, it’s pretty easy to rotate an image on your iPhone – a few taps in the Photos app will solve your problem. The headache starts when you have dozens of images that need to be manually rotated.
Good thing there’s a quick fix that allows you to bulk rotate all your images with a single tap using shortcuts. Read along!
Why you might want to rotate multiple photos on iPhone?
The iPhone doesn’t have a built-in tool or method that lets you rotate or transform all of your images at once, like the Mac does. Having a tool or process, especially in a hurry, can save you time and effort.
Your device uses the built-in gyroscope to determine the orientation of your device. This allows your images to come out in the same orientation as your iPhone at the time of shooting. This is why taking a photo while holding the iPhone horizontally will result in a landscape image.
A little advice. Before taking a picture, check the preview screen and check if the image is in the orientation you want.
Sometimes you get this when you have a glitch that causes your iPhone’s camera to flip. If you need help, check out how to fix upside-down iPhone camera photos stuck upside down. It can also happen when your iPhone’s screen doesn’t rotate even if you hold the device at different angles.
In other cases, people have sent you images rotated incorrectly. This is true for many scanned images and documents.
How to Create an iPhone Shortcut That Batch Rotates Images
If you’re all about efficiency, you can use Shortcuts, a built-in app that lets you automate tasks to make your job easier. All it takes is to create an iPhone shortcut that allows you to rotate multiple iOS images at the same time. To set up a label:
- Open shortcuts → select the + icon in the top right corner.
- Name your label.
- Click Add Action → select Applications tab → select Photos.
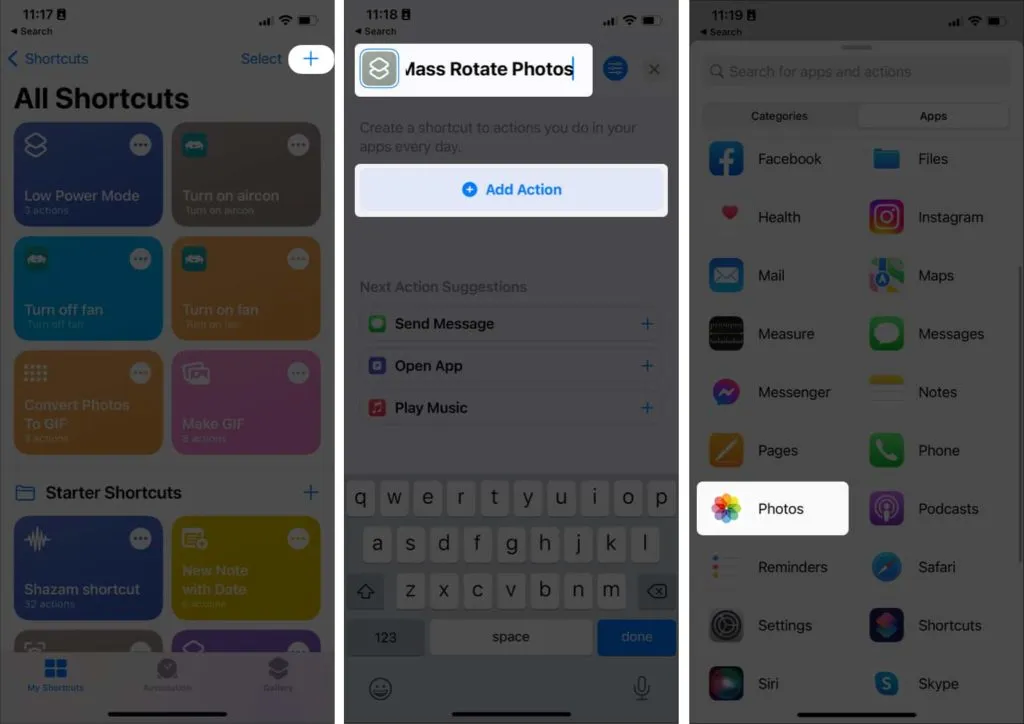
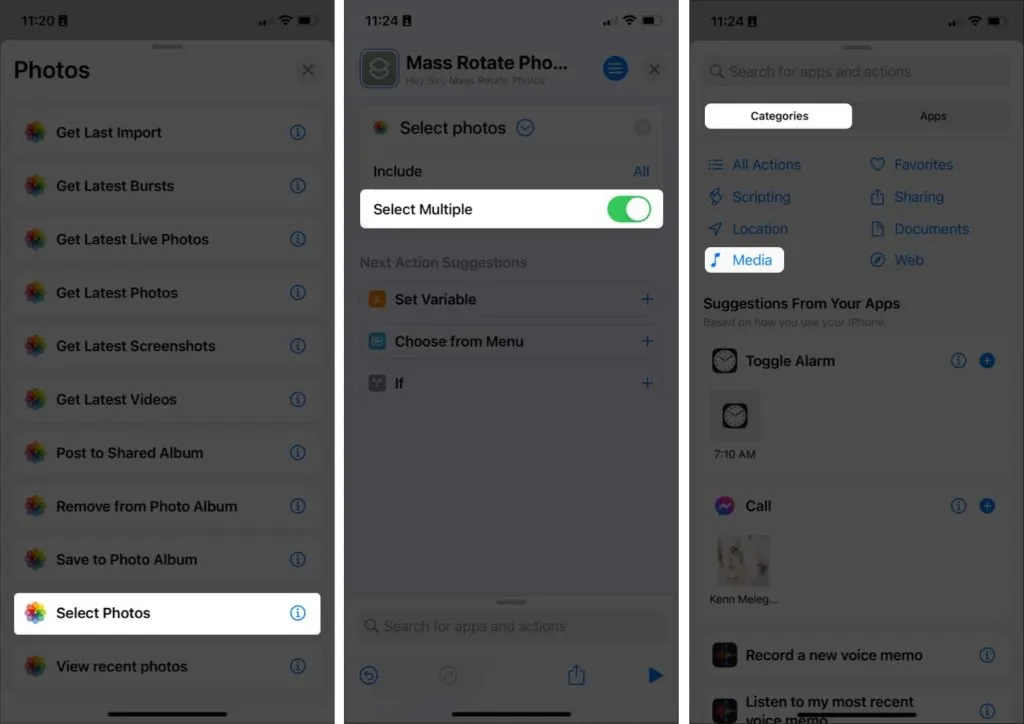
- Scroll down and click “Select Photos”.
- Tap the arrow to expand the selection and toggle Select Multiple.
- Touch the X at the bottom and swipe up to display the menu again.
- Select the Categories tab and click on Media.
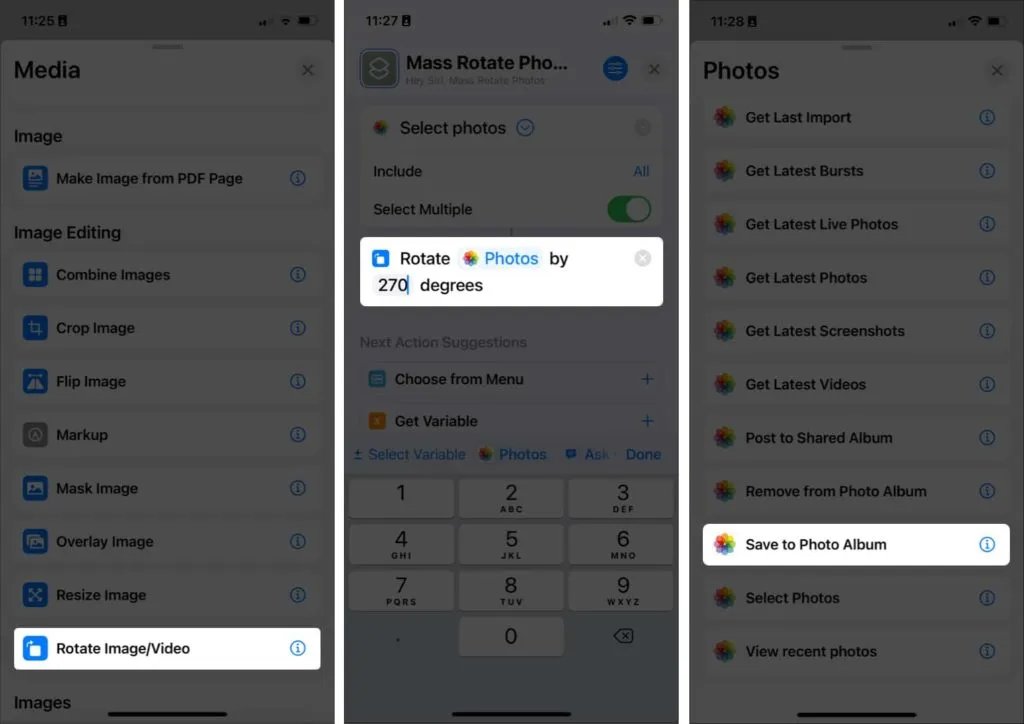
- Select Rotate Image/Video under Image Editing. Note. The default orientation is 90, which means 90 degrees clockwise. Enter 180 to rotate the images twice and 270 to rotate them three times.
- Click Done.
- Press X and swipe up to see the menu again.
- Go to the Applications tab → select Photos → select Save to Photo Album. The default location will be “Recent”. You can change this by clicking “Recent”and selecting a different album.
- Tap the X to exit. Your shortcut will be automatically saved.
Now that you’ve created a bulk rotate shortcut, start using it:
- Go to “Shortcuts”and tap the shortcut you created. It should automatically open your photo library.
- Select images from your library and click “Add”. You can also open the Albums tab and select the album where these photos are stored.
- Wait a few seconds. After that, navigate to the location where your images are saved.
Use the Photos app on your Mac
If you don’t want to create a shortcut, you can also use your Mac (if you have one). You have two options:
Use photos
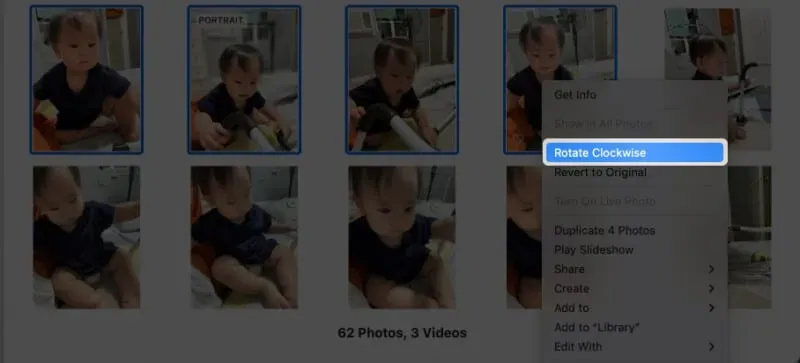
If your photos are synced to iCloud, you should be able to access your Mac images in Photos.
- Open photos.
- Select the images and Control-click → choose Rotate Clockwise. Repeat the steps until you get the desired orientation.
Use Quick Actions
You can also use quick actions that you can take on your desktop or any folder where your images are located. Just select and Control-click photos → Rotate Left. Do this several times until you get the desired orientation.
Use a third party app
There are also several third party apps that you can use to batch rotate images. Most of them are paid, but some offer free trials. Examples are Batch Photo or BatchResizer2 on the App Store.
FAQ
You have two options: go to Photos, select the images and Control-click them → choose Rotate Clockwise. If your photos are on the desktop or saved in a specific folder, select those images and Control-click → Rotate Left.
Just turn your iPhone on its side. If that doesn’t work, make sure the portrait orientation lock in Control Center is disabled.
Go to “Photos”→ tap “Select”→ tap or swipe to select photos at once.
Completion…
While creating a shortcut to bulk rotate images seems like a daunting task, it will save you time and effort in the long run. Thus, you no longer have to worry about future photos and images sent in the wrong orientation. Are there any other questions? Share in the comments below!