
You don’t have to wait for periodic forecasts to get an idea of the behavior of the weather around you. Sometimes all you need is your iPhone’s weather maps to keep track of upcoming weather changes. The Weather app for iPhone contains forecasts of precipitation, air quality, and temperature. This allows you to plan your day and not get into unforeseen circumstances.
But how can you use your iPhone’s weather maps capabilities to use them like a pro? Read on to find out.
How to Access Weather Maps on iPhone
Weather Map is an intuitive addition to the Weather app in iOS 15 and later. If you’ve been using third-party weather apps, it’s time to try iPhone weather map interactivity.
To access weather maps on your iPhone, make sure you’ve updated your iOS to the latest version and follow these steps:
- Open the Weather app on your iPhone.
- Tap the zigzag map icon in the bottom left corner to open the weather map.
- Click “Done”in the top left corner to close it.
How to use the iPhone weather map
Weather Map for iPhone is easy to use. In terms of features, you can use the map to predict 12 days of rainfall and view real-time fluctuations in temperature and air quality across multiple regions.
A weather map can be a lifesaver if you’re planning on hiking or camping. For example, you can use it to compare air quality or temperature differences between your current location and your destination. Let’s see the detailed guide below.
1. General use of iPhone weather map
The weather map has several useful features. Here’s how to use them:
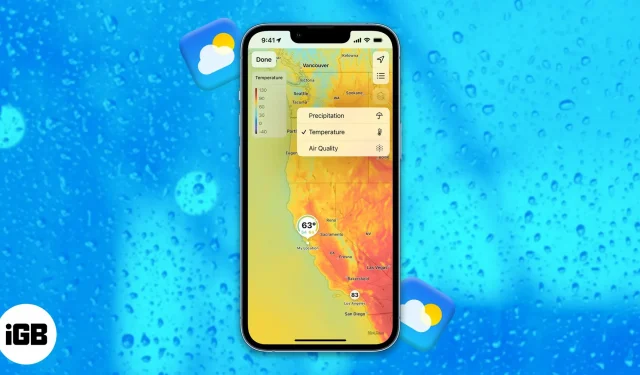
- Tap the layers icon in the top right corner to toggle the weather display.
- Select “Precipitation”, “Temperature”or “Air Quality”here.
- The index at the top left describes the severity or mildness of the displayed weather.
- Pinch the screen to enlarge or reduce the selected location.
- Swipe the map to see more locations.
- Tap the list menu at the top right to switch regions.
- Select the location marker to return to your location.
2. View the rain forecast
You can also view a 12-hour rainfall forecast for your location and other regions. To view the rain forecast:
- Tap the layers icon in the top right corner of the weather map.
- Select Precipitation.
- At the bottom of the map, you’ll see a twelve-hour rainfall forecast for your location.
- The slider indicates different time intervals.
- Tap the play icon on the time slider and you’ll see a pattern of precipitation across the map (shown in different colors). Advice. You can also manually move the slider for a specific amount of time to predict rainfall.
- Match the colors shown on the map with the legend in the upper left corner. This allows you to determine the intensity or softness of precipitation at any chosen location.
- You can also swipe the map to switch to a different location.
3. View current temperature
- On the layers icon in the upper right corner, select Temperature.
- The index measures the degree of temperature (from -40 to 55 degrees).
- Match the color displayed anywhere on the map with the description in the index: for example, yellow on the map could indicate temperatures around 20 and 25 degrees.
- Swipe the map or change location to compare temperature differences.
4. View and compare air quality
You can also view and compare the air quality index (AQI) of different locations:
- Tap the layers icon in the top right corner and select “Air Quality”from the options.
- The color displayed on the map represents the AQI for the selected region: use the index field in the upper left corner to determine the air quality level.
Conclusion
The iPhone weather map provides detailed information about weather changes around you. In addition to planning ahead, this is a great way to learn about weather fluctuations around the world. How do you use the weather map on your iPhone? Let me know in the comments section below.