
If you have an Android smartphone, chances are you are already disappointed with its battery life. On the other hand, if you have a new smartphone bought after 2021, there may be fewer battery issues. However, older smartphones released before 2020 only had a 3,000 mAh battery, which was a problem. Thus, for such users, setting a custom battery limit is practically necessary. In this guide, we will walk you through the process of setting a custom battery limit on Android.
What is a custom battery limit in Android?
As for lithium-ion batteries, they discharge over time. However, this time increases if the battery is frequently charged from 0 to 100%. However, lithium polymer batteries are used these days, which do not differ in charge cycles and can deplete over time with use.
As a result, when a custom battery limit is set in Android, the battery charge is limited to the set percentage. Therefore, a lithium-ion battery is immune to a full charge.
Now, if you use the custom battery limit, your phone will not charge above that percentage, which will save your battery from deep charge cycles. This will prolong battery life and also save you the hassle of changing batteries. Needless to say, the cost of batteries is quite high these days due to the global economy and the shortage of chips.
How to set a custom battery limit in Android
Unfortunately, setting a custom battery limit in Android is not easy, especially if you have a non-rooted phone. If you have a non-rooted Android, check out this guide to root your device even without using a PC. Once you’ve rooted your device, you’re ready to set a custom battery limit.
Method 1: Using a Third Party Application
Using a third party app on your phone is pretty handy if you want everything served right in front of you. You just need to install the app and follow the steps listed below:
- Download Battery Limit from Google PlayStore.
- After installation, open it.
- The app will prompt you with a Magisk request. Be sure to approve it.
- You will now see a battery limit switch, use this switch to set your desired battery limit.
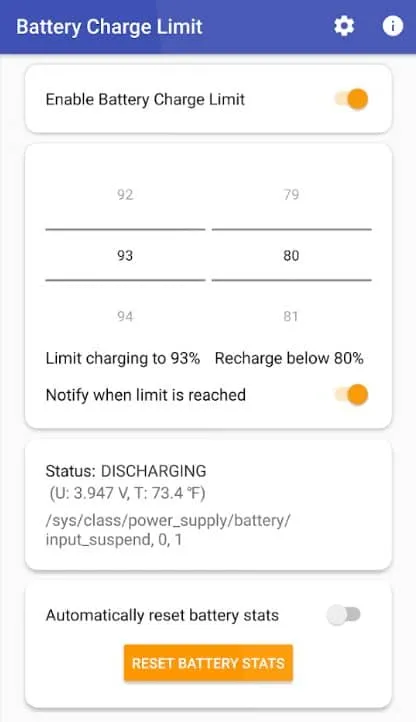
- You can also enable notification when the limit is reached.
Once turned on, battery charging will stop as soon as the percentage of charge reaches the set limit. Also, if you’ve enabled “Notify me when limit is reached”, you’ll get a notification and be able to remove the charger.
Method 2: using the command interface
If you think the above method is too easy for you, using the command interface will raise the battery limit to a new level. However, as we have already mentioned, this is a tricky method and you should only try it if you are quite familiar with the ADB shell. Follow these steps to do the same now:
- Download the SDK Platform Tools and extract it using the archiver on your PC.
- Now enable USB debugging on your Android smartphone.
- If you don’t know, open Settings and go to About phone.
- Click “Software”and then click “Build Number”7 times to unlock “Developer Options”.
- Open developer options and enable USB debugging.
- Now open the SDK Platform Tools folder and open Power Shell or Command Prompt by right clicking on an empty space.
- Type these codes into the command line and be sure to press the enter key after each command:
adb shell
$ cu
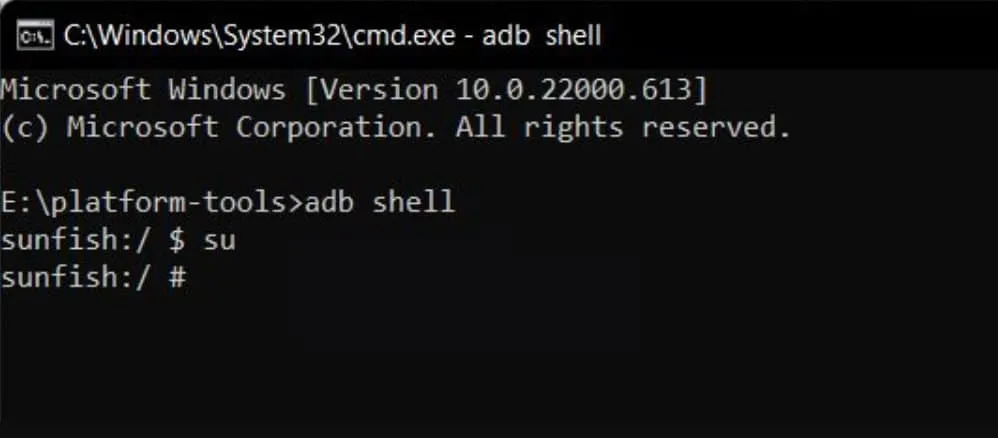
- Your Android phone will now prompt you for a superuser request. Click on Grant.
- Once you have permission, go back to your PC screen and enter this code on the command line:
echo 70 > /sys/devices /platform/google,charger /charge_stop_level - Press Enter, close the command prompt and disconnect the mobile phone from the PC.
In the code above, 70 represents the percentage of charge. When the battery reaches 70% charge, it will stop charging. You can change this number as you wish.
How to set a battery limit if your phone is not rooted?
Well, in most cases, users do not have a rooted phone. Moreover, users who are not into rooting and custom ROMs will find the idea of rooting disgusting. But what can these users do to limit the battery life of their phones?
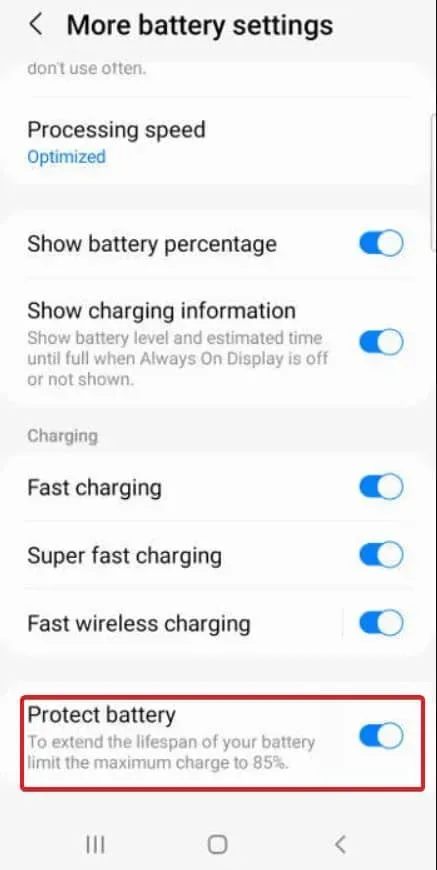
Well, Samsung, Oppo, Realme and OnePlus smartphones have dealt with this problem well. Samsung provides a dedicated battery protection switch that stops battery charging after 85%.
On the other hand, OnePlus, Realme and Oppo provide optimized battery charging. This means that if you charge your phone overnight, your phone will not go over 80%. However, you should take care to unplug your phone from the charger as soon as the morning comes. Because in the morning the phone will be charged 100%, which is by no means desirable.
What is the hype around charging up to 80%?
Before you understand the 80% charge cycle hype, you need to understand the concept of Deep Cycles.
In a lithium ion or lithium polymer battery, there are charge cycles that determine the life of the battery. Charging cycles means charging the battery from 20% to 80%. However, deep cycling means charging the battery from 0% to 100%. Most often, batteries are equipped with either 500-cycles or 1000-cycles.
Now, if you regularly charge your phone from 0 to 100, your battery will drain quickly, in less than a year. By the end of the year, you will be charging your phone twice a day for 24 hours of use.
A study by Battery University found that fully discharged batteries (those that were charged to 100% and used to close to 0%) showed more signs of degradation than partially discharged batteries (those that were charged before loaded them). up to 30%) in laboratory studies.
As already mentioned, some manufacturers include features to further optimize battery life, but for now we have to make do with temporary fixes.
bottom line
That’s all we have on how to set a battery limit in Android. We hope this guide has helped you. However, if you still have any doubts or questions, be sure to leave a comment below.