
Apple didn’t allow large iOS updates to be downloaded over cellular/mobile data for a long time. The situation is changing with the advent of 5G. Those using iPhone 12 and above need an active 5G plan to download iOS updates via cellular/mobile data. However, if you’re using an iPhone 11 or below, don’t worry as there are other workarounds to download iOS 16 with cellular/mobile data.
- Can I update my iPhone to iOS 16?
- Things to know before updating to iOS 16 via cellular/mobile data
- How to Install iOS 16 with Cellular/Mobile Data
- Change iOS update download date
- Update your iPhone to iOS 16 via Mac or PC
- Share iPhone cellular data with Mac and use it as a hotspot
Can I update my iPhone to iOS 16?
Eligible iPhone list for iOS 16 update:
- iPhone 13 Pro Max
- iphone 13 pro
- iPhone 13
- iphone 13 mini
- iPhone SE 2022
- iPhone 12 Pro Max
- iphone 12 pro
- iphone 12
- iphone 12 mini
- iPhone SE 2020
- iPhone 11 Pro Max
- iPhone 11 Pro
- iphone 11
- iphone xs max
- iphone xs
- iPhone xp
- iphone x
- iphone 8 plus
- iPhone 8
Things to know before updating to iOS 16 via cellular/mobile data
- There is a good chance that the Wi-Fi hotspot hosted on your Mac will be slower than your cellular/mobile data rate.
- Please make sure you have a high data limit or unlimited data.
- If you have any existing updates or downloads happening in the background on your Mac, pause those downloads so you don’t run out of data limits. It also ensures that you get faster speeds if the bandwidth isn’t being used elsewhere.
- As long as you are using your Mac as a Wi-Fi hotspot host, AirDrop will not be available on Mac. Also, the same applies to iPhone used to transfer mobile data via USB to Mac.
- For major software updates, it is recommended that you connect to a Wi-Fi network.
- Please follow the steps below only if you have fast, stable and unlimited cellular/mobile data.
How to Install iOS 16 with Cellular/Mobile Data
Several 5G-enabled iPhones (iPhone 12 and above) can download the iOS 16 update via cellular/mobile data without any problems. All you need to change is the following settings:
- Open settings.
- Select Cellular/Mobile Data.
- Turn on the Cellular/Mobile Data switch.
- Tap Cellular/Mobile Data Options.
- On the next page, touch Data Mode.
- Select Allow more data on 5G.
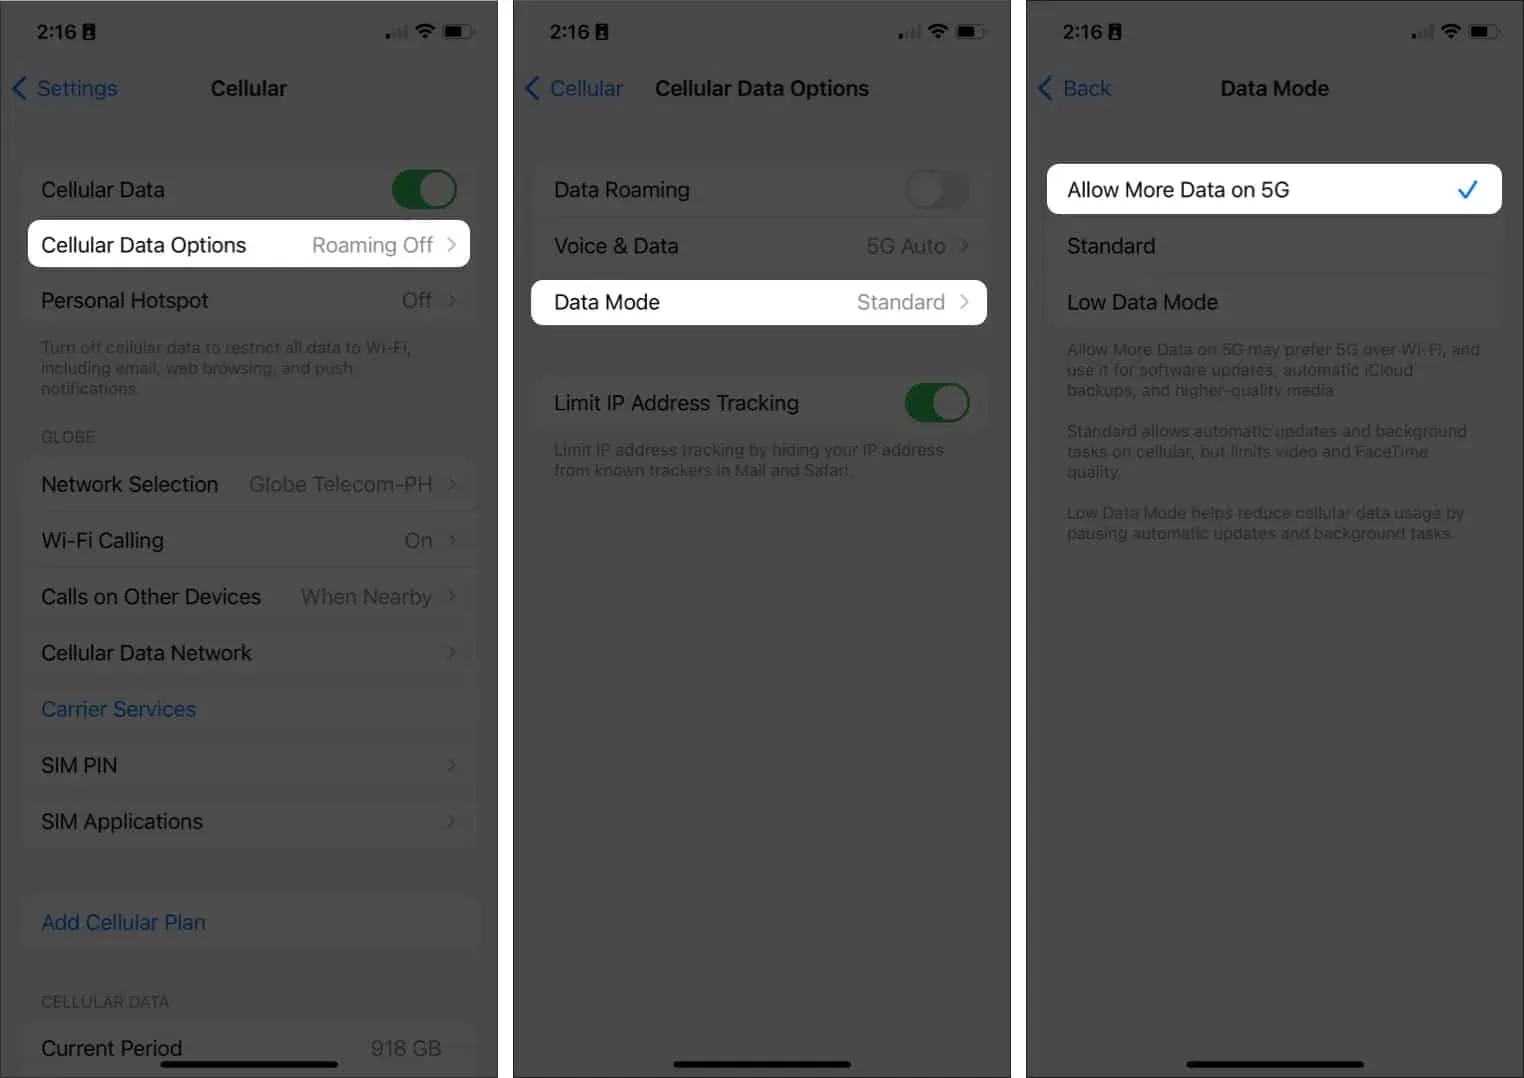
You can now download and install iOS 16 as following these steps will remove the data limits. However, make sure you have enough data left before proceeding so you don’t get stuck in between.
Change iOS update download date
In this method, you need to make your iPhone believe that it lives in the future. I’m not sure how changing the date gets around the iPhone’s data limit, but it works.
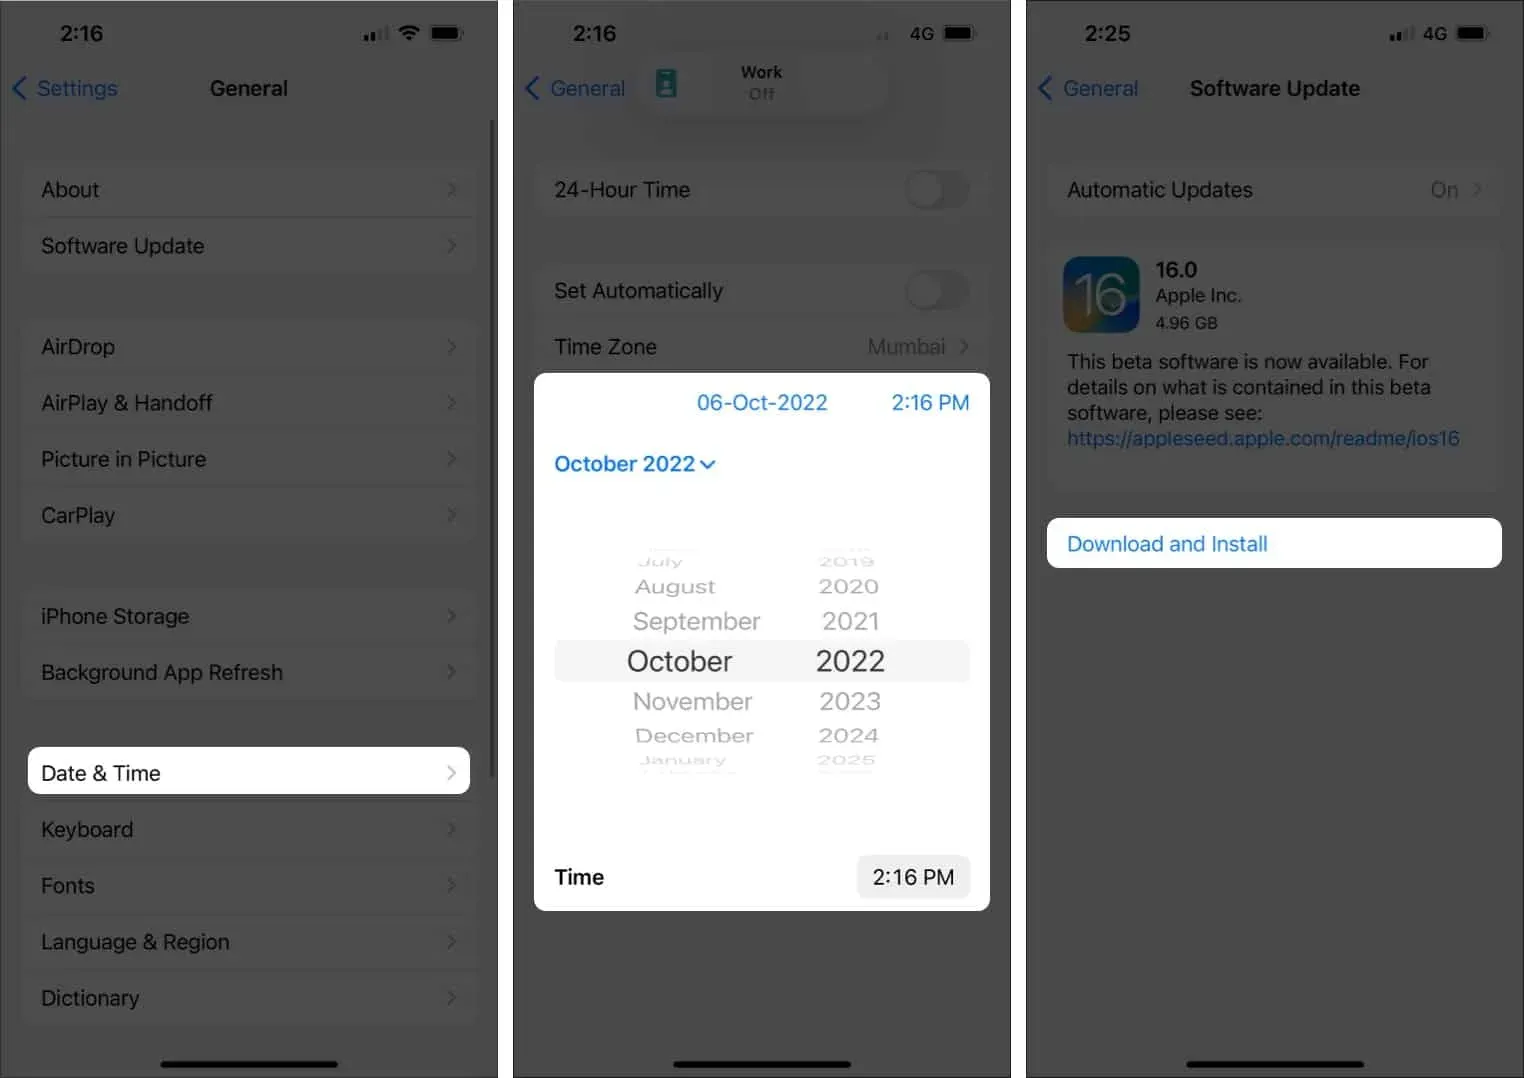
- Open “Settings”on iPhone.
- Tap General.
- Select Date and time.
- Turn off the “Install automatically”option.
- Select the date displayed below the time zone. Example: September 06, 2022
- Move the date forward at least a month. Example: October 06, 2022
- Go back to general settings.
- Tap Software Update.
- Select Download and Install.
- Once the update is downloaded, go to the Date and Time section and enable the Install automatically option.
- Once the date and time are back to the actual date and time, proceed with iOS 16 installation.
If the Download and Install option is still greyed out even after changing the date, try switching the date a couple of times and the option will be available.
Update your iPhone to iOS 16 via Mac or PC
You may not have a Wi-Fi connection, but you have an active Internet connection on your Mac or PC. In that case, you can download and install iOS 16 by connecting your iPhone to your Mac or PC with a compatible Lightning cable. (Interlink) Here’s how:
- Connect your iPhone to Mac or PC.
- Open Finder if you’re on a Mac and iTunes if you’re on a Windows PC. Note. Further steps apply to Finder on Mac. They are similar to iTunes on PC.
- In the Places section, select your iPhone.
- Click “Trust”on your Mac.
- Click “Trust”on your iPhone.
- Select General.
- On a Mac, under Software, select Check for Updates.
- Select Download and Update.

It is possible that if you have an unstable internet connection, the download will fail. In such cases, you will need to re-upload the file. You can download the iOS update through a third party website to avoid all this hassle. This is a particularly useful method for users with an unreliable internet connection. Follow the steps below to download the iOS 16 update file.
- Open the web browser of your choice.
- Type ipsw.me into the search bar and press Enter.
- Once you’re on the IPSW website, select your iPhone and your iPhone model.
- Select the last file under “Signed IPSW”.
- Upload the file and remember the storage path.
- Now go to Finder → Select your iPhone.
- Press and hold the selection key and click Check for Updates.
- Select a file and click Open.
Your iPhone will restart after installing the iOS 16 update.
This method will work for a certain group of people who have iPhones and Macs. All you have to do is connect your iPhone to your Mac and change a couple of settings. There is no need to rely on third party apps to complete any steps.
It works by sharing your iPhone’s cellular/mobile data with your Mac via USB. Then, after tweaking some settings, the Mac will act as a Wi-Fi hotspot and share cellular/mobile data. After setting up a hotspot, you can connect your iPhone to a Wi-Fi hotspot on your Mac, which is your iPhone’s mobile internet.
All the steps mentioned in the steps are Mac native settings. Before we continue with the guide, be sure to do the following.
- Disconnect your Mac from Wi-Fi: You don’t need to disable Wi-Fi. Click the menu bar → Click the Wi-Fi icon → Press and hold the Option key and select your Wi-Fi network. You are now disconnected from any active connection, but Wi-Fi is still on.
- On your iPhone: turn on mobile data. Make sure you have enough or unlimited cellular/mobile data.
Let’s start.
- Open “Settings”on your iPhone.
- Turn off Wi-Fi, Bluetooth, and personal hotspot. Do not use the Control Center to disable these features.
- Connect your iPhone to your Mac.
- Tap “Personal Hotspot”in Settings on iPhone.
- Turn on the “Allow others to join”option.
- When the pop-up window appears, select USB only. If another pop-up appears asking “Trust”or “Don’t trust”, select “Trust”and enter your iPhone passcode.
- On a Mac, click the Apple logo in the top left corner of the screen.
- Click System Preferences.
- Select Sharing.
- Click the Internet Sharing option on the left side of the screen. Please do not check the box.
- A drop-down menu will appear next to the “Share connection from:”option. Select iPhone USB. (If you don’t see the iPhone USB option in the dropdown menu, we have a solution at the end of these steps)
- In the next option “To computers using:”select and check the Wi-Fi box.
- Now select and check the Internet box. A pop-up window will appear if you have not already completed this action.
- The popup window has all the details including network name, channel, security and password. While the default values are ideal, you can change them to suit your needs.
- Fill in all the details.
- Click Start to confirm your action.
- To check if all settings have been successfully applied, go to the menu bar. The Wi-Fi icon will display an upward arrow. This indicates that your Mac is using your iPhone’s mobile data and is transmitting it through a Wi-Fi hotspot.
Note. If you don’t see the option to set a password in step 11, it means you have used this feature in the past. To change the settings, click “Wi-Fi Settings…”and set a password. Finally, click inside the small “Internet Sharing”window to start sharing the iPhone Mobile Data hotspot over Wi-Fi.
Now you need to connect your iPhone to the Wi-Fi hotspot used by your Mac and install the iOS update. Do it:
- Open “Settings”on your iPhone.
- Tap WiFi.
- Turn on the Wi-Fi option.
- After searching for nearby networks, tap your Mac’s Wi-Fi network and enter the generated password.
- Once connected successfully, iPhone will display the Wi-Fi logo at the top of the screen.
- After that go to General.
- Select Software Update.
- Now you can choose “Download and Install”to update your iPhone to iOS 16.
For users who did not have the iPhone USB option in step 11
- Turn on Personal Hotspot on your iPhone.
- Connect your iPhone to your Mac.
- Click on the Apple logo in the top left corner of the screen.
- Select System Preferences.
- Click Network in System Preferences.
- Select the + plus icon located in the bottom left corner.
- From the Interface drop-down menu, select iPhone USB and click Create.
- Finally, click “Apply”in the bottom right corner and continue from step 11.
Completion…
I still don’t know why Apple doesn’t allow users to download iOS updates via cellular/mobile data with a 4G network connection.
The above methods will help you upgrade from iOS 15 to iOS 16 and work with other incremental updates. However, whenever you have the opportunity, try connecting to a Wi-Fi network to update iOS on your iPhone.
If you have any questions regarding the steps mentioned above, please leave a comment below and we will try to resolve your issue as soon as possible.