External hard drives are one of the ideal solutions for storing gigabytes of data locally. You just need to connect the drive to your Mac and access them on your desktop or Finder. However, when the external drive does not mount and does not appear, problems arise.
But don’t worry! I’ve put together the best fixes to fix the problem with external hard drive not showing up on Mac. But first, let’s look at the possible reasons for this.
Why is my external hard drive not showing up on Mac?
Here are 7 reasons why your external drive, hard drive, solid state drive, or other similar drives might not show up on your Mac.
- Drives are underpowered.
- There is a problem with the Mac USB port.
- The external drive is not formatted in a file format recognized by macOS.
- There is a temporary issue on your Mac.
- You have chosen not to display external drives on your Mac’s desktop.
- The cable connecting the drive and Mac is broken, loose, or damaged.
- Your external drive is physically damaged.
Note. If it’s one of the last two, the mentioned fixes won’t work. You will have to buy a new cable or go to a data recovery service like DriveSavers.
Now that you know the basics, let’s take a look at the fixes.
How to Fix an External Drive Not Showing Up on Mac
- Change Finder Preferences to Show Disc
- Make sure the drive is getting enough power
- Replace USB ports or USB dongle
- Check drive connection cable
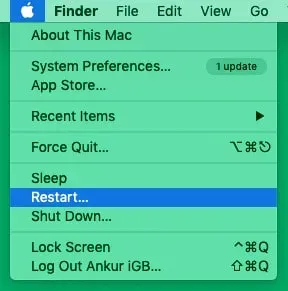
- Restart your Mac
- Try a different Mac or PC
- Access the drive using macOS Disk Utility.
- Change hard drive format
- Reset NVRAM or PRAM on Mac
1. Change Finder Preferences to Show Disc
The first step is to make sure external drives can show up on the Mac desktop.
- Stay on your Mac desktop. Click Finder on the top menu bar and select Preferences.
- Click General.
- Make sure the “External Drives”box is checked.
- Then click “Sidebar”and make sure “External Drives”is checked.
If the options are already checked, move on to the next fix.
2. Verify that the drive is receiving adequate power.
Small hard drives, solid state drives, and flash drives may not require additional power. The power they get from the Mac’s USB port is plenty.
But if you have a large hard drive that requires external power, make sure you supply it. Secondly, some drives have two ports, and both must be connected to the computer. If everything is in order here, proceed to the next step.
3. Replace USB ports or USB dongle
This is a fairly common technique for solving such problems. I’m sure you’ve already tried this. But if you haven’t, unplug the drive from your current Mac’s USB port and plug it into another. Give it a few seconds and see if you can see it.
Second, if you’re using a USB-C dongle/hub, unplug it from your Mac and plug it into a different type-C port. If the dongle is too hot, let it cool down for a few minutes and then try again. This should probably fix the issue.
If this doesn’t happen, don’t panic! Move on to the next one.
4. Check the connecting cable of the drive.
Is the cable connecting your hard drive to your Mac loose on both ends? If yes, do not use force as this may aggravate the problem. Place your Mac on a table or floor. Now do the same for the drive and carefully plug it into your Mac. See if it appears on the desktop or in the Finder.
If it does show up, I would suggest copying the most important data to a Mac or another drive. You may also consider purchasing a new drive cable or a new drive.
If the hard drive is not visible on your Mac, carefully move the cable around the junctions (where it connects to the drive and Mac) and see if that helps.
5. Restart your Mac

Important Tip: If a simple reboot doesn’t help, boot your Mac into Safe Mode. This will help you understand if the problem is related to some software/application on your Mac.
If you see an external drive after booting into safe mode, it means that some application or software is causing the problem (for example, to clean your Mac, an antivirus application, security applications, etc.). You may need to remove these applications.
6. Try a different Mac or PC
Before we move on to subsequent fixes, it’s important to determine if the issue is with the drive or with the Mac itself. To test this, borrow a Mac (or Windows PC) from a family member or friend. Connect the drive to that Mac and see if it shows up there.
If the drive shows up on a Windows PC but not on a Mac, it means there is a format conflict. Below we will see how to fix it.
7. Access the drive using macOS Disk Utility.
- Press command + space bar to bring up Spotlight search. Now type Disk Utility and open this application.
- Here, if the drive is not physically damaged, you should see it under the External heading.
- If the drive is not connected, click to select it. Next, click Connect. You can also right-click it and select Mount. (If it’s already mounted, you’ll see “Disable”. Do nothing and continue to the next step.)
- The next solution is to run First Aid, which checks for errors and performs the necessary fixes. To do this, select the drive on the left sidebar and click “First Aid”. Let it run, finish and ask to fix the found errors, if prompted.
8. Change the disk format
If First Aid doesn’t fix the problem, you’ll have to format the drive, which will erase everything on it. Before doing so, it is important to learn more about it.
| File format | operating system |
| HFS+ (also known as Mac OS Extended or HFS Extended) | Mac running macOS Sierra and earlier |
| APFS (Apple File System) | Mac running macOS High Sierra and later |
| NTFS | This is the file format used on Windows PC. macOS can read NTFS but cannot write to it. |
| exFAT or FAT32 | Both Windows and Mac can read and write this file format. If you have to choose between the two, choose exFAT in almost all cases. This is newer and better than FAT32 (referred to as MS-DOS (FAT) in Disk Utility). |
Looking at the table above, we can deduce the following:
- If you’re using a new version of macOS and want to use the external drive with your Mac only, format it in APFS format.
- Next, if you also have an old Mac, you can format it to HFS+, which can be used on both new and old Macs.
- If you want to use an external drive on both Mac and Windows, format it to exFAT (or FAT32 if you have Windows XP or earlier).
- And if you want to use the external drive primarily from a Windows PC, format it to NTFS. You can still read files on it when you connect this drive to your Mac.
So, depending on your situation, here is how to format an external drive using Disk Utility.
Note. It will delete all data that is currently on it. Thus, be sure to copy it somewhere before proceeding. You can also connect the drive to a Windows PC, copy everything to a PC or another drive, and then format it with a Mac to the desired file format.
How to format an external drive using Disk Utility on Mac
- Connect the drive to your Mac and open Disk Utility.
- On the left sidebar, select your external drive and click Erase.
- Give it the desired name.
- In the “Format:”section, select the desired option. Since I would like to use the drive with both Mac and Windows, I choose ExFAT.
- Click “Erase”and let the process complete.
You should then be able to see the drive on your Mac.
9. Reset NVRAM or PRAM on Mac
Finally, is the file format correct? Cable, USB ports and everything else working fine? But you still can’t see the external drive? Go ahead and reset NVRAM. If your Mac shuts down when you plug in an external drive, fix it by resetting the SMC.
These are the ways to solve the “external drive not showing up on Mac”problem. I hope the solutions helped and you can now use your drive. If you have any questions, please check the next section.
FAQ
No. You can’t track down a lost external hard drive because it doesn’t have internet or Bluetooth connectivity to show their location on a map.
Be sure to keep your Mac and connected hard drive on a solid, stable, flat surface such as a table. This will prevent unnecessary jerks that disconnect them. Also, use one cable instead of multiple cables to connect your drive to your Mac. Finally, get a reputable USB-C hub if you’re using newer MacBooks.
No. But multiple hard drives will consume more power, which can affect overall performance. If you have a good power supply this shouldn’t be a problem. Also, after copying large files from your hard drive to Mac, things can run slowly. Restart your computer to fix this.
Have more questions or suggestions? Shoot them in the comments below!


